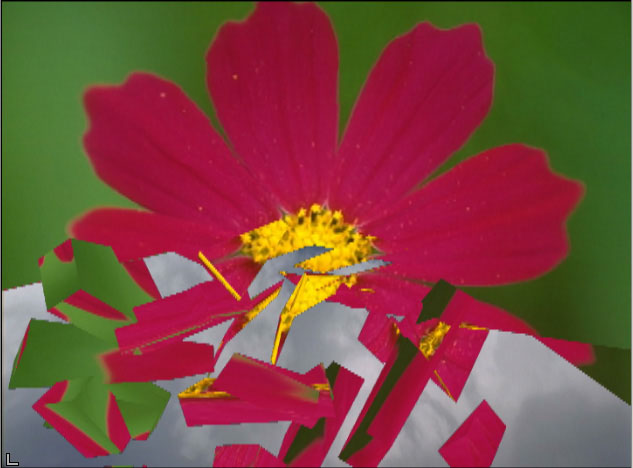
The BCC 3D Extruded Image Shatter filter shatters the image in 3D space and disperses the image fragments. Unlike the 3D Image Shatter filter, this filter allows you to create three-dimensional particles with adjustable extrusions.
The filter provides a variety of explosion, velocity, and gravity parameters to control particle movement. In addition, 3D Extruded Image Shatter allows you to control the particle size, rotation, opacity, lighting, and explosion style. This filter auto-animates by default, but you can manually animate it for more precise control over the movement of the particles.
Transition Tip: While most BCC transitions automatically conform to the duration of the transition, BCC 3D Extruded Image Shatter has special requirements when applied as a transition. Due to the great complexity and randomized motion of the particle simulation which underlies this effect it is impossible for the 3D Extruded Image Shatter to automatically adjust its timing to ensure that the transition fully completes by the end of the host transition point. When used as a transition it is frequently necessary to manually adjust parameters such as the Init Velocity, Gravity, and/or the Automate: Manual+Scatter controls in order to tweak the overall timing of the effect and thus ensure it completes on time.
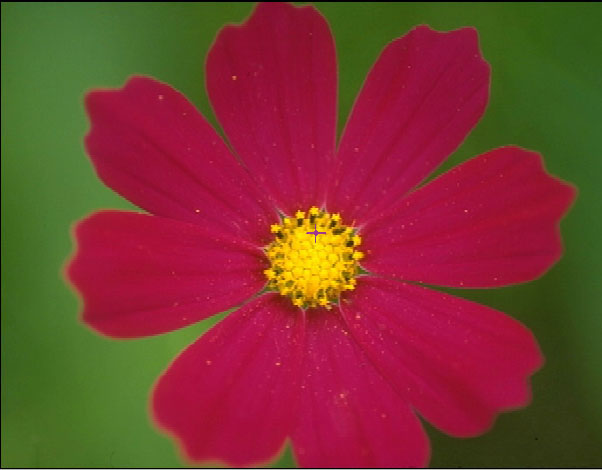 | 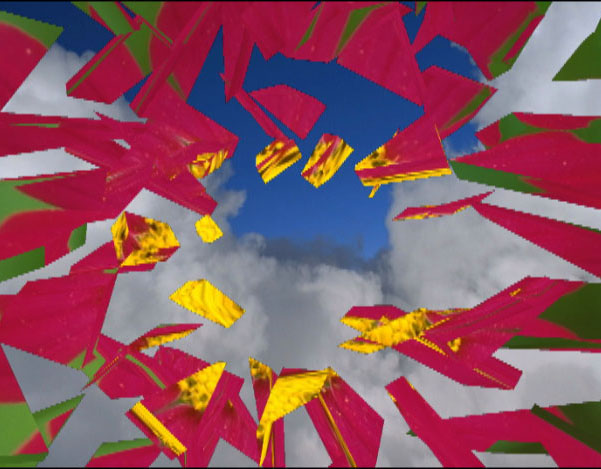 |
| Original Image | Filtered Image |
Function
Presets and Common Controls
BCC filters come with a library of factory installed presets plus the ability to create your own custom presets and preview them with the BCC FX Browser™.
BCC filters also include common controls that configure global effect preferences and other host-specific effect settings.
For more information about working with presets and other common controls, Click Here.
Render Group
Antialiasing: controls the level of antialiasing applied to the edges of the shattered image edges. If the edges of the image look jagged, increasing the Antialiasing level can help smooth the appearance of the edges. The options are: None, Low, Medium, High, Higher, Highest.
Alpha Mode: Enables the different modes of displaying the image shatter. The options are: GL Intersect, Individual Sorting, and Best Guess.
Double Side Lighting: Lights the front and back face of particles when the comp lights function is enabled.
Field of View: Determines how much of the image can be seen once it shatters.
Random Seed: Determines how the image breaks and into how many pieces.
Use Comp Lights: When enabled, the filter will use AE lights enabled in the comp. The maximum number of total lights (including built-in and AE lights) the filter can use at once is 8. If there are more than 8 enabled AE lights in the comp it will use the 8 enabled light tracks that are topmost in the timeline.
Use Comp Camera: When enabled, the filter will display the Cards from the perspective of the enabled AE camera whose track is topmost in the timeline. When Use Comp Camera is enabled, the Built-In Camera group is disabled.
The Particle X menu provides a multiplication factor for Grid Spacing (see “Shatter Parameter Group” below for details) that determines the number of particles. For example, if Grid Spacing is 15 and Particle X is 100, the image breaks into 1500 particles. As the number of particles increases, the size of each individual particle decreases.
- Warning: Rendering time is directly proportional to the number of particles. If you use a high Particle X value, you might want to work in Draft Mode to speed your previews.
The Automate Scatter menu controls the speed and direction in which the filter auto- animates. The choices are Manual, Fast Forward, Medium Forward, Slow Forward, Fast Reverse, Medium Reverse, or Slow Reverse. The Forward options create an effect that shatters the initial image and disperses it, revealing a new image; whereas the Reverse options cause pieces to fly onto the screen to form the transition image. For more precise control over the animation of the effect, choose Manual. This allows you to use the Scatter Adjust setting directly, and animate it forwards, backwards, or both using keyframes.
Scatter Adjust determines the initial position of the scattered image. At the default of 0, the image appears as if it is not scattered, which is ideal for creating transitions from one complete image to another. Negative Scatter values do not scatter the image, but are useful if you animate Scatter and want the image to appear unaffected for a longer period of time. This parameter only applies when the Automate Scatter menu is set to Manual.
Movement Parameter Group
These parameters adjust the particles’ movement.
The Velocity Direction menu controls the pattern of movement the particles follow.
- Random moves the particles in random directions as they disperse.
- Straight moves the particles in a straight line along Gravity angle.
- Centripetal moves the particles toward the center point determined by Position XY in the System parameter group.
- Centrifugal moves the particles away from the center point.
- Spiral CW moves the particles in a clockwise spiral around the center point.
- Spiral CCW moves the particles in a counter-clockwise spiral around the center point.
- No Movement makes the particles rotate but not change position.
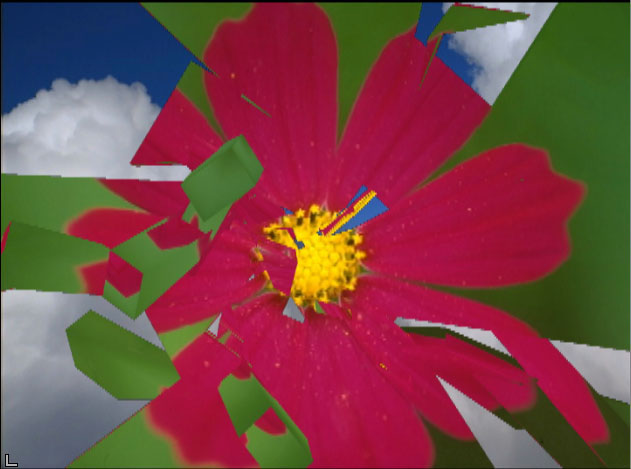 | 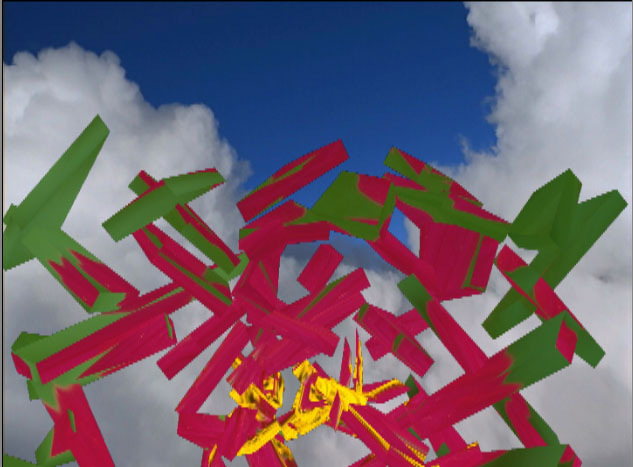 |
| Centrifugal | Straight |
Init. Velocity: determines the initial speed of the particles. A high Initial Velocity gives particles more momentum as they leave the source, meaning that they travel farther in the initial direction before they decay or are affected by factors such as Gravity or Chaos Wind. At the default values, the particles leave a point and move up until gravity pulls them down. Increasing Initial Velocity allows the particles to achieve more height before falling. Decreasing Initial Velocity gives the particles less momentum, so they fall more quickly.
Velocity Radius: sets the radius of the particle system when the Velocity Direction menu is set to Centripetal, Centrifugal, Spiral CW, or Spiral CCW.
Velocity Adjustment: behaves differently depending on the Velocity Direction menu setting.
- In Random and Straight modes, Adjustment works as a variance control on the particle direction. Animating Adjustment, makes the particles swerve or change course.
- In Spiral CW and Spiral CCW modes, Adjustment determines the strength of the spiral. Increasing this value makes the particles spiral much faster, while decreasing this value makes them spiral more slowly.
- In Centripetal, Centrifugal and No Movement modes, Adjustment has no affect.
Velocity Z-Factor: determines how fast the particles move in the Z direction in relation to the X and Y directions. A high value makes the particles appear to jump at you or recede into the screen, and a lower value keeps their depth relatively stable.
Velocity Variance: sets the range of different particle speeds in the effect. A Velocity Variance of 0 synchronizes all particles. A higher value increasingly randomizes particle speeds.
Gravity: applies a secondary force to the particles’ movement in addition to their normal velocities. A small amount of Gravity can often help an effect appear more natural by creating more parabolic movement. You can pull the particles in any direction by adjusting Gravity Angle, which can be used to simulate wind.
Chaos Wind: adds an element of chaos to the particles’ movement, blowing the particles randomly as they move. Increasing Chaos Wind varies particle movement, which can create a more natural effect.
Particles Parameter Group
Shard Resize: adjusts the size of the particles without affecting the grid spacing or the number of particles. At the default setting of 100, the image splits into the number of particles determined by the Particle X and Grid Spacing settings. If you increase Size, each particle maintains its original position in the grid but increases in size, so that the image fragments overlap in the unscattered image. Conversely, if you decrease Size, the unscattered particles maintain their positions but do not fill the screen.
Extrusion: sets the thickness of the extruded sides. At the default value of 0, the particles are two dimensional.
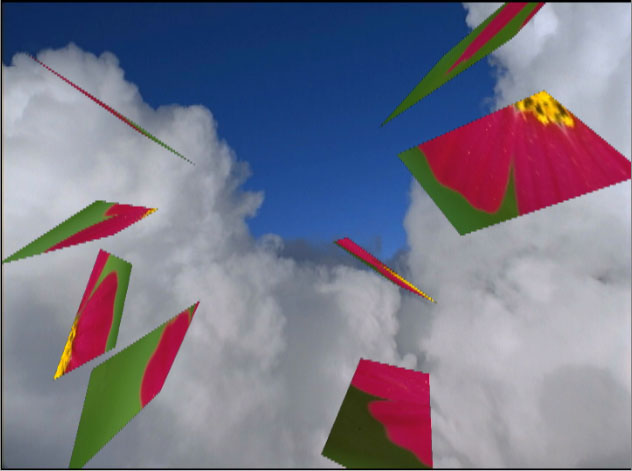 | 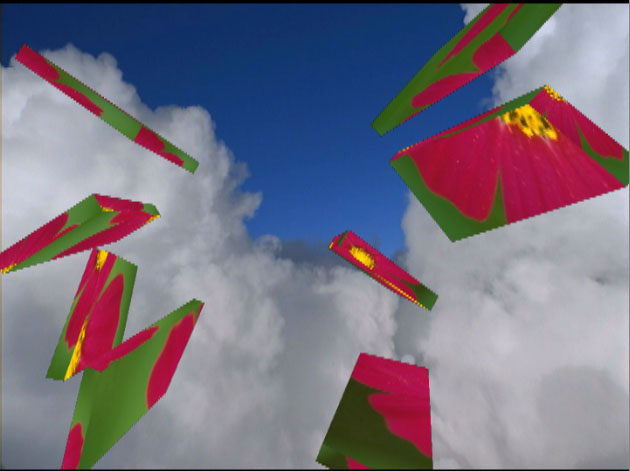 |
| Extrusion=0 | Extrusion=25 |
The Extrusion Mode menu determines how the image is mapped to the extruded sides of the shards.
- Shard maps the face of the particle onto each extrusion, without caring that it is a shard – piece mapped onto a rectangle.
- Stretch stretches the image to fit the width of the extruded edges of the shard. This option can look stretched or distorted on the extrusion.
- Crop maps the rectangle containing the shard onto the extrusions.
- Solid Color maps a solid color to the extruded edges of the shard. When you choose this option, use the Color Adjust parameter to set the color.
- MultiColor maps multiple colors to the extruded edges of the shard. When you choose this option, use the Color Adjust parameter to set the color.
 | 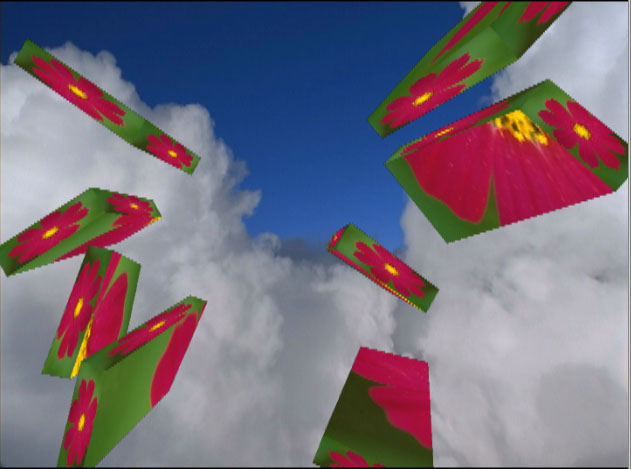 | 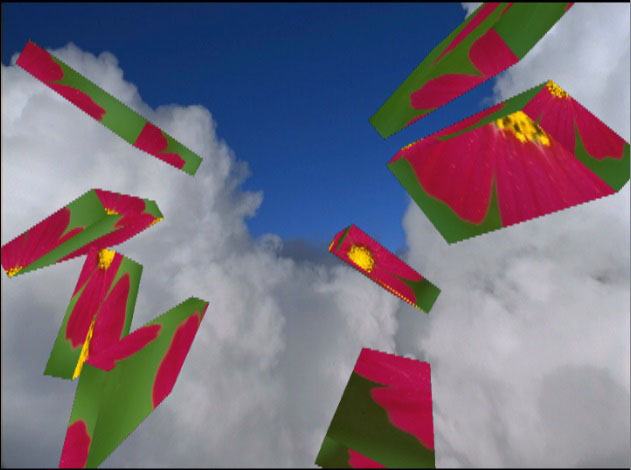 |
| Shard | Stretch | Crop |
Tumble Speed, Spin Speed and Rotate Speed set the velocity of the particle flow around the X-, Y- and Z-axis, respectively.
Spin Variance: determines the range of different Tumble, Spin and Rotate Speeds that can appear in the effect. A Spin Variance of 0 synchronizes all of the particles. A higher value increasingly randomizes particle flow.
System Parameter Group
The Master Scale parameter allows you to adjust all three Scale parameters with a single control.
Scale X, Scale Y and Scale Z: adjust the size of the particles along the X, Y and Z axis respectively, scaled as a percentage.
Position XY: controls set the X and Y coordinates of the center point of the particles.
Position Z: adjusts the apparent depth of the particles. Decreasing negative values move the particles closer to the viewer, while increasing positive values move the particles away.
Tumble, Spin, and Rotate: move the entire system around the X, Y, and Z axis, respectively. Tumble, Spin, and Rotate can be animated over values greater than 360° in order to make the particle system complete more than one full revolution.
Field of View: controls the camera perspective. Decreasing values move the camera closer to the image, exaggerating the perspective on portions that are closest to the camera. Increasing values move the camera away from the image, elongating the extrusions.
Alpha Mode: sets how the particles intersect when they include an alpha channel.
- If you choose GL the particles can intersect, but if the image contains a large amount of alpha, then it may not appear correct.
- If you choose Sorting, the alpha appears correctly, but the particles won’t intersect.
- Best Guess determines if the image contains large alpha areas and then uses the appropriate mode.
Lights Parameter Group
You can apply up to two lights to the particles. You must select the Enable Light checkbox to apply the light. If this checkbox is deselected, the other parameters have no affect.
The L1 and L2 Position XY controls position the light source in space by moving the light parallel to the image plane along the X and Y axes.
L1 and L2 Color controls adjust the color of the directional light.
L1 and L2 Ambient adjust the total amount of ambient light on the particles. The default setting of 100 does not add or subtract ambient light. Decreasing this setting makes the particles darker before the other lights are applied. Ambient light illuminates or darkens the particles evenly, and is unaffected by any other lighting parameters.
L1 and L2 Directional sets the amount of directional diffuse light applied to the particles.
The Double Side Lighting checkbox enables or disable’s OpenGL’s backside lighting which lights the back sides of the particles.
Shatter Parameter Group
Grid Spacing: works in conjunction with Particle X to set the number of particles. Higher values make the grid resolution greater, generating a larger number of smaller particles; lower values generate a smaller number of larger particles. The Grid Spacing value is multiplied by the Particle X value to set the total number of particles.
Shatter Control: sets how the image breaks into pieces or how the cracks form. For example, if the image breaks into a Spiral pattern, Shatter Control determines how tight the spiral is.
Wipe Effect Parameter Group
Parameters in the Wipe Effect group shatter images in a wipe-like fashion, and control the rate and direction in which shards break off and disperse.
The Scatter Wipe menu allows you to set the type of wipe effect that is created.
- With None chosen, no wipe takes place.
- With Straight chosen, the particles wipe across the screen in a straight line. The direction of the line is determined by Angle.
- Pass Through is similar to Straight, except that the particles begin at a negative Scatter value rather than a value of 0. Particles come together along the edge of the wipe, then fall apart again as the wipe passes across the screen. This creates an effect which looks like a line that forms and dissipates the image as the line moves across the screen.
- With Random chosen, the particles break off randomly across the screen.
 |  |
| Scatter Wipe=Straight | Scatter Wipe=Random |
Speed: sets the speed of the wipe by determining the Scatter value at which the whole image is broken in particles. To wipe faster, decrease Speed. To wipe gradually, increase Speed.
Regardless of the particles’ Speed setting, a low Speed value wipes the image quickly, and a high Speed value wipes the image slowly. With high-speed particles and a low-speed wipe, the image unravels slowly, but each particle flies away extremely quickly. With slow particles and a fast wipe, the image breaks up quickly, but the particles then slowly drift off.
- Note: Angle and Speed have no affect if the Scatter Wipe menu is set to None.
Animation Extras Parameter Group
The Animation Extras parameters affect particle density, position, size and behavior.
The Explosion Type menu controls the animation style of the explosion.
- Burst creates a fast initial burst, then particles slow down.
- Soft Burst creates a slower initial burst, then particles slow down.
- Constant disperses the particles at a constant speed.
- Soft Acceleration causes particles to move slowly at first, then gradually accelerate.
- Acceleration causes particles to move slowly at first, then quickly accelerate.
The Z Movement menu determines which way the particles move in the Z direction. Choose Forward, Backward, or Both.
The Rotate Direction menu determines whether the particles rotate forwards, backwards, or in both directions. The Rotate Direction menu defaults to Both, but if you want to synchronize the particles, set it to Forward or Backward.
Random Seed determines which value is input to the random number generator used by the filter. Adjust this value when you like the overall effect but want to alter the random configuration of the particles.
Beat Reactor
The BCC Beat Reactor is an animation control suite which drives effect properties based on the contents of an audio track. This lets you seamlessly tie visual FX to an audio soundtrack without the need for ANY manual keyframing.
For more information on the Beat Reactor, Click Here.


