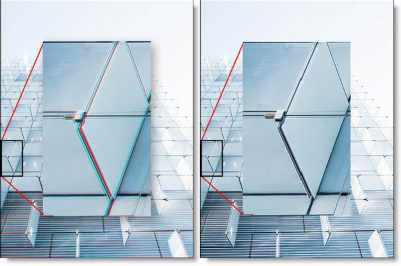
The BCC+ Chromatic Aberration filter simulates the look of chromatic aberration caused by a lens having a different refractive index for different wavelengths of light and is seen as fringes of color around the edges of the image. This fringing is removed by un-distorting the individual color channels.

Before and After
Presets and the FX Editor
The FX Editor provides a convenient way to store and retrieve factory installed and/or user generated filter presets. To select a preset, open the FX Editor interface and pick one from the Presets panel. Click the apply button in the FX Editor to return to the host user interface.
To save a custom preset, click the “Create Custom Preset” icon in the top right corner of the parameter list, next to the filter name, set a name for the new custom preset in the dialog that appears and click done.
Filter Parameters
There are some new types of color fringes that are not chromatic aberration. These effects might be visible as purple or blue fringes and are visible around overexposed areas in most cases. If the following conditions apply, your image most likely has true chromatic aberration as opposed to color fringing caused by sensor overloading:
- Corners should show most color fringes whereas the center should show none.
- Color fringes should be not only at the edges of overexposed areas but at lower contrast edges, too.
- Color fringes should be of complementary color (red-cyan, green/magenta, and blue-yellow) on opposite sides of a dark or bright area.
- Color fringes should be in all corners with the same direction and pointing out from the center
Controls
**Red/Cyan, Green/Magenta, Blue/Yellow:**Use the appropriate color group to remove the chromatic aberration. For instance, if you see red/cyan fringing, use the Red/Cyan group. Start by adjusting the Distortion parameter.
Distortion: Pulls the corners of the image in or out. Negative values pull the corners of the image inward while positive values pull the corners of the image outward.
Anamorphic Squeeze: Anamorphic Squeeze corrects for the squeeze found in anamorphic motion picture lenses.
Curvature X and Y: Curvature X and Y correct for non-radial, asymmetric distortions found in anamorphic motion picture lenses.
Note: Anamorphic Squeeze and Curvature X and Y only work once the Distortion parameter has been adjusted.
Center X and Y: Determines the center point for the distortion.
PixelChooser: The BCC PixelChooser provides a way for the user to select which pixels in the filtered source are actually going to be affected by the filter, via the generation of image based mattes, gradient mattes and vector shape masks. Mocha planar tracking and vector shape masking options are included in the PixelChooser, which allows for the generation of motion-tracked mask shapes as a hold-back mask.
For more information on the PixelChooser, Click Here.
Working with The Filter
- Apply BCC+ Chromatic Aberration from the BCC Lens unit.
- Look at the edges of the image and determine if the chromatic aberration is red/cyan, green/magenta, or blue/yellow.
- Start by adjusting the Distortion parameter for the particular color fringing that you are trying to remove. For instance, if you see red/cyan fringing, adjust the Distortion slider in the Red/Cyan group.
If you are using anamorphic motion picture lenses or are experiencing non- radial, asymmetric fringing, you may need to adjust the Anamorphic Squeeze and Curvature X/Y parameters.


