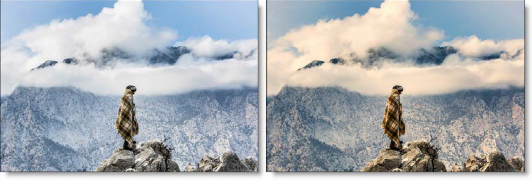
The BCC+ Develop filter provides useful developing controls for globally adjusting the color and tonal scale of your images.

Before and After
Presets and the FX Editor
The FX Editor provides a convenient way to store and retrieve factory installed and/or user generated filter presets. To select a preset, open the FX Editor interface and pick one from the Presets panel. Click the apply button in the FX Editor to return to the host user interface.
To save a custom preset, click the “Create Custom Preset” icon in the top right corner of the parameter list, next to the filter name, set a name for the new custom preset in the dialog that appears and click done.
Filter Parameters
Temperature: Sets the color of the image to be either warmer or cooler. Dragging the slider to the right makes the image cooler (bluer) and dragging the slider to the left makes image warmer (redder).
Tint: Adds either Green or Magenta to the image. Dragging the slider to the right makes the image more magenta and dragging the slider to the left makes the image more green.
Exposure: Sets the overall image brightness, with a greater effect in the high values. Adjust the slider until the image looks good and the whites are at the right level. Use Recovery to bring highlight values down. Exposure values are in increments equivalent to f-stops. An adjustment of +1.00 is similar to increasing the aperture 1 stop. Similarly, an adjustment of –1.00 is similar to reducing the aperture 1 stop.
Recovery: Reduces the tones of extreme highlights and attempts to recover highlight detail lost because of overexposure.
Fill Light: Lightens shadows to reveal more detail while maintaining blacks. Take care not to over apply the setting and reveal image noise.
Blacks: Specifies which image values map to black. Moving the slider to the right increases the areas that become black, sometimes creating the impression of increased image contrast. The greatest effect is in the shadows, with much less change in the midtones and highlights.
Brightness: Adjusts image brightness, mainly affecting midtones. Set the overall tonal scale by setting Exposure, Recovery, and Blacks. Then set the overall image brightness. Large brightness adjustments can affect shadow or highlight clipping, so you may want to readjust the Exposure, Recovery, or Blacks slider after adjusting brightness.
Contrast: Increases or decreases image contrast, mainly affecting midtones. When you increase contrast, the middle-to-dark image areas become darker, and the middle-to-light image areas become lighter. The image tones are inversely affected as you decrease contrast.
Vibrance: Adjusts the saturation so that clipping is minimized as colors approach full saturation, changing the saturation of all lower-saturated colors with less effect on the higher-saturated colors. Vibrance also prevents skin tones from becoming over saturated.
Saturation: Adjusts the saturation of all image colors equally.
PixelChooser: The BCC PixelChooser provides a way for the user to select which pixels in the filtered source are actually going to be affected by the filter, via the generation of image based mattes, gradient mattes and vector shape masks. Mocha planar tracking and vector shape masking options are included in the PixelChooser, which allows for the generation of motion-tracked mask shapes as a hold-back mask.
For more information on the PixelChooser, Click Here.


