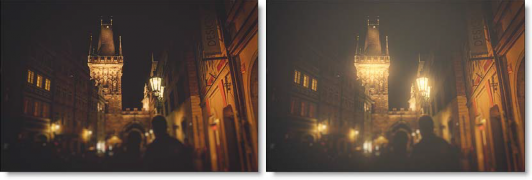
The BCC+ Double Fog filter creates a soft, misty atmosphere over the image by first applying fog using a vanishing point along the direction of increasing distance in the image. Then, a second pass blooms image highlights.

Before and After
Presets and the FX Editor
The FX Editor provides a convenient way to store and retrieve factory installed and/or user generated filter presets. To select a preset, open the FX Editor interface and pick one from the Presets panel. Click the apply button in the FX Editor to return to the host user interface.
To save a custom preset, click the “Create Custom Preset” icon in the top right corner of the parameter list, next to the filter name, set a name for the new custom preset in the dialog that appears and click done.
Filter Parameters
Fog
Color: The Color parameter sets the color of the fog to be added through the use of a standard color picker. The default color is white.
Vanishing Point: A vanishing point along the direction of increasing distance in the image is used to add fog. By default, the vanishing point is set to the center of the screen.
Essentially, the fog is added in a radial pattern emanating from the vanishing point. So at the default center position, fog is added in a circular pattern with a greater amount of fog being added in the center while falling off at the edges. For instance, if you would like your fog to move in the direction of top right to bottom left, set your vanishing point towards the top right corner and the fog will be more intense at the upper right and fall off at the bottom left. However, in most cases, the vanishing point can be left in the center of the screen and you will obtain acceptable results.
There is an on-screen control in the center of the image. By clicking and dragging the on-screen control, the position of the vanishing point can be adjusted.
Position X: The horizontal position of the vanishing point.
Position Y: The vertical position of the vanishing point.
Note:There is an on-screen control in the center of the image. By clicking and dragging the on-screen control, the position of the vanishing point can be adjusted. To see the on-screen control in After Effects/Premiere Pro, you may need to highlight Double Fog in the Effect Controls window. On Avid Editing Systems, the Vanishing Point parameters are named only X and Y.
Fog: Sets the amount of fog to be added to the scene.
Min Depth: Controls how much fog is added in the darker areas of the image.
Max Depth: Controls how much fog is added in the brighter areas of the image.
Glow
The Glow controls are used to add additional atmosphere and are useful in adding glow to highlights. By default, a wide matte of highlights are glowed in the image and blended with the Screen blend mode. This works well for adding additional fog. To add glow around highlights such as light sources, it is best to set the Blend mode to Add and lower the Matte > Range parameter to limit the areas of glow to only include the light sources.
Blend: Determines the blend mode to be used to create the glow effect.
- Add: The glow is added to your image.
- Screen: The glow is combined with the image using a Screen blend mode. This looks kind of like the Add blend mode, but highlights are retained.
Brightness: Sets the intensity of the glow.
Blur: Sets the softness of the glow.
Color: The Color parameter sets the color of the glow through the use of a standard color picker. The default color is white.
Matte
A matte is used to create the glow effect
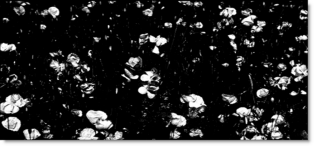
Position: Pinpoints the color values to be used in the matte. For a luminance matte, a Position value of 100 would make a white matte of the highlights and a value of 0 would make a white matte of the shadows. In the flower image below, look at how the matte varies for different Position values in a red extraction. When the Position is at a value of 100, the red flowers are shown as white in the matte.

Position=100, Range=25
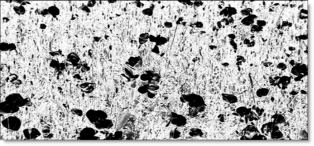
When the Position is moved to 50, the red flowers turn black.

Position=50, Range=25\
**Range:**Increases or decreases the range of values in the matte. A low Range value indicates a narrow range of values. A high Range value indicates a large range of values included in the matte.
Blur: The matte is blurred by a quality blur.
PixelChooser: The BCC PixelChooser provides a way for the user to select which pixels in the filtered source are actually going to be affected by the filter, via the generation of image based mattes, gradient mattes and vector shape masks. Mocha planar tracking and vector shape masking options are included in the PixelChooser, which allows for the generation of motion-tracked mask shapes as a hold-back mask.
For more information on the PixelChooser, Click Here.
Working with The Filter
- Apply BCC+ Double Fog from the BCC Optical Diffusion unit.
- Click the BCC FX Editor button. The FX Editor user interface opens and consists of Presets, Parameters and Viewer windows.
- Try out some of the presets.
- Click on the Fog > Color parameter to set the color of the fog.This sets the color of the fog to be added.
- Adjust the Fog > Fog parameter to control how much overall fog is added to the image.The fog is added in a radial pattern emanating from the vanishing point. For instance, if want your fog to move in the direction of top right to bottom left, set your vanishing point towards the top right corner and the fog will be more intense at the upper right and fall off at the bottom left. However, in most cases, the vanishing point can be left in the center of the screen and you will obtain acceptable results.
- If needed, move the Vanishing Point to a new location by clicking and dragging the on-screen control in the center of the screen.You can limit where the fog is added to your image by using the Min/Max Depth sliders. Min Depth controls how much fog is added in the darker areas of the image, while Max Depth controls how much fog is added in the brighter areas of the image.
- Change the Min/Max Depth values if you want to control how fog is added in the shadow and highlight areas of the image.Secondary fogging effects can be achieved using the Glow parameters. A portion of the screen is isolated with a matte, and based on this matte, additional fog and glow can be added.
- Adjust the Glow > Brightness, Blur and Color settings to your liking.In some of the filters, a matte is generated to create the desired effect–in this case, highlight glow.
- Change your View to Matte to see the matte values.The areas that are white in the matte are the areas where glow will be introduced. For instance, If you want to put glow around bright lights, make sure that the light sources appear as white in the matte. The location and amount of the additional glow within the scene can be adjusted by modifying the Matte > Position and Range parameters.
- Change the Matte > Position parameter if you want to select different luminance values to be used for the matte.
- Increase the Matte > Range value to add more glow into the scene. Decrease for less glow.
- Increase the Matte > Blur parameter to soften the transition areas of the matte.
- Change your View to Output to see the filtered image.
- To create Glow effects around highlights such as bright lights, change your Glow> Blend parameter to Add and make sure that your matte includes only the light sources.
- Click the Apply button to return to the host application.
The values of the parameter adjustments in the FX Editor user interface are transferred to your host application.


