The BCC+ Light filter allows light to be added to a scene where none existed before just as if you were adding light at the time of shooting. Realistic lighting and shadow is introduced using digital versions of lighting gobos.
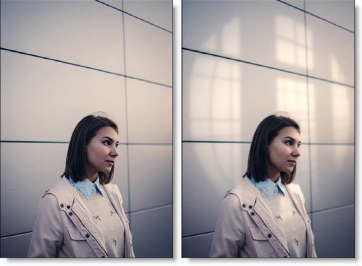
Before and After
Gobos (patterns) are widely used by designers in theatre, film, photography and television to create atmosphere, project scenery, and generally enhance the visual impact of their lighting. Normally used in front of lights during photography, these same exact gobos can be applied digitally to the entire image or inside a matte.
Presets and the FX Editor
The FX Editor provides a convenient way to store and retrieve factory installed and/or user generated filter presets. To select a preset, open the FX Editor interface and pick one from the Presets panel. Click the apply button in the FX Editor to return to the host user interface.
To select a gobo, open the BCC FX Editor interface and pick one from the Presets window. If you would like to view gobos from a different category, use the pop- up menu at the top left of the Presets window.
Click the apply button in the FX Editor to return to the host user interface.
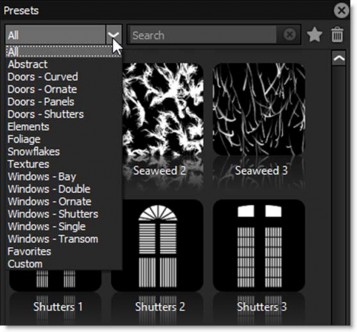
To save a custom preset, click the “Create Custom Preset” icon in the top right corner of the parameter list, next to the filter name, set a name for the new custom preset in the dialog that appears and click done.
Filter Parameters
Light
Blend: Determines the blend mode to be used to add the light.
- Add: The light is added to your image.
- Screen: The light is combined with the image using a Screen blend mode. This looks kind of like the Add blend mode, but highlights are retained.
- Subtract: The light is subtracted from your image creating shadow instead of light.
Brightness: Sets the intensity of the light.
Displacement: Displaces the gobo by the luminance values of the image. This “fakes” the effect of light wrapping over objects in the image.
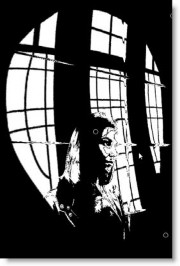 Displaced Gobo
Blur: Sets the softness of the light.
Gels: Photographers, cinematographers and lighting designers use colored filters or gels in front of lights. Whatever mood you wish to create, we have the colors needed to achieve the effect. Select one of the Gels presets from the pop-up menu.
Color: Sets the color of the light through the use of a standard color picker.
Shadow
Brightness: Sets the intensity of the shadows. The Brightness parameter will darken only those areas that are not being affected by the Light settings.
Gobos
The gobos are organized into various categories including: Abstract, Doors, Elements, Foliage, Snowflakes, Textures and Windows groups.
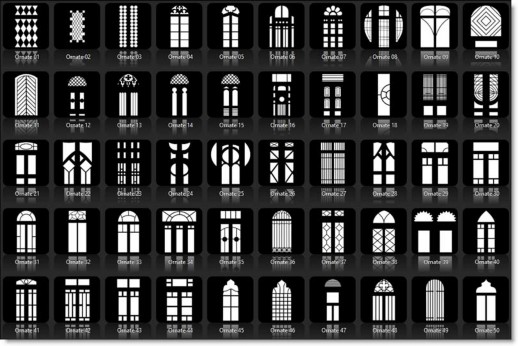
Type
- Gobo: Uses the gobo selected in the Presets window.
- Input: Input allows you to use your own image or sequence as the light source.
Note:You must first select Input from the Gobo > Type pop-up menu before you can use your own image or sequence as the light source.
If you wish to use your own image or sequence as the light source the process is slightly different depending on your host application:
After Effects:
- Select Input from the Gobo > Type menu.
- Select a layer from the Gobo > Input menu.Premiere Pro:
- Select Input from the Gobo > Type menu.
- Select a track from pop-up menu located below the Gobo > Type menu.
Final Cut Pro X:
- Select Input from the Gobo > Type menu.
- Click the drop zone to the right of the Gobo Input parameter, choose a clip, and press Apply Clip below the Viewer.Motion:
- Select Input from the Gobo > Type menu.
- Drag the image to be used as the light source and place it onto the drop zone to the right of the Gobo > Input parameter.
Avid Editing Systems
- Select Input from the top most pop-up in the Gobo group.
- Place the light source clip on a track below the clip you applied Light to.
Note:If the camera is moving and you want to add a gobo, the gobo won’t automatically follow the camera. You will either need to manually move the gobo to follow the camera or better, use Motion Tracking software to Match Move the gobo to the camera move. Track the motion of your source image, set your View to Gobo, apply the tracker motion to your gobo and render it. To use the newly tracked and rendered gobo as a light source, follow the previous instructions listed for using your own image or sequence as the light source.
OFX Hosts
- Assign the image to be used as the light source.Note**:**Using an image as the light source is only available in OFX hosts that support auxiliary inputs. Consult the host documentation for instructions on how to assign a source input as this will vary by host.
- Select Input from the top most pop-up in the Gobo group.
- The assigned input will now be used as the light source.
Blend
The gobo can be added to a matte using a variety of Blend modes. Blend modes are used to combine images in a variety of different ways.
- Gobo Only: Displays the Gobo normally, without any blending.
- Add: The pixels of one image are added to another image
- Subtract: Looks at the color information in each channel and subtracts either the blend color from the base color or the base color from the blend color, depending on which has the greater brightness value. Blending with white inverts the base color values; blending with black produces no change.
- Multiply: Looks at the color information in each channel and multiplies the base color by the blend color. The result color is always a darker color. Multiplying any color with black produces black. Multiplying any color with white leaves the color unchanged.
- Screen: Looks at each images color information and multiplies the inverse of the two images. This looks kind of like the Add blend mode, but highlights are retained.
- Difference: Looks at the color information in each channel and subtracts either the blend color from the base color or the base color from the blend color, depending on which has the greater brightness value. Blending with white inverts the base color values; blending with black produces no change.
- Darken: Looks at the color information in each channel and selects the base or blend color—whichever is darker—as the result color. Pixels lighter than the blend color are replaced, and pixels darker than the blend color do not change.
- Lighten: Looks at the color information in each channel and selects the base or blend color—whichever is lighter—as the result color. Pixels darker than the blend color are replaced, and pixels lighter than the blend color do not change.
Multiply blend mode is ideal for combining gobos with the matte because it only puts the gobo within the areas of the matte.
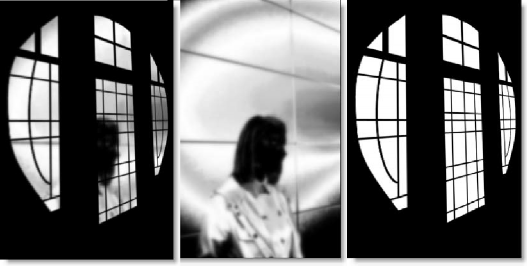 Multiply Matte Gobo
Opacity: Sets the opacity of the gobo.
Blur: Sets the softness of the gobo.
Transform
Gobos can be transformed using Position, Scale, Rotate, Corner-Pin, Shear and Crop controls
Crop
The image can be cropped by adjusting the various Cropparameters.
- Top: Crops the image from the top down.
- *Bottom:*Crops the image from the bottom up.
- Left: Crops the image from left to right.
- Right: Crops the image from right to left.
Corner Pin
The image can be corner pinned by adjusting the Corner Pin sliders as well as dragging the four points on the corners of the screen.
**Note:**You may need to zoom the image out a bit to see the corner points. In addition, to see and adjust the corner points in After Effects, make sure that the effect title in the Effect Controls window is highlighted. For Final Cut Pro, you must activate the cross hair icon next to the corner position parameters to see and adjust the corner points on the screen.
- Upper-Left: Controls the X and Y position of the Upper Left Point.
- Upper-Right: Controls the X and Y position of the Upper Right Point.
- *Lower-Right:*Controls the X and Y position of the Lower Right Point.
- Lower-Left: Controls the X and Y position of the Lower Left Point.
Position
Positioncan be adjusted by clicking and dragging an on-screen control in the center of the image.
- Position X: The horizontal position.
- Position Y: The vertical position.
**Note:**For Final Cut Pro, you must activate the cross hair icon next to the Position parameter.
Scale
The scaleof the image can be changed by adjusting the vertical and horizontal scale parameters.
- Scale X: The horizontal scale.
- Scale Y: The vertical scale.
- *Gang Scale:*The Scale X and Scale Y slider values can be ganged together. When enabled, the scale parameter will not display individual X and Y parameters.
Rotate
In addition to the standard position and scale controls, you can rotate. Positive values rotate clockwiseand negative values rotate counter-clockwise.
Shear
In addition to the standard position, scale and rotation controls, you can shear, or skew, the image.
- Shear X: Skews left and right.
- Shear Y: Skews up and down.
Anchor
Anchor points determine the position along the X and Y axis upon which the position, rotation, scaling and shearing occur.
- Anchor X: Defines the point on the X axis around which position, rotation, scaling or shearing takes place.
- Anchor Y: Defines the point on the Y axis around which position, rotation, scaling or shearing takes place.
Filter
You can choose the filteringmethod when applying a transform to the image. Mitchell is the default, however a number of additional filtering options are available.
- Triangle: The Triangle filter is not the highest quality, but fine for scaled images.
- Quadratic: Quadratic is like triangle, but more blur with fewer artifacts. It offers a good compromise between speed and quality.
- Cubic: Cubic is the default filter in Photoshop. It produces better results with continuous tone images, but is slower than Quadratic. If the image contains fine details, the result may be blurrier than desired.
- Catmull-Rom: This produces good results with continuous tone images which are scaled down, producing sharp results with fine detailed images.
- Gaussian: Gaussian lacks in sharpness, but is good with ringing and aliasing.
- Mitchell: A good balance between sharpness and ringing, Mitchell is a good choice when scaling up.
- *Sinc:*Keeps small details when scaling down with good aliasing.
Matte
A matte can be used to create areas of light or limit where gobos will be added. Wherever there is white in the matte is where the light will be added. When using the Light and Gobo filters, it is usually helpful to blur the matte.
Extract On: allows for the selection of the type of matte. Select whichever type isolates the desired values. A matte is created based on one of the following:
- Luminance: A matte is created based on the luminance of the image.
- Hue: A matte is created based on the hue of the image. When adjusting the Position parameter, you are selecting different hues.
- Saturation: A matte is created based on the saturation of the image.
- Average: A matte is created based on the average of the image’s RGB values.
- Red: A matte is created based on the image’s red values.
- Green: A matte is created based on the image’s green values.
- Blue: A matte is created based on the image’s blue values.
- Cyan: A matte is created based on the image’s cyan values.
- Magenta: A matte is created based on the image’s magenta values.
- Yellow: A matte is created based on the image’s yellow values.
Position: Pinpoints the color values to be used in the matte. For a luminance matte, a Position value of 100 would make a white matte of the highlights and a value of 0 would make a white matte of the shadows. In the flower image below, look at how the matte varies for different Position values in a red extraction. When the Position is at a value of 100, the red flowers are shown as white in the matte.
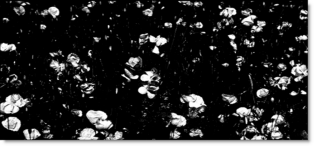 Position=100, Range=25
When the Position is moved to 50, the red flowers turn black.
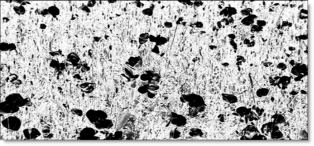 Position=50, Range=25
**Range:**Increases or decreases the range of values in the matte. A low Range value indicates a narrow range of values. A high Range value indicates a large range of values included in the matte.
Blur: The matte is blurred by a quality blur.
PixelChooser: The BCC PixelChooser provides a way for the user to select which pixels in the filtered source are actually going to be affected by the filter, via the generation of image based mattes, gradient mattes and vector shape masks. Mocha planar tracking and vector shape masking options are included in the PixelChooser, which allows for the generation of motion-tracked mask shapes as a hold-back mask.
For more information on the PixelChooser, Click Here.
Working with The Filter
- Apply BCC+ Light from the BCC Lights unit category.
- Click the BCC FX Editor button from the Effects and Presets banner. The FX Editor user interface opens and consists of Presets, Parameters and Viewer windows.
- Try out some of the presets.
- In the Presets window, choose a new gobo group from the pop-up menu to see a different set of gobo presets.
- Choose Light > Blend > Add, Screen or Subtract for the blend mode.Add will burn out highlights while Screen will retain them. Subtract, on the other hand, will add shadow in place of light in the area of the gobo.
- In the Light menu, adjust the Brightness, Displacement, and Blur of the light.Adding blur to the light makes the light glow.
- Adjust the position of the gobo by clicking and dragging the center image point to the desired location.
- You can also use the Gobo > Transform controls to transform the gobo.
- To apply a custom light color to the image, click on the Light > Color box and select a color.
- To apply a colored gel to the light, select one from the Light > Gels pop-up menus.
- Combine the gobo with a matte by changing Gobo > Blend from Gobo Only to Multiply.I like the Multiply blend mode because it only adds the gobo in the areas of the matte.
- Change your View selector to Matte to see the matte values.The default matte settings are preset to a highlight matte to create the light effect. If you are not seeing sufficient light, your matte should be adjusted. The areas that are white in the matte are the areas where light will be added into the image. The location of the light within the scene can be adjusted by changing the Matte > Position and Range parameters.
- Change the Matte > Position parameter if you want to select different values to be used for the light.
- Increase the Matte > Range value to add more light into the scene. Decrease for less light.
- Increase the Matte > Blur parameter to soften the transition areas of the light.
- Change the View selector from Matte to Output.
- The softness of the light can also be adjusted using the Light > Blur setting.
- Click the Apply button to return to the host application.
The values of the parameter adjustments in the FX Editor user interface are transferred to your host application.
If you wish to use your own image or sequence as the light source the process is slightly different depending on your host application:
After Effects:
- Select Input from the Gobo > Type menu.
- Select a layer from the Gobo > Input menu.Premiere Pro:
- Select Input from the Gobo > Type menu.
- Select a track from pop-up menu located below the Gobo > Type menu.
Final Cut Pro X:
- Select Input from the Gobo > Type menu.
- Click the drop zone to the right of the Gobo Input parameter, choose a clip, and press Apply Clip below the Viewer.Motion:
- Select Input from the Gobo > Type menu.
- Drag the image to be used as the light source and place it onto the drop zone to the right of the Gobo > Input parameter.
Avid Editing Systems
- Select Input from the top most pop-up in the Gobo group.
- Place the light source clip on a track below the clip you applied Light to.
Note:If the camera is moving and you want to add a gobo, the gobo won’t automatically follow the camera. You will either need to manually move the gobo to follow the camera or better, use Motion Tracking software to Match Move the gobo to the camera move. Track the motion of your source image, set your View to Gobo, apply the tracker motion to your gobo and render it. To use the newly tracked and rendered gobo as a light source, follow the previous instructions listed for using your own image or sequence as the light source.
OFX Hosts
- Assign the image to be used as the light source.Note**:**Using an image as the light source is only available in OFX hosts that support auxiliary inputs. Consult the host documentation for instructions on how to assign a source input as this will vary by host.
- Select Input from the top most pop-up in the Gobo group.
- The assigned input will now be used as the light source.


