Overview
Looper allows you to quickly create looped effects. You can animate the number and duration of loops, offset the loops automatically, and create fades and dissolves between the looped clips.
Function
You can apply Looper directly to the clip that you want to loop; however, the duration of the looped effect is then limited to the duration of the filtered clip. To create a looped effect that is longer than the duration of the source media, follow the steps below.
Create a solid (After Effects, Premiere Pro), Color track (Red) or slug (Final Cut Pro) that is the same size as the clip, layer or precomp to loop.
Apply the BCC Looper filter to the solid or slug.
Choose the clip or layer that you want to loop in the Loop Layer menu.
Adjust the other parameters as needed.
Presets and Common Controls
BCC filters come with a library of factory installed presets plus the ability to create your own custom presets and preview them with the BCC FX Browser™.
BCC filters also include common controls that configure global effect preferences and other host-specific effect settings.
For more information about working with presets and other common controls, Click Here.
Animating BCC Looper Parameters
All Looper parameters can animate. However, animation behaves slightly different than in other filters because Looper renders loops, rather than frames, as its basic unit. Therefore, the properties of the first loop are set by the parameter settings at the start of the effect. Value changes that occur through animation are ignored until the start of the second loop, at which point the new parameter values take effect. Subsequent parameter changes are ignored until the start of the third loop, and so on. This pattern allows all parameters to produce predictable results when animated.
The Loop Layer menu chooses the clip in the timeline to loop.
Start Frame sets the frame in the Loop Layer to use as the beginning of the looped clip. For example, if Start Frame to 10, the loop begins on the 10th frame of the Loop Layer clip.
Loop Length determines how many frames are in each loop. For example, if you set Loop Length to 30, each looped clip lasts exactly 30 frames.
Increment automatically offsets the start frame of the each loop. For example, if the Start Frame is 10 and Increment is 2, the effect begins on frame 10 in the first loop, on frame 12 in the second loop, on frame 14 in the third loop, and so on.
The Loop Mode menu determines how the filter plays successive loops.
- Normal plays each loop forwards only. For example, if Loop Length is 4, the filter plays frames 0, 1, 2, 3, 0, 1, 2, 3, and so on.
- Reset after N Cycles plays each loop in the same manner as Normal does, but resets the Increment value to 0 after the number of loops specified by Reset Cycles.
- Back & Forth plays the loop forward and then backwards, but only plays the end frames once. For example, if Loop Length is 4, the filter plays frames 0, 1, 2, 3, 2, 1, 0, 1, 2, 3, 2, and so on.
- BF Repeat Ends plays the loop forward and backwards, repeating the end frames. For example, if Loop Length is 4, the filter plays frames 0, 1, 2, 3, 3, 2, 1, 0, 0, 1, and so on.
If you apply Looper to a clip with an alpha channel, selecting the Matte with Own Alpha checkbox masks the Loop Layer with the source layer’s alpha channel. Leave this option deselected if you do not want to mask the Loop Layer.
- Note: The source alpha channel is not looped when used as a mask.
Fade Parameter Group
When the Loop Mode menu is Normal, the parameters in this section can be used to create dissolves and fades. If Loop Mode is not set to Normal, these parameters have no affect.
The Fade menu creates dissolves and fades by blending the transitions between each loop.
- Cross Fade fades out the end of each loop as the beginning of the next loop fades in, creating dissolves between each loop. When Cross Fade is chosen, Overlap sets the number of frames in which the outgoing and incoming loops overlap. Negative Overlap values create a gap between the outgoing and incoming loops.
- Fade In–Fade Out fades out the end of each loop before the succeeding loop begins to fade in. When Fade In–Fade Out is chosen, the Fade In and Fade Out values determine the duration (in frames) of each loop’s fade in and fade out, respectively.
- None cuts the end of each loop directly to the beginning of the next loop.
Frame Curve Parameter Group
The Frame Curve Parameters are preview display controls which enable you to view a curve that graphs the frame in the Loop Layer used to render each frame in the loop effect.
Select the View Curve checkbox to display the time curve. Deselect this option to view the effect.
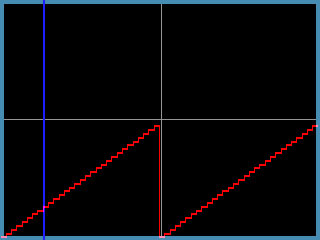
This example shows a frame curve for a loop effect. The vertical blue line represents the current time. The X axis represents time (measured in frames), and the Y axis represents the source frame number. In this effect, Start Frame is 0, Loop Length is 30, and Loop Mode is Normal. The first frame in the effect corresponds to frame 0 in the source. This point is represented by the far left point on the curve. As the effect progresses and the source frame increases, the curve climbs. When the effect reaches frame 30 in the source, it loops back to frame 0, and the curve drops precipitously.
 |
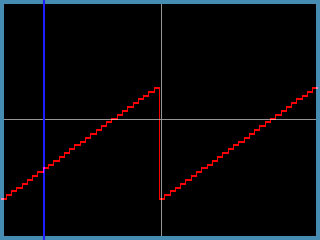
In this example, Start Frame is increased to 10, moving the curve upwards. Since each loop begins on frame 10, the curve never reaches the bottom of the Y axis.
 |
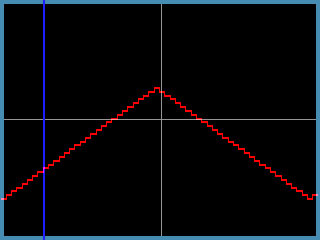
In this example, Loop Mode is set to Back & Forth. This creates a smoother curve pattern because the frame number does not drop to the Start Frame value each time the effect loops.
 |
The Composite Curve menu allows you to composite the curve over the Loop Layer clip or the completed effect. If the View Curve checkbox is not selected, these menu choices have no affect.
- Curves composites the curve over a black background.
- Curves Over Layer composites the curve over the Loop Layer.
- Curves Over Comp composites the curve over the entire composition.
The Input Time View menu controls the scale of the X axis in the frame curve. Full Effect scales the X axis to the untrimmed length of the filtered layer. 16 Seconds, 8 Seconds, 4 Seconds, and 2 Seconds scale the X axis to the corresponding number of seconds centered around the timeline indicator.
The Output Time View menu controls the scale of the Y axis in the frame curve. Full Effect scales the Y axis to the untrimmed length of the filtered layer. First 16 seconds, First 8 seconds, First 4 seconds, and First 2 seconds scale the Y axis to the corresponding number of seconds starting from the frame specified by Scroll Curves.
Scroll Curves selects the first frame in the effect that is displayed when Output Time View is set to First 16 seconds, First 8 seconds, First 4 seconds, or First 2 seconds. This parameter has no effect if Output Time View is set to Full Effect.


