 |
 |
 |
 |
Overview
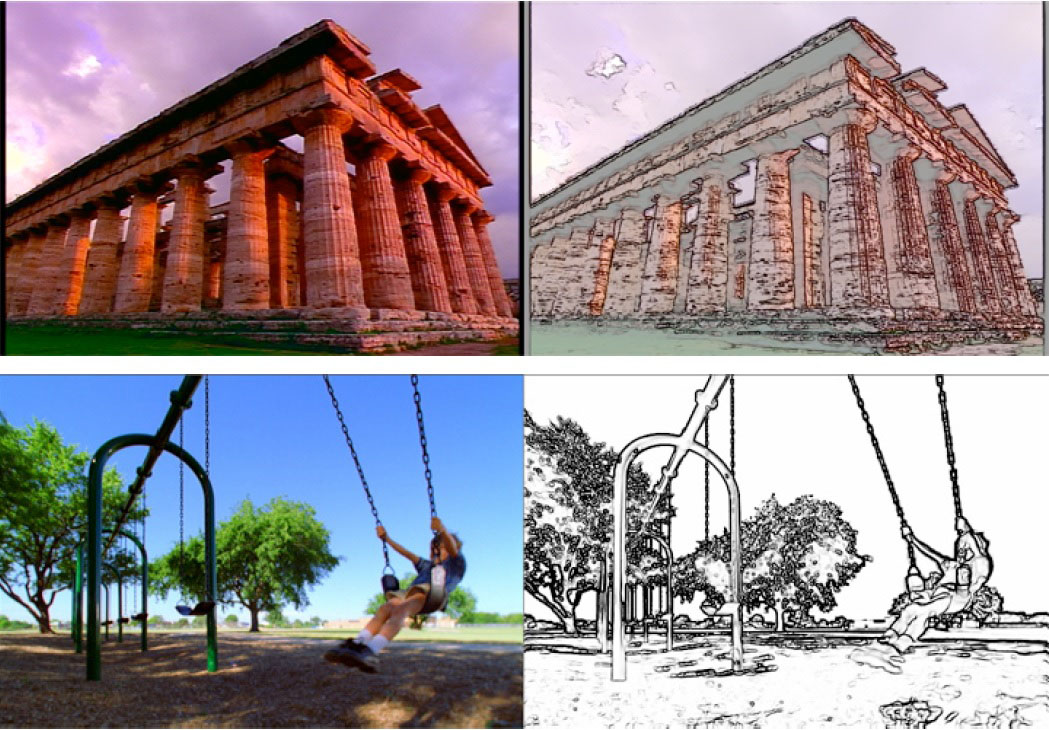
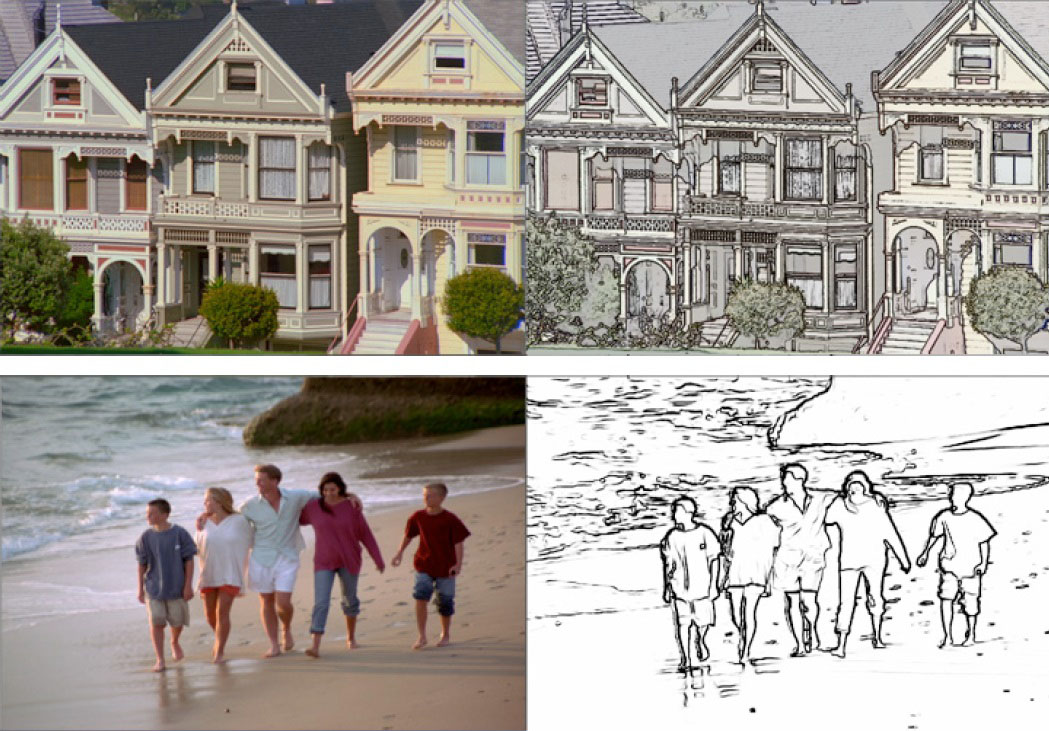
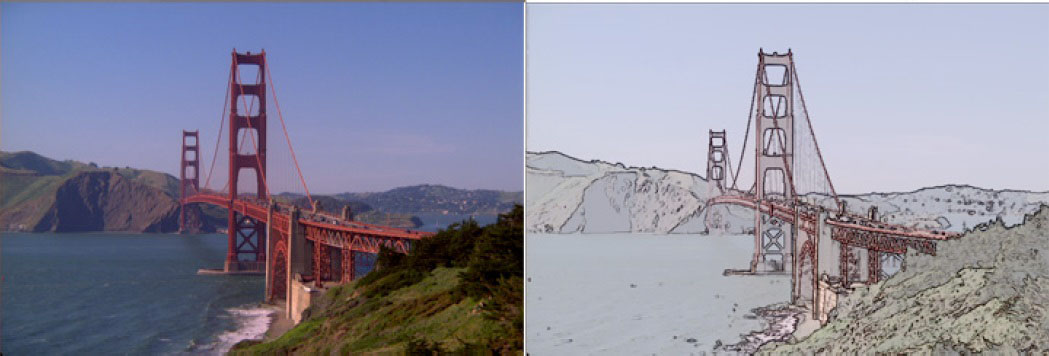
This filter takes input from an image clip and converts this into a hand-drawn pencil sketch style animation.
Function
Presets and Common Controls
BCC filters come with a library of factory installed presets plus the ability to create your own custom presets and preview them with the BCC FX Browser™.
BCC filters also include common controls that configure global effect preferences and other host-specific effect settings.
For more information about working with presets and other common controls, Click Here.
Compare Mode
The BCC Compare Mode provides a convenient mechanism to compare the effect result with the original source layer. It provides several variations on basic split-screen views with the filtered clip placed next to the unedited original.
For more information on the Compare Mode,Click Here.
Compare Mode popup: Controls what is displayed by the Compare Mode. The options are:
- Offshows the output of the filter.
- Side By Side the left side of the output shows half of the incoming image, and the right side shows the same half of the image as processed by the filter. When in Side-by-Side mode, the corresponding Slide and Right Offset sliders become available.Wipe*enables the user to interactively wipe the effect across the image. The left side of the wipe bar on the image output shows the unfiltered image, while the right side of the wipe bar shows the filtered result. When in Wipe mode, the corresponding Wipe slider becomes available.
- Wipe/Slideoperates as a Wipe function when Wipe is selected in Compare Mode, and as a Slide function when Side-‐By-‐Side is selected in Compare Mode. When in Wipe mode, adjustments to this parameter moves the vertical wipe bar across the image; the region on the left of the wipe bar shows the original unfiltered image, while the region on the right shows the filtered result. When in Slide mode, adjustments to this parameter pans the image in the viewer window, maintaining the spatial relationship in the viewer between the before and after images.
- Right Offset provides a way to adjust the spatial relationship between the unfiltered original image and the filtered result in the viewer window. Adjustments to this parameter will offset the position of the filtered image in the viewer.
View pop-up: Allows you to view the final output or the output of some of the individual steps outline above. Note that setting this to Line Mask can produce some useful textured looks that you can’t otherwise get with the filter.
- Output – This is the normal display setting, which combines the posterized background and the generated lines.
- Background – Displays only the posterized background image without additional lines.
- Lines – Displays only the generated lines.
- UnMasked Lines – Displays only the generated lines, bypassing the Line Matte settings.
- Cartoon Matte – Displays only the matte used by the filter for the image posterization.
Temporal Smoothing Checkbox: Used to enable the smoothing of the filter result over time.
Soften: Softens / smoothes the image before the lines are drawn.
Line Style pop-up: Offers 3 options to set the width of the sketched lines:
- Light – generates thinner sketch lines
- Medium – generates medium weight sketch lines
- Heavy – generates thicker sketch lines
Line Threshold: Sets the base threshold value for the lines generation. Boosting this tends to produce a cleaner looking result.
Line Width: Used to attenuate the width of the lines.
Line Soften: Controls the softness of the pencil lead. Higher values generate softer lines.
Advanced Group
This group of controls, which defaults to closed, enables you to fine tune the result of the contouring and line generation.
- Boost Contrast – Boosts the contrast of the input image.
- Soften Max Deviation – This is a fine-tuning instrument for the master soften parameter. Increasing the value in this parameter increases the amount of softening that is applied to the image.
- Soften Iterations – This is used to apply multiple passes of softening to the image. A value of 2 applies the softening algorithm two times, a value of 3 applied the softening 3 times etc.
Lines Group
Contains controls for the weight of the sketch
- Intensity – Increases the intensity of the edges when they are rendered into lines.
- Gamma – Increasing gamma makes the lines more prominent.
- Thicken – Secondary control to make the lines thicker
- Blur – Applies a blur filter to the lines
- Contract/Expand – Contracts or expands the width of the lines
- Boost Dark Pixels On – Enhances detail in the shadow regions of the image when enabled
Boost Dark Pixels Group
This group of controls is used to fine tune the shadow regions in the filtered image when the Boost Dark Pixels switch is enabled
- Cutoff – Used to set the value above which dark pixels are boosted. Higher values include more of the dark regions
- Soften – Softens the Threshold value – increasing this value adds more detail to the image
- Boost Lines – Darkens the value of existing lines in the filtered result
- Add to Lines – Adds additional lines to the dark pixels region
Line Matte Group: This group of controls fine tunes the Line Matte
Line Matte On Checkbox: Enables the Line Matte function. The Line Matte is an internally generated matte function that the filter uses to clean-up the result, thereby removing lines from the image. When enabled, the filter generates a stark, cleaner look. When working with these controls, it is recommended that you switch the view pop-up at the top of the filter to View Line Matte (make sure to switch this back when you have finished modifying the Line Matte controls.)*
- Local Diffs. On Checkbox – This function uses difference modes to generate more detail
Apply When Pop-up – Determines how the Differences are computed
- Prefer Darker – Differences are biased toward the darker pixels
- Prefer Lighter – Differences are biased toward the lighter pixels
- Diff Threshold – Sets the Threshold cutoff value for the difference modes. Higher values in this parameter generate a cleaner result
- Diff Scale – Multiplies the result over itself. Higher values in this parameter generate a cleaner result luma matte
- Luma On Checkbox – Enables the Luma function within the Line Matte. Enabling this switch includes more pixels in the generated
- Luma Threshold – sets the cut-off point for the luma values that are included in the luma matte. Increasing the value in this parameter includes more of the luma information in the matte.
Luma Mode
- Prefer Darker – Differences are biased toward the darker pixels
- Prefer Lighter – Differences are biased toward the lighter pixels
Luma Distance: Has the effect of flattening out pixel values. Higher values increase the amount of flattened pixels that are included.
Luma Scale: Brightens the values of the result from the luma distance function. Increasing the value in this parameter lightens the:
- Smooth Matte – Smoothes the lines by blurring the Line Matte
- Choke Matte – Expands or Contracts the width of the Line Matte
FG Opacity: Controls the opacity of the Foreground color. Values of less than 100 add transparency to the Foreground.
FG Color Picker: Used to set the Foreground color.
BG Opacity: Controls the opacity of the Foreground color. Values of less than 100 add transparency to the Foreground.
BG Color Picker: Used to set the Foreground color.
Reverse Colors: Swaps the FG and BG colors.
Apply Mode: This pop-up is used to blend the filtered result back into the original image and contains all of the apply mode compositing options that are found in most every filter in the package.
Apply Mix: Blends the current apply mode with the normal apply mode.
Mix With Original: Blends the effect with the original unfiltered clip.
PixelChooser
The BCC PixelChooser provides simple, built-in masking of the effect result. The PixelChooser is generally used to select a portion of the image and restrict an effect to just the selected area while maintaining the original image content in unselected regions. The selection can be based on geometric shapes or on the image’s luma/color properties.
For more information on the PixelChooser, Click Here.


