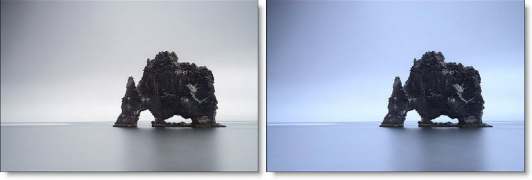
The BCC+ Photographic filter incorperates the most complete line of Kodak® filters for photographic uses. Available in the form of gelatin films known as Wratten® Gelatin Filters, our Photographic filter is a digital equivalent of the Wratten set and were created using the spectral transmission curves for each optical filter. The Color Conversion, Light Balancing and Color Compensating preset groups are subsets of the Photographic filters.
 Before and After
Photographic
Digital versions of the complete line of Kodak® Wratten® Gelatin Filters.
Color Conversion
Color Conversion filters correct for significant differences in color temperature between your light source and recording media.
Light Balancing
Light Balancing filters correct for minor differences in color temperature between your light source and recording media.
Color Compensating
Color Compensating filters control color by attenuating specific parts of the spectrum. They can be used to make changes in color balance or compensate for deficiencies in the image’s spectral quality.
Presets and the FX Editor
The FX Editor provides a convenient way to store and retrieve factory installed and/or user generated filter presets. To select a preset, open the FX Editor interface and pick one from the Presets panel.
Click the apply button in the FX Editor to return to the host user interface.
Filter Parameters
Color
Color: The Color parameter sets the color of the filter through the use of a standard color picker.
Opacity: Sets the opacity of the color filter.
Preserve Highlights: Preserves the white areas of the image.
Exposure Compensation: Exposure Compensation adds back the brightness loss as a result of the filter application.
Grad
These filters can optionally use a gradient that limits where the filter is applied. Grad is the transition area between the colored portion and the original image. Its direction, corners and size can be adjusted.
ND Brightness: Darkens the colored portion of the grad.
Type: Controls the direction of the gradient
- Top-to-bottom: The direction of the gradient is from top to bottom.
- Bottom-to-top: The direction of the gradient is from bottom to top.
- Left-to-right: The direction of the gradient is from left to right.
- Right-to-left: The direction of the gradient is from right to left.
- Horizontal Strip: Horizontal strip gradient gradient
- Vertical Strip: Vertical stripgradient grad.
Size: Adjusts the overall size of the gradient.
Angle: Adjusts the angle of the gradient
The grad can also be corner pinned by adjusting the Corner Pin sliders as well as dragging the four points on the corners of the screen.
Note: You may need to zoom the image out a bit to see the corner points. In addition, to see and adjust the corner points in After Effects, make sure that the effect title in the Effect Controls window is highlighted. For Final Cut Pro, you must activate the cross hair icon next to the corner position parameters to see and adjust the corner points on the screen.
- Upper-Left: Controls the X and Y position of the Upper Left Point.
- Upper-Right: Controls the X and Y position of the Upper Right Point.
- Lower-Right: Controls the X and Y position of the Lower Right Point.
- Lower-Left: Controls the X and Y position of the Lower Left Point.
PixelChooser: The BCC PixelChooser provides a way for the user to select which pixels in the filtered source are actually going to be affected by the filter, via the generation of image based mattes, gradient mattes and vector shape masks. Mocha planar tracking and vector shape masking options are included in the PixelChooser, which allows for the generation of motion-tracked mask shapes as a hold-back mask.
For more information on the PixelChooser, Click Here.
Working with The Filter
- Apply BCC+ Photographic from the Grads and Tint unit.
- Click the BCC FX Editor button. The FX Editor user interface opens and consists of Presets, Parameters and Viewer windows.
- Try out some of the presets.
- If you want less coloring of the image, turn down the Color > Opacity.
- Image highlights can be retained by adjusting the Filters > Preserve Highlights control to a value of 100.The selected filter can be applied through a gradient creating a graduated transition between the colored portion and the original image.
- Click on the Grad > Enable checkbox to activate the Grad.
- Adjust the Grad > Type, Corner Points, Size and Angle.To adjust the Corner Points, just click and drag them to the desired location.
- If you are curious, you can see what the Grad looks like by changing your View to Grad. Change your View to Output when done.
- Click the Apply button to return to the host application.
The values of the parameter adjustments in the FX Editor user interface are transferred to your host application.


