Replaced by BCC+ Prism
We recommend use of BCC+ Prism instead of BCC Prism. The newer BCC+ Prism filter contains more advanced chromatic abberation, smear techniques, GPU acceleration for faster smoother results, and FX Editor support.
Overview
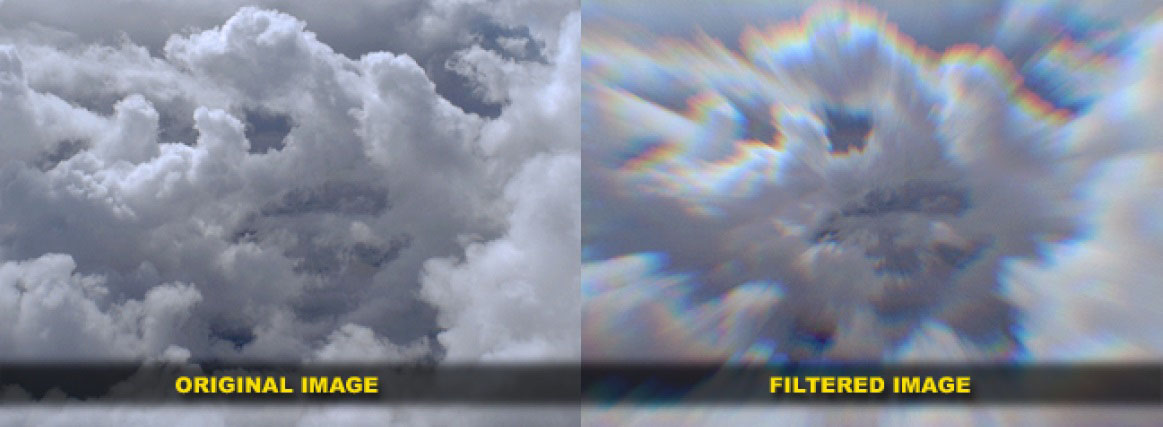
The BCC Prism filter can be used to simulate the photographic effect of chromatic aberration, where a bad lens can create prismatic color fringing along edges of contrast within the image. The filter can also be used as an interesting wipe or blur effect and includes controls for image rotation along 2 points of one axis within the image, which with some settings leads to a pleasant twisting blurred effect. The Prism filter is another one of the new filters that are included in the OpenGl category and benefits from the super fast image processing that the hardware acceleration allows for.
Function
The BCC Prism filter has the ability to generate a couple of different unique looks, depending upon the source clip that it is applied to and the filter preset that is being applied. For this exercise, we’ll use the filter to emulate the chromatic aberration effect on a background clip and to make the alpha channel of a piece of text trail off in different colors.
To start, we import a clip into the AE project window. Then create a new D1 comp of 2 second duration and drag the imported clip down into the timeline. Then generate a new text element above the image clip. For the text, we’ll type out the word “PRISM” in capital letters using the font Arial Black at a size of 100 points. Set the color of the text to white.
Now apply the BCC Prism filter to the background clip. We are going to use the setting labeled default in the filter preset menu – click on the load button and select the default preset. Observe that the clip now appears to have chromatic aberration, meaning a loss of convergence in the outer regions of the image. The image appears sharp in the center, with each of the RGB channels the same size and in perfect register but as you move out toward the edge of the image, you can see that the RGB channels no longer converge in the same spot. This is what we see in the real world when shooting scenes with imperfect lenses that have registration problems. The effect is also known as purple fringing. Let’s click in the Starting Depth parameter and set the value to 1.06. Notice how changing this value grows the width of the fringe that we are introducing the image, which produces an effect of rapid movement where there was none in the original.
We’re going to move on to the text layer now and apply the Prism filter to generate a trails effect. Apply the BCC Prism filter to the text layer. Observe that even at the default setting, the effect is interesting. Let’s set the sample count to 20 and offset the starting angle. Because of the fact that this filter is hardware accelerated, we can simply go to the angle dial control and just start dragging it to the value that we want and see a real-time preview of the effect.
Presets and Common Controls
BCC filters come with a library of factory installed presets plus the ability to create your own custom presets and preview them with the BCC FX Browser™.
BCC filters also include common controls that configure global effect preferences and other host-specific effect settings.
For more information about working with presets and other common controls, Click Here.
Sample Count: Sets the amount of copies of the original used to create the effect. the upper limit of 100 generates a smooth result. Starting- sets the start point of the zoom effect.
Ending: Sets the end point of the zoom effect.
Starting Depth: Sets the start point for rotation along the Z axis.
Ending Depth: Sets the end point for rotation along the Z axis.
Rotation Center: Sets the center point around which the image will spin along the XY axis.
Starting Angle: Sets the counter clockwise angle for the image spin.
Ending Angle: Sets the clockwise angle for the image spin.
Short Color: Sets the color of the short color waves. The default is blue.
Mid Color: Sets the color of the medium color waves. The default is green.
Long Color: Sets the color of the long color waves. The default is red.
Outside Pattern: Pop-up options for the outside area of the image include:
- No (does nothing)
- Tile (tiles the image to fill the gap)
- Reflect (reflects the outer edges to fill the gap)
Mix With Original: Blends the effect back with the original unfiltered clip.
PixelChooser
The BCC PixelChooser provides simple, built-in masking of the effect result. The PixelChooser is generally used to select a portion of the image and restrict an effect to just the selected area while maintaining the original image content in unselected regions. The selection can be based on geometric shapes or on the image’s luma/color properties.
For more information on the PixelChooser, Click Here.
Beat Reactor
The BCC Beat Reactor is an animation control suite which drives effect properties based on the contents of an audio track. This lets you seamlessly tie visual FX to an audio soundtrack without the need for ANY manual keyframing.
For more information on the Beat Reactor, Click Here.


