Updated for Continuum 2020.5
Overview
The BCC Remover filter was designed to provide a semi-automatic way of removing small undesired elements from an image or video clip by cloning pixels from one user defined section of the image to another section of the image.
There are three stages involved in setting up this filter: Setting the destination (pixels to be removed / replaced), setting the source (pixels to fill the area to be removed), and selecting a method of removal. There are currently 4 distinct modes of object removal:
• Auto-Fill Sharp (fills the distinction shape with surrounding pixels)
• Auto-Fill Smooth (fills the distinction shape with surrounding pixels, then smooths the result)
• Clone Spot (clone stamp from source to destination, similar to paint cloning)
• Clone Shape (fills the destination region with pixels from the source region)
Each of these methods will yield a different result and, given the subjective nature of object removal from an image frame, a trial and error approach of going through the different modes is recommended. As you become more familiar with the filter and how it will operate on different types of images, the mode selection will become more predictable.
How to use the filter – all modes except for Clone Spot :
Stage 1 – Setting up the mask :
Before you begin to set up the mask shape, you should disable the Remove Area checkbox located near the top of the parameter list. This will prevent the filter from processing the image, which will make it easier to set up the isolation mask. Just remember to reenable this feature when you are ready to process the image.
In order to create a mask shape, you need to set the Removal Method pop-up to any option other than Clone Spot. To set up the mask, either use the integrated PixelChooser matte / masking system or use the integrated Mocha masking. Set the PixelChooser to use a region mask and / or pixel matte in such a way that a clearly defined region containing the element for removal is visible and separate from pixels that are to remain in the image frame. It should be fairly easy to do this by setting the PixelChooser to View Chosen Pixels or Mask Unchosen Pixels, selecting a shape, and positioning the shape over the area to be removed. Once this stage is complete, switch the PixelChooser status to On. Note that the PixelChooser supports host spline masks in After Effects and these AE native mask shapes can be used instead of the built-in region based shapes, and can also be combined with PixelChooser-based matte selections.
Stage 2 – Selecting a removal mode :
As already mentioned, until you are familiar with the filter, mode selection is best accomplished by trial and error. Fast Sharp and Fast Smooth are the natural first two to pick, just because they render very quickly and for narrow objects (such as wires, poles etc) we have found that they provide a reasonably pleasing result. If the result is acceptable then there is no need to try the other modes. If the result does not measure up to expectations – perhaps as a result of the region being too large for the Auto-Fill Sharp and Auto-Fill Smooth modes to handle – then select Clone Shape.
Auto-Fill mode :
When using either Auto-Fill Sharp or Auto-Fill Smooth, you may want to adjust the Search Radius to speed image processing – a smaller radius value will take less time to process than a larger radius. You may also want to tweak the Region of Interest controls so that the area being viewed by the filter is as small as possible while providing the best possible result. A larger Region of Interest will take more time to process than a smaller region and might not yield a better result.
Also note that this filter works best when removing small objects from the image and that sometimes a more pleasing / convincing result can be achieved by stacking multiple instances of the filter, each instance focused on removing different small regions in the frame.
Clone mode :
Sometimes, the only way to successfully remove an object from an image or clip is to use image cloning. The Remover filter includes a fast and easy way to copy or clone pixels from one region in the image (source) and position this image clone in a different portion of the image (destination.) There are two image clone options – Clone Spot and Clone Shape.
The Clone Shape feature enables you to select user defined shape masks to define an area for removal. To use the Clone Shape feature, first select Clone Shape from the Removal Method pop-up. Next, go to the PixelChooser group and either create a mask using the built-in tools, or (in After Effects) select a mask from the timeline. Then use the Offset parameter in the Clone group to position the replacement image pixels to fill the selected mask shape.
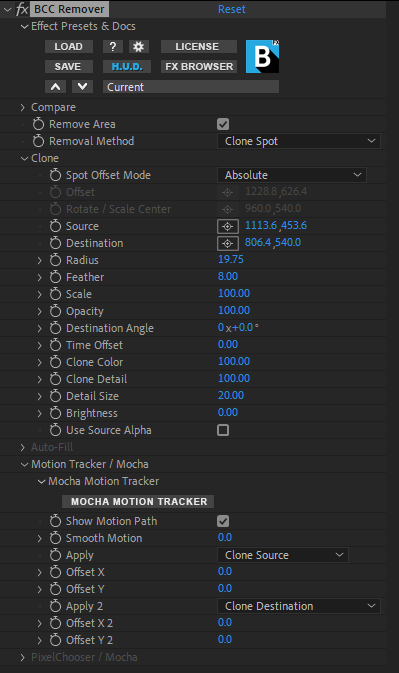
The Clone Spot feature enables you to set up a circular spot to define the source and destination for removal. To use the Clone Spot feature, select Clone Spot from the Removal Method pop-up. Next, open the Clone group in the filter UI and position the destination point over the region containing the object to be removed. Then set the source point over a region in the image that you would like to use to cover the object … this method will enable you to interactively position the source for a clean composite. Next, set the radius, angle, and feathering options so that the clone blends seamlessly with the original image.
Sometimes, it’s necessary to offset the clone source in time. For instance, you might need to pull pixels from a future or past frame in order to generate a seamless clone. To do this, use the Time Offset feature to grab pixels from an alternate frame in time.
Parameter Controls:
Presets and Common Controls
BCC filters come with a library of factory installed presets plus the ability to create your own custom presets and preview them with the BCC FX Browser™.
BCC filters also include common controls that configure global effect preferences and other host-specific effect settings.
For more information about working with presets and other common controls, Click Here.
Compare Mode
The BCC Compare Mode provides a convenient mechanism to compare the effect result with the original source layer. It provides several variations on basic split-screen views with the filtered clip placed next to the unedited original.
For more information on the Compare Mode,Click Here.
Remove Area Checkbox : When disabled, the removal is bypassed, allowing you to set up the mask/matte while avoiding any processing overhead. Enabling this checkbox signals the filters algorithm to process the image and remove the masked object.
Removal Method Pop-up
• Auto-Fill Sharp : Automatically fills the shape with neighboring pixels.
• Auto-Fill Smooth : Automatically fills the shape with neighboring pixels and smoothes the result.
• Clone Spot : Manual source-to-destination clone confined to a round shape.
• Clone Shape : Manual source-to-destination clone to fill a user defined shape.
Clone Group
This group of params controls the relative location of the clone source data plus details on fine tuning the clone shape and clone application.
Spot Offset Mode: Allows you to select available source offset controls.
- Relative Offset: Links the source and destination so their position remains relative to each other. You can independently set the position for Source and Destination, and, once the source is set, the destination will maintain its relative distance.
- Absolute Offset: Sets the source and clone destination to always move independently of each other, requiring you to set the location of each one manually.
Offset: Used to reposition the replacement pixels over the destination shape.
Rotate / Scale Center: Used to set the pivot point around which the replacement pixels are scaled or rotated.
Source: Used to position the x/y source for Clone Spot.
Destination: Used to set the x/y destination for Clone Spot.
Radius: Used to set the size of the Clone Spot circle.
Scale: Used to set the scale of the image within the Clone Spot destination.
Feather: Used to feather or soften the edge of the clone shape.
Opacity: Used to reduce the opacity of the clone.
Destination Angle: Used to set the angle of the clone destination.
Time Offset: Used to adjust the frame of the clone destination.
Clone Color: Used to adjust the chroma value of the clone destination. Higher values pull in more chroma from the clone source.
Clone Detail: Used to adjust the luma value of the clone destination. Higher values pull in more luma from the clone source.
Detail Size: Used to adjust the amount of detail used in the clone destination. Higher values pull in larger detail from the clone source.
Brightness: Used to increase or decrease the brightness of the clone destination.
Use Source Alpha checkbox – When enabled, preserves alpha channel in the clone.
Auto Fill
Search Radius (Auto-Fill only): Used to set the pixel radius used by the Auto-Fill cloner. Larger values will yield longer processing times.
Region of Interest (Auto-Fill only): Used to set the area that the Auto-Fill cloner will process. Larger regions will yield longer processing times.
Motion Tracker/Mocha
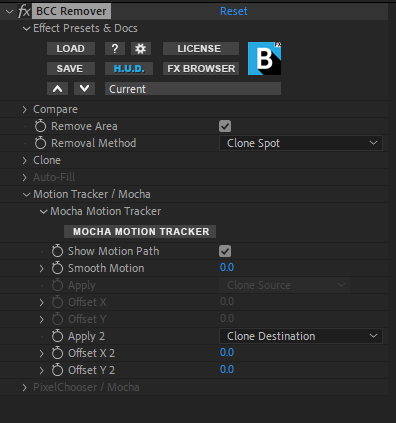
The BCC Mocha Motion Tracker provides built-in motion and parameter tracking that helps drive Remover’s Clone Source and Destination.
Mocha Motion Tracker is only available with the Clone Spot removal method. To enable motion tracking of Remover’s Clone Source and Clone Destination points:
- Set the Removal Method to Clone Spot. By default this will enable Mocha motion tracking for Clone Destination.

- In the Clone Sub Group, set the Spot Offset Mode to Absolute if you would like to also motion track Clone Source.

For more information on working with Mocha Motion tracker, click here.
PixelChooser / Mocha
The BCC PixelChooser with integrated Mocha provides simple, built-in masking of the effect result. The PixelChooser is generally used to select a portion of the image and restrict an effect to just the selected area while maintaining the original image content in unselected regions. The selection can be based on geometric shapes, Mocha Spline Shapes, or on the image’s luma/color properties.
PixelChoose / Mocha is available for all Removal Methodes, except for Clone Spot.
For more information on working with the PixelChooser, Click Here.


