 |  |
| Source image | Mix layer |
 |  |  |
| Normal | Scale Screen | Lightness |
Overview
RGB Blend provides independent compositing of the source image’s RGB channels with the Mix Layer’s RGB Channels. The brightness and contrast of the composite can be adjusted independently for each channel.
Function
Presets and Common Controls
BCC filters come with a library of factory installed presets plus the ability to create your own custom presets and preview them with the BCC FX Browser™.
BCC filters also include common controls that configure global effect preferences and other host-specific effect settings.
For more information about working with presets and other common controls, Click Here.
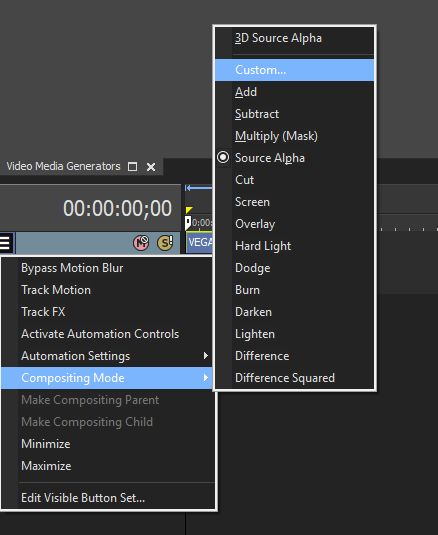
- Vegas Pro Workflow Tip: To use the Light Wrap feature in Vegas Pro you must apply the filter in Custom Composite Mode. For more information on working with Custom Composite Modes in Vegas, Click Here.
 Using Custom Composites in Vegas Pro
Compare Mode
The BCC Compare Mode provides a convenient mechanism to compare the effect result with the original source layer. It provides several variations on basic split-screen views with the filtered clip placed next to the unedited original.
For more information on the Compare Mode,Click Here.
Compare Mode popup: Controls what is displayed by the Compare Mode. The options are:
- Off shows the output of the filter.
- Side By Side the left side of the output shows half of the incoming image, and the right side shows the same half of the image as processed by the filter. When in Side-by-Side mode, the corresponding Slide and Right Offset sliders become available.Wipe*enables the user to interactively wipe the effect across the image. The left side of the wipe bar on the image output shows the unfiltered image, while the right side of the wipe bar shows the filtered result. When in Wipe mode, the corresponding Wipe slider becomes available.
- Wipe/Slide operates as a Wipe function when Wipe is selected in Compare Mode, and as a Slide function when Side-‐By-‐Side is selected in Compare Mode. When in Wipe mode, adjustments to this parameter moves the vertical wipe bar across the image; the region on the left of the wipe bar shows the original unfiltered image, while the region on the right shows the filtered result. When in Slide mode, adjustments to this parameter pans the image in the viewer window, maintaining the spatial relationship in the viewer between the before and after images.
- Right Offset provides a way to adjust the spatial relationship between the unfiltered original image and the filtered result in the viewer window. Adjustments to this parameter will offset the position of the filtered image in the viewer.
The Mix Layer menu selects the clip or layer that is composited with the original image. This layer is used without any filters.
Mix Layer Geometrics Parameter Group
When the Apply Geometrics to Mix Layer checkbox is deselected, the Mix Layer is resized to the size of the source image. When this checkbox is enabled, the controls in the Mix Layer Geometrics group are applied to the Mix Layer before it is composited. The display units of the crop and position controls are scaled to the source layer, not the Mix Layer.
- Note: One application for using Mix Layer Geometrics is creating a pan-and-scan effect on a large still image. You can use the Mix Layer Geometrics controls instead of precomposing and applying the filter to the precomp.
If the source image is opaque, selecting the Source Opaque checkbox can speed rendering and previews. If your source is partially transparent, deselect this option for best results.
Scale X and Scale Y adjust the size of the source along the X and Y axis respectively. These parameters are scaled as percentages of the source’s original width or height. Thus, a Scale X setting of 200 produces a source twice as wide as the original source. Select the Lock to Scale X checkbox to keep the Scale X and Y values in proportion.
Position XY sets the X and Y coordinates of the center point of the source.
Position Z adjusts the apparent depth of the source. Decreasing negative values move the source closer to the viewer, while increasing positive values move the source farther away.
Tumble, Spin, and Rotate move the source around the X, Y, and Z axis, respectively. Tumble, Spin, and Rotate can be animated over values greater than 360° in order to make the source complete more than one full revolution.
The Crop controls crop the edges of the mix layer. The Crop Top-Left and Crop Bot-Right set the upper left and lower right corners of a rectangle that defines the borders of the cropped image.
Blend softens the edges of the image by reducing their opacity.
The Order menu determines the order of the two layers in the composite.
Mix On Top composites the Mix Layer over the filtered layer.
Original On Top composites the original image over the Mix Layer.
If the Lock Mix checkbox is selected, adjusting the Red Mix sets all the Mix parameters. Deselect this checkbox to adjust levels accordingly.
Red Mix, Green Mix, and Blue Mix adjust the mix of the source and Mix Layer in each color channel. For example, if Red Mix is 0 and Composite Order is set to Mix Layer Over Original, the composited pixels use the values in the corresponding source pixels as their red values. If Red Mix is 50, the composited pixels use an average of the values in the corresponding source and Mix Layer pixels as their red values. If Red Mix is 100, the composited pixels use the values in the corresponding Mix Layer pixels as their red values. When the Lock Mix checkbox is selected, the Red Mix value also sets the Green and Blue Mix values.
In the following illustrations, the Order is Mix On Top and the Green Mix and Blue Mix are set to 0.
 |  |  |
| Red Mix=0 | Red Mix=50 | Red Mix=100 |
Alpha Mix sets how the source and Mix Layer’s alpha channels are mixed to produce a composite alpha channel. For example, if the Composite Order menu is set to Mix Layer Over Source and Alpha Mix is 0, the source’s alpha channel is used as the composite alpha. As the Alpha Mix value increases, the Mix Layer’s alpha channel is mixed with the source alpha to produce the composite alpha. At an Alpha Mix value of 50, the composite alpha is an equal mix of the source and Mix Layer alpha channels. When Alpha Mix is 100, the Mix Layer’s alpha channel is used as the composite alpha.
The Apply Mode menu controls how the source and Mix Layers are composited. For descriptions of all the possible Apply Modes, Click Here.
Apply Mix blends the Apply Mode setting with the Mix From menu setting. The resulting mixed mode is used to composite the Mix Layer over the original source media. For example, if Apply Mode is set to Lighten and Apply Mix From is set to Normal, then Apply Mix blends the Lighten and Normal apply modes. In this case, an Apply Mix setting of 0 uses the Normal apply mode, and an Apply Mix setting of 100 uses the Lighten apply mode. An Apply Mix setting of 50 blends the two apply modes equally.
- Note: You can use Apply Mix to soften the effect of a given apply mode, or to animate from one apply mode to another over time.
If the Lock Brightness checkbox is selected, the Red Brightness values are used for the Green and Blue Brightness values.
Red Brightness, Green Brightness, and Blue Brightness adjust the brightness of the corresponding output channels.
If the Lock Contrast checkbox is selected, the Red Contrast values are used for the Green and Blue Contrast values.
Red Contrast, Green Contrast, and Blue Contrast adjust the contrast of the corresponding output channels.
 |  |  |
| Normal | Scale Screen | Lightness |
Selecting the Enable Mix Back checkbox allows you to quickly create transitions between the source layer, composite image, and Mix Layer without having to adjust multiple parameters.
The Mix Back menu determines which pixels are mixed.
When Slider is selected, all pixels are affected, and Mix Back determines how the pixels in the source and Mix Layers are composited. If Mix Back is –100, the source layer is completely opaque. As Mix Back approaches 0, the composite image becomes increasingly opaque. At 0, the composite image is completely opaque. Increasing Mix Back above 0 makes the Mix Layer increasingly opaque, and at a value of 100, the Mix Layer is completely opaque.
When PixelChooser is selected, pixels are mixed according to the selection in the PixelChooser. Pixels that are fully selected in the PixelChooser are mixed according to the Mix Back Max setting. Pixels that are fully unselected in the PixelChooser are mixed according to the Mix Back Min setting. Pixels that are partially selected are mixed to intermediate values between the Mix Back Min and Mix Back Max settings. Mix Back Min and Mix Back Max each work in the same way as the Mix Back parameter used when Mix Back From is set to Slider. If the Mix Back Min and Mix Back Max settings are the same, then the PixelChooser selection has no effect.
When Original Alpha is selected, the alpha channel in the source layer is used to determine which pixels are selected. When Original Alpha is selected, the source’s alpha channel is not used for compositing–that is, the source behaves like a fully opaque layer. Pixels that are fully opaque in the source alpha are mixed according to the Mix Back Max setting. Pixels that are fully transparent in the source alpha are mixed according the Mix Back Min setting. Pixels that are partially transparent in the source alpha are mixed to an intermediate value. Original Alpha is designed to allow you to create mattes for the Mix Back parameters by altering the source layer’s alpha channel.
Note: The Mix Back, Mix Back Min, and Mix Back Max values are scaled by the Mix in Front value. Therefore, if Mix in Front is at a value less than 100, the Mix Layer never reaches full opacity, even if Mix Back or Mix Back Max is at 100. The range of opacities also varies according to the Apply Mode settings.
The PixelChooser setting in the Mix Back From menu offers greater control over the appearance of a composite of two opaque layers. You can use the PixelChooser parameters to choose pixels in the source layer to control the mix of pixels. See Chapter 10 in the User Guide for more information on working with the PixelChooser.
Try using transfer modes and brightness and contrast adjustments to further enhance a Composite effect.
You can animate Mix Back Min and Mix Back Max to create a transition from the source layer, to a composite effect, and then to the Mix Layer.
PixelChooser
The BCC PixelChooser provides simple, built-in masking of the effect result. The PixelChooser is generally used to select a portion of the image and restrict an effect to just the selected area while maintaining the original image content in unselected regions. The selection can be based on geometric shapes or on the image’s luma/color properties.
For more information on the PixelChooser, Click Here.


