The BCC+ Selective Saturation filter allows the user to independently adjust the saturation of the shadows, midtones and highlights.

Before and After
Presets and the FX Editor
The FX Editor provides a convenient way to store and retrieve factory installed and/or user generated filter presets. To select a preset, open the FX Editor interface and pick one from the Presets panel. Click the apply button in the FX Editor to return to the host user interface.
To save a custom preset, click the “Create Custom Preset” icon in the top right corner of the parameter list, next to the filter name, set a name for the new custom preset in the dialog that appears and click done.
Filter Parameters
Shadows
- Saturation: Adjusts the saturation of the image in the shadows. Positive values saturate, negative values desaturate.
- Position: Selects the shadow values to be adjusted.
- Range: Controls the range of values to be used for the shadows. A higher Range value considers more values as shadows.
Midtones
- Saturation: Adjusts the saturation of the image in the midtones. Positive values saturate, negative values desaturate.
- Position: Selects the midtone values to be adjusted.
- Range: Controls the range of values to be used for the midtones. A higher Range value considers more values as midtones.
Highlights
- Saturation: Adjusts the saturation of the image in the highlights. Positive values saturate, negative values desaturate.
- Position: Selects the highlight values to be adjusted.
- Range: Controls the range of values to be used for the highlights. A higher Range value considers more values as highlights.
Working with Matte Parameters
BCC+ Selective Saturation utilizes matte position and range values to adjust the shadows and highlights. The above Position and Range parameters are further elaborated on here:
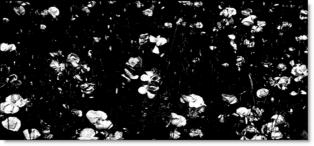
Position: Pinpoints the color values to be used in the matte. For a luminance matte, a Position value of 100 would make a white matte of the highlights and a value of 0 would make a white matte of the shadows. In the flower image below, look at how the matte varies for different Position values in a red extraction. When the Position is at a value of 100, the red flowers are shown as white in the matte.

Position=100, Range=25
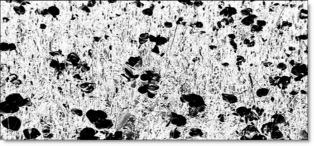
When the Position is moved to 50, the red flowers turn black.

Position=50, Range=25
Range: Increases or decreases the range of values in the matte. A low Range value indicates a narrow range of values. A high Range value indicates a large range of values included in the matte.
PixelChooser: The BCC PixelChooser provides a way for the user to select which pixels in the filtered source are actually going to be affected by the filter, via the generation of image based mattes, gradient mattes and vector shape masks. Mocha planar tracking and vector shape masking options are included in the PixelChooser, which allows for the generation of motion-tracked mask shapes as a hold-back mask.
For more information on the PixelChooser, Click Here.
Working with The Filter
- Apply BCC+ Selective Saturation from the BCC Color and Tone unit category.
- Click the BCC FX Editor button from the Effects and Presets banner. The FX Editor user interface opens and consists of Presets, Parameters and Viewer windows.
- Try out some of the presets.
- Adjust the Saturation in the Shadows, Midtones or Highlights.In some of the filters, a matte is generated to create the desired effect–in this case, selective saturation. Shadow, midtone and highlight mattes have been preset for you to adjust the saturation selectively in those areas.
- Change your View to Shadows, Midtones or Highlights to see the matte values.The areas that are white in the matte are the areas that will be adjusted by the Saturation sliders. The areas defined as shadows, midtones or highlights can be adjusted by modifying the Position and Range parameters.
- Use the Shadows, Midtones or Highlights Position parameters if you want to select different values to be used for the matte.
- Increase the Shadows, Midtones or Highlights Range controls to add more values to the matte. Decrease for less values.
- Change your View to Output to see the image.
- Click the Apply button to return to the host application.
The values of the parameter adjustments in the FX Editor user interface are transferred to your host application.


