Overview
Sequencer allows you to create a looping sequence up to 10 steps long. Each step is comprised of a clip from a layer in the composition. The source layer, start frame, length, and velocity of each step clip can be controlled and animated independently.
Parameter Controls
Presets and Common Controls
BCC filters come with a library of factory installed presets plus the ability to create your own custom presets and preview them with the BCC FX Browser™.
BCC filters also include common controls that configure global effect preferences and other host-specific effect settings.
For more information about working with presets and other common controls, Click Here.
Creating a Sequence Effect
You can apply Sequencer directly to the clip or layer that you want to sequence, however, the duration of the effect is then limited to the duration of the source media. To create a sequence effect that is longer than the duration of the source media, follow the steps below.
- Create a solid (After Effects, Premiere Pro), Color track (Red) or slug (Final Cut Pro) that is the appropriate duration for all of the clips or precomps that you want to include in the sequence.
- Note: The filter will resize all media to conform to the size of the filtered layer.
Apply the BCC Sequencer filter to the solid or slug.
Set Steps Used to the number of steps you want to appear in the sequence.
Assign the media that you want to appear first in the sequence in the Layer Step 1 menu. Follow the same procedure for each remaining step.
Adjust the remaining parameters as needed.
Steps Used sets the number of steps that are included in the sequence. For example, if Steps Used is set to 3, the sequencer loops steps 1, 2, and 3 and ignores the Step 4-10 settings.
Global Increment allows you to offset the start frame of each step in each successive loop of the sequence. Each step is offset by the same amount. For example, suppose the Global Increment is set to 2, step one begins on frame 10, and step 2 on frame 20. In the second loop the first step begins on frame 12, and step 2 on frame 22. In the third loop, the first step begins on frame 14 and the second on frame 24, and so on.
If you select the Auto Increment Steps checkbox, each step in the sequence is automatically offset by the same number of frames as its Length (see below) with each successive loop. For example, suppose Step 1 is 15 frames long and Step 2 is 20 frames long. When Auto Increment is selected, in the second loop of the sequence Step 1 begins playing 15 frames after the specified Start Frame Step 1 (see below) and Step 2 begins 20 frames after the specified Start Frame Step 2.
Step 1-10 Parameter Groups
The parameters in these sections control the corresponding steps in the sequence.
The Layer menu selects a clip or layer in the composition to use as the step in the sequence.
Start Frame determines which frame in the chosen Layer Step is used as the first frame in the clip.
Length sets the length, in frames, of the step clip.
Overlap allows you to create cross-fades within the sequence. Increasing the Overlap frames value causes the step clip to extend into the next step clip and fade out over the specified number of frames. For example, if there are two steps that are 60 frames long and both have Overlap is set to 15 frames, the render is be a loop of 120 frames. Each step in the sequence dissolves into the nest over 15 frames.
- Warning: Overlap may not be suitable for use with partially transparent source Layers. In addition, using Overlap values higher than the step’s Length value produces undesirable results.
Velocity controls the frame rate of the step clip. This value is expressed as a percentage of the composition’s frame rate. For example, if the frame rate of the composition is 30 fps and Velocity is 50, the step’s frame rate is 15 fps.
Selecting the Frame Blending checkbox enables frame blending in the step. The Status menu determines whether the step appears in the sequence.
- On causes the step to appear in the sequence. This is helpful when retiming video.
- Off removes the step from the sequence, reducing the total number of steps in the effect. Choosing this is helpful when retime animations of still and synthetic media.
- Gap makes the sequence transparent for the duration of the step.
Increment allows you to offset the step’s Start Frame incrementally with each successive loop of the sequence. This value is added to the Global Increment value (which offsets all of the steps by the same amount) to determine the total offset for the step. For example, if the Start Frame Step 1 is 10, Global Increment is 2, and Increment Step 1 is 1, on the first loop, the first step in the sequence begins on frame 10. After the remaining steps play, the sequence loops and starts playing from the beginning again. On this second loop, the first step begins on frame 13. On the third loop, the first step begins on frame 16, and so on.
Order allows you to rearrange the steps in the sequence, placing them in a different order. This is especially useful if you need to insert a new step in the middle of a sequence. Each step’s default Order value corresponds the step number, i.e., Order Step 1 is 1, Order Step 2 is 2, and so on. If you change a step’s Order value, the position of the step in the sequence changes. For example, suppose you have created a sequence 6 steps long and decide to insert a new step between Steps 3 and 4. You can use the Step 7 Parameters to create the new step, then set Order Step 7 to 3.5 to insert the new step in the sequence between steps 3 and 4.
Frame Curve Parameters
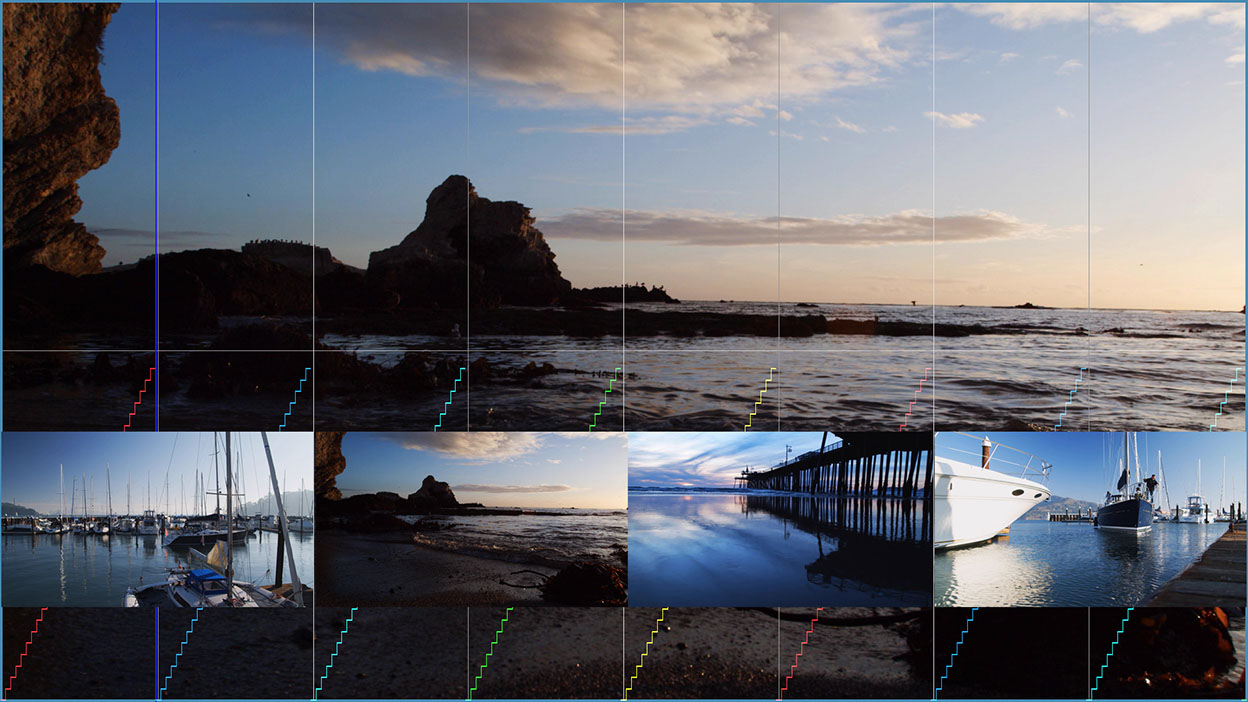
The Frame Curve Parameters are preview controls which enable you to view a curve that graphs the frame in each Step Layer used to render each frame in the sequence.
The Composite Curve menu allows you to composite the curve over a black background or the completed effect. When you use the Draft Only options, the curves are not visible in the rendered effect. However, you must preview in Draft mode in your host application for these options to display. When you use the Render options, the curves will appear in the rendered effect.
Off displays the effect without any curves.
Curves: Draft Only and Curves: Render composites the curve over a black background.
Curves Over Layer: Draft Only and Curves Over Layer: Render composites the curve over the sequence.
Curves Over Comp: Draft Only and Curves Over Comp: Render composites the curve over the entire composition.
Note: If the source layer is opaque, Curves Over Layer and Curves Over Comp produce the same result.
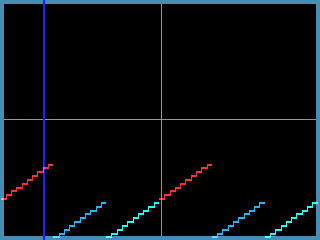
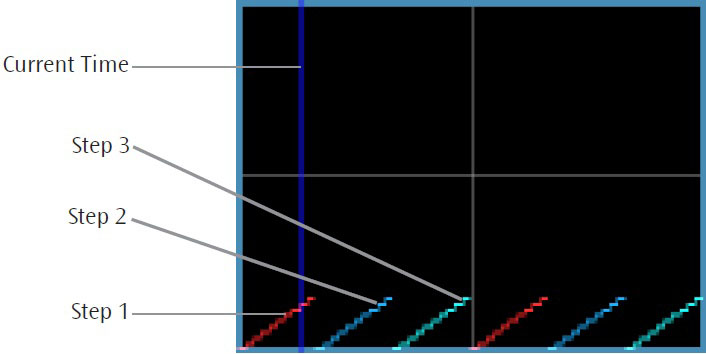
The illustration below shows a frame curve for a 3 step sequence. The vertical blue line represents the current time. The X axis represents time (measured in frames), and the Y axis represents the source frame number. In this effect, each step’s Start Frame is 0 and each step’s Step Length is 10. The first frame in the effect corresponds to frame 0 in Step 1. This point is represented by the far left point on the first red curve. As the effect progresses and the source frame in Step 1 increases, the curve climbs. When the effect reaches frame 10 in the Step 1 source, Step 2 starts playing. Step 2 is followed by Step 3. Because the sequence includes 3 steps, after Step 3 it loops back to Step 1.
In this example, Start Frame Step 1 is increased to 10, moving the Step 1 curves upwards along the Y axis.
 |
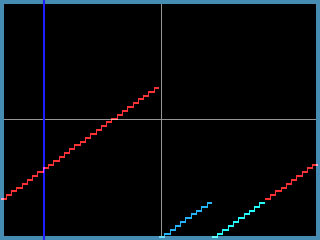
In this example, Length Step 1 is increased to 20, lengthening the Step 1 curves.
 |
The Input Time View menu controls the scale of the X axis in the frame curve. Full Effect scales the X axis to the untrimmed length of the filtered layer. 16 Seconds, 8 Seconds, 4 Seconds, and 2 Seconds scale the X axis to the corresponding number of seconds centered around the CTI.
The Output Time View menu controls the scale of the Y axis in the frame curve. Full Effect scales the Y axis to the untrimmed length of the filtered layer. First 16 seconds, First 8 seconds, First 4 seconds, and First 2 seconds scale the Y axis to the corresponding number of seconds starting from the frame specified by Scroll Curves.
Scroll Curves selects the first frame in the effect that is displayed when Output Time View is set to First 16 seconds, First 8 seconds, First 4 seconds, or First 2 seconds. This parameter has no affect if Output Time View is set to Full Effect.


