 |
Overview
Steel Plate creates a textured plate of steel generator. The steel can act as a filter on a layer or generate a steel surface.
Function
Presets and Common Controls
BCC filters come with a library of factory installed presets plus the ability to create your own custom presets and preview them with the BCC FX Browser™.
BCC filters also include common controls that configure global effect preferences and other host-specific effect settings.
For more information about working with presets and other common controls, Click Here.
The Offset XY position controls determines the position of the generated steel plate.
Scale X and Scale Y determine the horizontal and vertical size of the steel plate image. Select Lock to Scale X checkbox to lock the Scale Y value to the Scale X value, or deselect this option to adjust each parameter independently.
Rotation spins the steel pattern around the Z axis.
Bump Height determines the height of the bump map used to create the texture of the bricks. Higher values create a more textured surface.
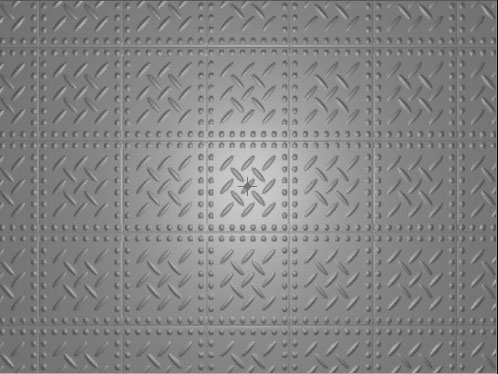
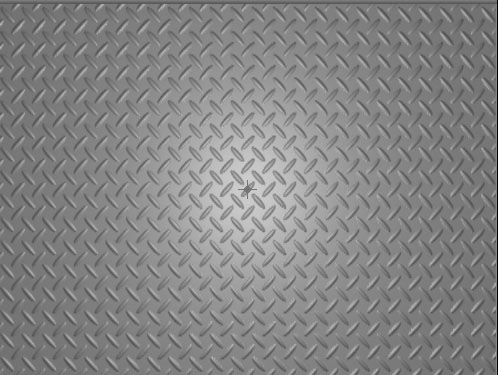
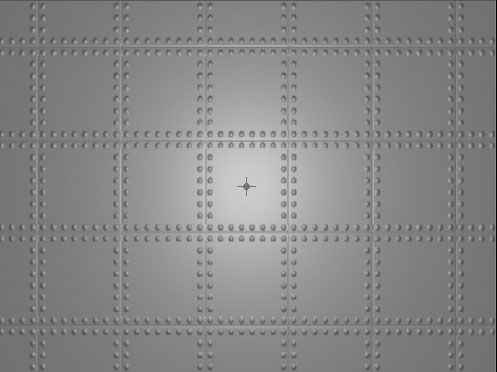
The Pattern Type menu determines the texture of the Steel Plate, choose Shape&Rivet, Shapeor Rivet which are illustrated below.
 |  |  |
| Pattern Type=Shape & Rivet | Pattern Type=Shape | Pattern Type=Rivet |
The Rivet Shape menu determines the shape of the rivets, choose Round Bolt, Hexnut, Lugnut, Capped Lugnut and Star.
The Shape menu determines the shape choose Round Bolt, Hexnut, Lugnut, Capped Lugnut, Star, Diamond and Crosshatch.
Plate Gap determines the width of the gap between each steel plate. Higher values create wider gaps.
Plate Width Radio determines the aspect ratio of the steel plates. Higher values create wider plates. Lower values create taller plates. At the default of 1, the plates are square.
Rivet Size sets the size of the chosen Rivet. If the Pattern Type menu is set to Shape, this parameter has no affect.
Shape Size sets the size of the chosen Shape. If the Pattern Type menu is set to Rivet, this parameter has no affect.
Rivet Counts (Width) and Rivet Count (Height) set the number of Rivets on the X and Y axes respectively. If the Pattern Type menu is set to Shape, this parameter has no affect.
Shape Counts (Width) and Shape Count (Height) set the number of Shapes on the X and Y axes respectively. If the Pattern Type menu is set to Rivet, this parameter has no affect.
Rivet Offset sets the distance of the rivets from the edge of the plate. Higher values add more space between the rivets and the edge of the plate.
Shape Area Scale X and Shape Area Scale Y scale the shape on the X and Y axes respectively. This parameter differs from Scale X and Scale Y in that scaling the value scales the width and height of the plates but does not affect the plate gap.
Lighting Parameter Group
The Light Type menu determines the type of light source.
- Point combines both focused (specular) and diffuse light. You can use this Light Type to create the appearance of a shiny surface lit by a point light source.
- Distance creates a non-directional infinitely distant diffuse light, similar to sunlight.
- Spot creates the look of a traditional theatrical spotlight. Spot creates a small spot of intense light whose falloff can vary.
The Light XY controls position the light source in space by moving the light parallel to the image plane along the X and Y axes.
Light Z positions the depth of the light source relative to the image plane. A value of 100 places the light one source width above the image plane. Light Z can be negative, which places the light behind the image plane. If Light Z is negative, the light is seen only if the object is rotated or displaced so that all or part of it is behind the light source (that is, the light source always points in toward the object, never out at the viewer).
Light Intensity controls the intensity of the light.
The Light Color controls determine the color of the light.
The Spot XY controls set the X and Y coordinates for the point at which the spotlight is aimed. Unlike the X and Y Light controls (under the Light Type menu), adjusting the Spot parameters does not change the shape of the light.
Spotlight Angle sets the angle of the light. This is analogous to focusing the light. Decreasing values create a smaller, more focused light.
Spotlight Falloff controls the relative softness of the edges of the lit region. Leave Spotlight Falloff at its default setting if you prefer a soft edge, or decrease this value to harden the edges of the lit region. Spotlight Falloff removes light from the edges of the lit region. To maintain the size of the region while softening the edges, you need to increase Spotlight Angle accordingly.
White in Specular increases the amount of white in the specular light. Increasing this value can create a more metallic surface effect. This parameter is only useful when Specular Intensity has a value greater than 0.
Ambient Intensity adjusts the total amount of diffuse light on the image. The default setting of 100 does not add or subtract ambient light from the source image. Decreasing this setting makes the image darker before the other lights are applied. Ambient light illuminates or darkens the image evenly, and is unaffected by any other lighting parameters.
Diffuse Intensity determines the amount of non-directional diffuse light applied to the object. Increasing Diffuse Intensity brightens the object uniformly.
Specular Intensity simulates lighting a glossy surface from a point source, creating a small spot of intense light whose falloff can vary. Increasing this value adds reflected light to the surface.
Shininess controls the rate at which the Specular light falls off from the center of the lit region. A higher Shininess value creates a more concentrated highlight, simulating a shiny, highly reflective surface. A lower Shininess value spreads light more evenly throughout the lit region, simulating a rougher, less reflective surface.
Stain Parameter Group
Stain Amount sets the amount of stain added to the surface. You can use this parameter to imitate dirt, moss, spray paint or water on the steel plate. At a value of 0, no stain is visible.
Stain Scale X and Stain Scale Y sets the scale of the stain on the X and Y axis respectively. Select the Lock to Scale X checkbox to lock the Stain Scale Y value to the Stain Scale X value, or deselect this option to adjust each parameter independently.
Stain Smoothness adjusts the amount of blur applied to the stain. Higher values produce more blur, which tends to reduce the amount of detail and noise in the filtered image.
Stain Detail sets the level of detail in the stain texture. At a value of 0, the stain is not visible. At a value of 1, the stain is a simple gradient with soft edges. As the value increases, the texture appears finer, with a rougher gradient.
Stain Mutation controls the pattern of the stain at a given point by moving through the procedural noise from which the effect is generated along the Z axis.
The Stain Color controls set the color of the stain.
Surface Image Parameter Group
The Image Layer menu allows you to choose a layer to use as the background of the effect. When the Image Layer menu is set to None, the other parameters have no affect.
The Position XY controls determine the position of the layer specified in the Image Layer menu.
Scale X and Scale Y determine the horizontal and vertical scale of the layer specified in the Image Layer menu. Select Lock to Scale X checkbox to lock the Scale Y value to the Scale X value, or deselect this option to adjust each parameter independently.
Image Rotation spins the layer specified in the Image Layer menu around the Z axis.
Image Opacity sets the opacity of the layer specified in the Image Layer menu.
Apply Parameter Group
Select the Source Alpha checkbox to use the source alpha channel as a mask for the filter, so the texture appears only in the opaque regions of the source. If this option is deselected, the source image’s alpha channel is ignored.
Opacity adjusts the opacity of the simulated texture.
The Apply Mode menu controls how the texture is composited over the source image. For descriptions of all the possible Apply Modes, Click Here.
Apply Mix controls the mix of the specified Apply Mode with the Normal apply mode. If the Apply Mode is Normal, Apply Mix has no affect. If Apply Mix is 0, Apply Mode has no affect. Increase Apply Mix to blend the Apply Mode setting with the Normal apply mode.


