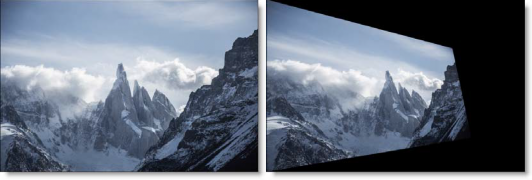
The BCC+ Transform filter allows you to quickly transform an image using Position, Scale, Rotation, Corner-Pin, Shear and Crop controls.
 Before and After
Presets and the FX Editor
The FX Editor provides a convenient way to store and retrieve factory installed and/or user generated filter presets. To select a preset, open the FX Editor interface and pick one from the Presets panel. Click the apply button in the FX Editor to return to the host user interface.
To save a custom preset, click the “Create Custom Preset” icon in the top right corner of the parameter list, next to the filter name, set a name for the new custom preset in the dialog that appears and click done.
Filter Parameters
Mocha Track: Click to launch the Mocha custom UI and motion track the movement of the transform.
The Beat Reactor Group: The BCC Beat Reactor is an animation control suite which drives effect properties based on the contents of an audio track. This lets you seamlessly tie visual FX to an audio soundtrack without the need for ANY manual keyframing.
For more information on the Beat Reactor, Click Here.
Allow Resizing: Available in Adobe After Effects only, this feature allows for manual resizing of the image to crop the edge of the effect.
Crop
The image can be cropped by adjusting the various Cropparameters.
- Top: Crops the image from the top down.
- Bottom: Crops the image from the bottom up.
- Left: Crops the image from left to right.
- Right: Crops the image from right to left.
Corner Pin
The image can be corner pinned by adjusting the Corner Pin sliders as well as dragging the four points on the corners of the screen.
Note: You may need to zoom the image out a bit to see the corner points. In addition, to see and adjust the corner points in After Effects, make sure that the effect title in the Effect Controls window is highlighted. For Final Cut Pro, you must activate the cross hair icon next to the corner position parameters to see and adjust the corner points on the screen.
- Upper-Left: Controls the X and Y position of the Upper Left Point.
- Upper-Right: Controls the X and Y position of the Upper Right Point.
- Lower-Right: Controls the X and Y position of the Lower Right Point.
- Lower-Left: Controls the X and Y position of the Lower Left Point.
Position
Positioncan be adjusted by clicking and dragging an on-screen control in the center of the image.
- Position X: The horizontal position.
- Position Y: The vertical position.
Note: For Final Cut Pro, you must activate the cross hair icon next to the Position parameter.
Scale
The scale of the image can be changed by adjusting the vertical and horizontal scale parameters.
- Scale X: The horizontal scale.
- Scale Y: The vertical scale.
- Gang Scale: The Scale X and Scale Y slider values can be ganged together. When enabled, the scale parameter will not display individual X and Y parameters.
Rotate
In addition to the standard position and scale controls, you can rotate. Positive values rotate clockwise and negative values rotate counter-clockwise.
Shear
In addition to the standard position, scale and rotation controls, you can shear, or skew, the image.
- Shear X: Skews left and right.
- Shear Y: Skews up and down.
Anchor
Anchor points determine the position along the X and Y axis upon which the position, rotation, scaling and shearing occur.
- Anchor X: Defines the point on the X axis around which position, rotation, scaling or shearing takes place.
- Anchor Y: Defines the point on the Y axis around which position, rotation, scaling or shearing takes place.
Filter
You can choose the filtering method when applying a transform to the image. Mitchell is the default, however a number of additional filtering options are available.
- Triangle: The Triangle filter is not the highest quality, but fine for scaled images.
- Quadratic: Quadratic is like triangle, but more blur with fewer artifacts. It offers a good compromise between speed and quality.
- Cubic: Cubic is the default filter in Photoshop. It produces better results with continuous tone images, but is slower than Quadratic. If the image contains fine details, the result may be blurrier than desired.
- Catmull-Rom: This produces good results with continuous tone images which are scaled down, producing sharp results with fine detailed images.
- Gaussian: Gaussian lacks in sharpness, but is good with ringing and aliasing.
- Mitchell: A good balance between sharpness and ringing, Mitchell is a good choice when scaling up.
- Sinc: Keeps small details when scaling down with good aliasing.
GPU Rendering: allows for the selection of GPU or CPU software rendering.
- Default: Uses the GPU to render the effect.
- 16 bit float
- 32 bit float
- Disabled: disables GPU rendering and allows for CPU software rendering.
Working with the Filter
- Apply BCC+ Transform from the BCC Perspective Unit category.
- Click the BCC FX Editor button.The FX Editor user interface opens and consists of Presets, Parameters and Viewer windows.
- Use the on-screen controls for Position and Corner-Pin.Note:On some host programs, you must highlight the effect title in the Effect Controls window to see the on-screen controls.
- Additionally, Crop, Scale, Rotate, and Shear controls can be used to affect the image.
- Click the Apply button to return to the host application.
The values of the parameter adjustments in the FX Editor user interface are transferred to your host application.
To select from a selection of factory installed and user-generated presets, open the FX Editor interface and pick one from the Presets window.


