


![]()
As of Continuum 2019, the older Legacy BCC Motion Tracker as has been deprecated. This page contains documentation for the legacy BCC Motion Tracker found in Continuum 11 and older. For motion tracking in Continuum 2019 and beyond, please refer to the main BCC Mocha Motion Tracker documentation.
Overview
The Motion Tracker parameter group allows you to track the motion of an object in a media file. You can then use the motion path data to control another aspect of the effect. The parameters that can be affected depend upon the filter. For example, apply a Pyramid Blur filter to a clip and use the Motion Tracker parameters to track a logo on a t-shirt. Use the PixelChooser parameters to apply the Pyramid Blur to obscure the logo. Or apply a Particle Emitter and use the tracker to sync the emitter point location to a moving object.
Note: This help file describes the way the Motion Tracker Parameter Group works in Apple Motion. The Motion Tracker parameter group works differently in other hosts.
Brief Description of Controls
The Motion Tracker parameter group includes the following controls. It is important that you also read the detailed sections “Understanding the Tracking Process” and “Tips when using the Motion Tracker” following this section. The Motion Tracker requires specific workflow considerations in each host so be sure to review the recommendations for you particular host carefully.
Clicking the Reset button clears any previously calculated motion tracking data. It does not affect the parameters in the Motion Tracker parameter group.
Clicking the Help button opens the help file specific to your host.
The Minimum Tracker Resolution menu controls the resolution required for successful tracking. If the tracker receives a frame from the host that falls below the specified resolution it will fail to track that frame and will return a copy of the source image or a rendered error message. Satisfactory tracking can frequently be performed at half or quarter resolution which allows for easier and quicker tracking but to ensure the highest quality tracking this should be left at the default of Full.
The Look Ahead Frames control specifies the maximum number of frame the tracker can be advanced from the last rendered frame without triggering a warning message. Higher values allow you to skip farther ahead in the timeline while still maintaining successful tracking but they require you to wait for the tracker to compute the track on all intervening frames so if this control is set too high you may experience delays when jumping ahead in the timeline while the tracker catches up.
The Preprocess parameter group controls the application of various processing steps to the source footage prior to analyzation by the Motion Tracker which can assist in generating a better track from problematic footage. This parameter group is explained in more detail below in the section entitled “Working with the Motion Tracker Preprocess Parameters”.
The Tracking Source Layer sets the layer to track, which may be different from the clip to which the filter is applied, thus allowing driving the animation in one clips based on the motion in a different clip.
When the Track On-the-Fly checkbox is selected and you press Play/spacebar or step through the media, the filter calculates the tracking data. When you select this checkbox, the chosen effect does not display but you instead see the results of the tracking process overlaid on the tracking source layer. Once you finish tracking, deselect this checkbox to play the applied effect.
- Note: See the “Understanding the Tracking Process” section to learn how to Track on the Fly.
The View menu controls which track indicators appear as the footage is analyzed to allow better visualizing the tracking path as it is generated.
The Show Motion Path checkbox enables the track indicators even when the Track On the Fly checkbox is false, thus allowing visualizing the tracking data while viewing the results of the applied tracker.
The Path Frames slider controls the length of the tracker path (in frames) displayed in the tracking indicators.
The Tracker Center KF position controls set up the area to track. Use the Tracker Center KF control to set up your tracking region, then adjust the Tracker Center KF position control if necessary for finetuning.
- Note: See the “Understanding the Tracking Process”section to learn how to use the Tracker Center KF to adjust tracking during an effect.
The Input Channel menu controls which channel of the source media is used when analyzing motion. Some footage may have more distinctive features suitable for tracking in alternate channels. If this parameter is changed after an initial tracking attempt, hit the Reset button to clear the tracker data before re-tracking.
The Sub-Pixel Accuracy menu controls how precisely the tracker fine-tunes the location of the tracked object. By default it locates the target to within the nearest eighth of a pixel which is sufficient for most typical scenarios. If this parameter is changed after an initial tracking attempt, hit the Reset button to clear the tracker data before re-tracking.
The Start Tracking Frame slider provides an offset if you wish the tracking to begin on a frame other than the first frame.
The End Tracking Frame slider allows terminating the tracking prior to the end of the clip if desired.
Target Width sets the size of the target to be tracked. A white outline indicates the selected area. If this parameter is changed after an initial tracking attempt, hit the Reset button to clear the tracker data before re-tracking.
Search Width sets the size of the area searched on each frame during the tracking process. Objects containing faster motion may need a larger search area. If this parameter is changed after an initial tracking attempt, hit the Reset button to clear the tracker data before re-tracking.
The Apply menu determines which parameter the Motion Tracker data affects. The choices depend on the filter. When None is chosen, the Motion Tracker data has no affect.
The Offset X and Offset Y parameters allow you to offset the effect on the X and Y axis respectively. This is useful if you want to track one area, then apply the effect to a different area. For example, you want to blur out an athlete’s name on a t-shirt but don’t want to blur the player’s number. However, the player ‘s number offers more contrast and is therefore easier to track. You would track the number, then offset the effect to obscure the name.
Tracker Time Offset shifts the tracker location through time which can be used in conjecture with trimmed clips to adjust by the trim amount and properly align the tracker.
The Extrapolate Motion menu determines how the position calculated for the tracker behaves in regions before and/or after the frames actually tracked.
The Smooth Motion slider allows averaging out small noise/bumps in the tracker path to create an overall smoother trajectory. Higher values produce greater amounts of smoothing.
The Smooth Falloff slider controls how many neighboring frames are used when smoothing the motion.
The Smooth On checkbox allows completely enabling/disabling the smoothing.
The Smooth Lock menu controls whether smoothing is applied to regions outside the trim points defined by the Start/End Tracking Frame parameters.
The Tracker Auto-Man allows blending between the position of the tracked object and the value of the normal position picker to which the tracker has been applied. This for example allows a point to maintain part of the character of its original keyframed animation while also being partially affected by the tracked motion path.
Working with the Motion Tracker Preprocess Parameters
A good target region contains a high-contrast object with good vertical and horizontal edge definition. Ideally, you should find a pattern that is visible in every frame. If your image does not contain a high-contrast object to track, you can adjust the Preprocess parameters to make your source image easier to track. For example, you could increase the contrast for better results.
The View Preprocessed Source checkbox lets you view the preprocessed source image as you adjust it. When you select this checkbox, the chosen effect does not display in the Effect Preview window. Once you finish adjusting the Preprocess parameters, deselect this checkbox to view the applied effect.
- You should deselect the View Preprocessed Source checkbox before you select the Track On-the-Fly checkbox and begin tracking.
The Input Black, Input White, Gamma and Blur-Sharpen parameters adjust contrast and eliminate noise. Video shot at night or in poorly lit settings often contains noise in the dark areas which can interfere with accurate tracking. Increasing Input Black removes this noise by treating all areas darker than the Input Black setting as black. Washed out or overexposed images do not contain the full range of levels. Increasing Input Black andIor decreasing Input White can also boost the contrast of the image.
Input Black sets the channel values of the input image that are treated as pure black by the filter. For example, if Input Black is set to 50, all pixels with a value of 50 or less are output to a value of 0. The remaining values (50-255) are remapped to produce a smooth gradient from black to white.
 |  |  |
| Input Black=0 | Input Black=75 | Input Black=125 |
Input White sets the channel values of the input image that are treated as pure white by the filter. For example, if Input White is set to 200, all pixels with a value of 200 or more are output to a value of 255. The remaining values (0-200) are remapped to produce a smooth gradient from black to white.
|  |  |
| Input White=255 | Input White=175 | Input White=125 |
Gamma controls the slope of the curve used to convert from the input color values to output values in pixels brighter than Input Black and darker than Input White. Increasing Gamma from the default of 100 lightens the image and decreases contrast, while decreasing Gamma darkens the image and increases contrast.
 | |  |
| Gamma=50 | Gamma=100 | Gamma=150 |
Blur-Sharpen blurs or sharpens your image. Decreasing negative values blur the image, which is useful to smooth noise that might interfere with tracking; increasing positive values sharpen the image, which can enhance objects that might be too blurry to track.
Understanding the Tracking Process
Motion Tracking is a powerful feature, but it can be complicated especially with some limitations that exist in certain hosts. To understand best how to track, you need to understand Tracking on the Fly, and the Tracker Center KF control.
Setting up your Effect
Place the current-time indicator on the first frame of your effect.
Select the Track on the Fly checkbox.
Set the Tracker Center KF position to the region you would like to track and adjust the Target Width and Search Width if desired.
We recommend you create a Hold keyframe for the Tracker Center KF parameter at this frame. This is helpful in case you need to adjust the tracker later in your effect, for example if the tracker loses track or goes behind an obstacle.
Adjust the other Motion Tracking parameters as necessary. See “Tips for Setting Up the Target Area” for more information.
Tracking needs to proceed in order from the beginning to the ending of the clip. You can jump ahead from the starting frame or a previously tracked frame as long as you don’t jump farther than the value set in the Look Ahead Frames parameter. The easiest way to track is to hit the spacebar to play through the footage frame by frame. Alternatively you can step through the footage by multiple frames. If you jump ahead in the timeline beyond the last tracked frame by more than the time specified in the Look Ahead Frames parameter a Rewind error message will be displayed. See “Understanding Error Messages when Tracking on the Fly” for more details in dealing with that situation.
If you need to create more keyframes later in your effect, for example if your tracker loses focus and you need to adjust the Tracker Center, we recommend you set the new keyframes to Hold interpolation. See “Adjusting Tracking with Hold Keyframes” for more information.
If you wish to retrack after tuning the tracking parameters, be sure to hit the Reset button to clear the old tracking data if you have changed the search width, target width, color space, or accuracy since the previous tracking pass.
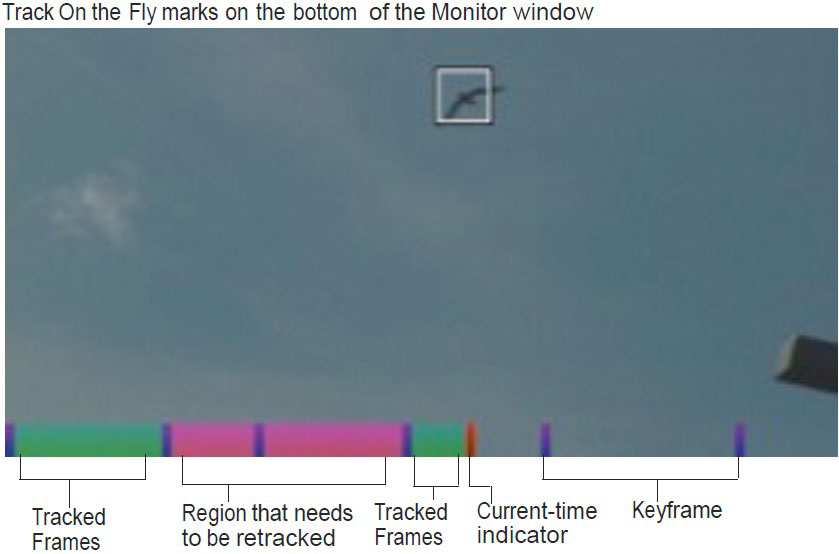
Understanding the Onscreen Tracking Marks
When Track on the Fly is enabled, the program renders a line along the bottom of the Composition window indicating the location of tracked frames. The line references the length of the edited source clip in the timeline. It is important to note that this line is actually rendered onto the image when you are in Track on the Fly mode. Make sure to turn off Track on the Fly before you render to disk or export your effect.
A Red mark along the bottom of the Monitor window indicates the current position of the current-time indicator.
Blue marks indicate keyframe locations. A keyframe location is any frame whose position differs from that of the previous frame. The first frame is always considered a keyframe. A frame where the center position differs from the previous frame is also considered a keyframe.
Note: The blue onscreen marks are internal to the Motion Tracker. While the Motion Tracker considers these frames to be “keyframes”, these are different than the keyframes that are visible in your timeline.
Green marks indicate the frames that have been tracked and are current (i.e. the location of the tracker center has not changed since the tracking data was generated).
Magenta marks indicates frames which were tracked, but for which the tracker point has changed. This usually indicates a region that needs retracking (unless you are manually positioning the Tracker Center KF without making keyframes in your timeline).
 |
Understanding Error Messages when Tracking on the Fly
The most common error message you will see during tracking is “Look Ahead exceeded. Please rewind to Frame X of your clip.”
There are several things you can do while tracking that cause this error message to appear.
- If you jump forward in the effect farther than the amount allowed by the Look Ahead Frames parameter. This may happen when scrubbing in the timeline.
- If you have partially tracked an effect, disabled Track on the Fly, and moved the current-time indicator past the tracked region before re-enabling Track on the Fly.
When you get this error message, you need to perform the following steps.
Move the current-time indicator to the frame indicated in the message.
Increasing the value of the Look Ahead Frames parameter may minimize the instances of this tracker error.
Working with the Tracker Center KF Control
The Tracker Center KF position control sets up the area to track. Use the Tracker Center KF control to set up your tracking region, then adjust the Tracker Center KF position control if necessary for finetuning.
Understanding How Keyframes Work in the Motion Tracker
It is sometimes necessary to “help the tracker along” when it loses the object by keyframing the Tracker Center KF control. The motion tracker treats any frame as keyframed if the Tracker Center position at that frame is different from the track center at the previous frame. Keyframes appear in blue along the bottom of the preview when Track On The Fly is on.
If you have created two Tracker Center KF keyframes with different values and are not using Hold interpolation, the tracker will treat each point between these keyframes as being at a keyframe.
- Note: The onscreen marks are internal to the Motion Tracker. While the Motion Tracker considers the frames represented by the blue marks to be “keyframes”, these are different than the keyframes that are visible in your timeline.
Adjusting Tracking During the Effect
It may be necessary to adjust the tracking during an effect, as the tracking can become inaccurate when the tracked object changes orientation or is obscured by another object. The best way to deal with this is by keyframing the Track Center KF control. Note that the onscreen Tracker Center KF crosshair control does not follow the tracked object, but you can reset it to the location of the tracked object at any point in the effect
Adjusting Tracking without Keyframes
It is also possible to adjust tracking without using keyframes. However you should be careful working this way because if you make a mistake your effect could jump. To use this workflow you MUST set the Look Ahead Frames parameter to 0.
You can move the current-time indicator to the point where you lost tracking, adjust the tracker, and continue tracking, You will notice that the tracked frame markers turn from green to magenta when you do this. This indicates that the Tracker Center KF is different from the current value.
This method works unless you go back to an earlier frame with the Track On The Fly checkbox on. If you go back, the tracker retracks that frame using the new (incorrect for that frame) value of Tracker Center KF, and the final render will jump. Since you haven’t saved the Tracker Center KF value for the start of the effect, you will have to re-enter it and retrack.
- Note: If you use this method, we recommend that you close the Motion Tracker group as soon as you finish tracking, so you don’t inadvertently change the tracker data.
- Note: The onscreen marks are internal to the Motion Tracker. While the Motion Tracker considers the frames represented by the blue marks to be “keyframes”, these are different than the keyframes that are visible in your timeline.
Adjusting Tracking with Hold Keyframes
We recommend that you use Hold keyframes for most adjustments. At the frame where the effect loses tracking, put a new Hold keyframe at the location of the object and continue tracking. You have to manually set keyframes to Hold.
If the object goes behind another object for several frames, you can put a Hold keyframe at each frame where the object is obscured.
You can also put a Linear keyframe where an object becomes obscured and a Hold keyframe where the object becomes visible again. The tracker will use the interpolated values as the location of the tracked object while it is invisible. You can add new keyframes as needed to adjust the motion while the object is concealed.
Additional Tips For Using the Motion Tracker
Tips for Setting Up the Target Area:
- A good Target area contains a high-contrast object with good vertical and horizontal edge definition. Ideally, you should find a pattern that is visible in every frame.
- The Target Width should be large enough to accommodate a good target image.
- If your image does not contain a high-contrast object and you have trouble tracking, use the Preprocess options to increase the contrast for better results.
Trimming Motion Tracked Effects
When you trim a clip that has been motion tracked, the filters do not purge the tracked data. This means that if a clip is trimmed from the end, you do not need to do anything. If a clip is trimmed from the beginning (or if you slide the clip, which is the equivalent of trimming from the beginning and end), you can either compensate with the Tracker Time Offset control or press the Reset button to invalidate all of the motion tracker data and retrack your effect.
Tracking Part of an Effect
There may be times when you want the effect to follow the tracked object for only part of the effect. If you want the tracking to follow the object to a certain point in the effect and then hold at that point, all you need to do is to stop the tracking when it reaches that point. The rendered effect will follow the object for as long as it has tracked, and then hold.
If you want the effect to hold steady for a while, and then pick up the object at a particular frame and start tracking it, follow the steps below.
Park the current-time indicator on the frame where you want to pick up tracking and add a Linear Tracker Center KF keyframe.
Go back to the beginning of the effect, and add another linear keyframe, setting its value to be a fraction of a pixel different from the value in step 1.
Track your effect. The tracker will now think that there are keyframes at every frame up to the one you set in step 1, so it won’t use any tracking data at that point in the effect. Once it reaches the second keyframe, it will track normally.