Overview
The OpenGL hardware-accelerated BCC Video Morph filter performs a combined warp and dissolve blend from one video clip into another clip, resulting in the generation of an animated image morph image clip. The filter uses matched pairs of user generated Adobe After Effects spline mask shapes to define edges on the source and the corresponding destination clips at key points along the timeline.
For example, when morphing the face from one video clip into a different face in a second video clip, the user creates and animates matched pairs of open or closed spline shapes on the source image clip that follow the contour line of key elements in the source and destination images, such as the jaw line, eyes, ears etc and the filter uses these shapes to aid in generating a smooth morph transition between the two clips. While it is creating the image warp, the filter also generates a blend over time between the source and destination clips. In addition to the AE spline mask shapes, which the filter uses to define the warp, the filter also uses Key Markers, which serve as instruction points for the Morph filter’s software algorithms that are set in the filter control panel by the user for the source and destination images to control of the duration of the morph. The Key Markers function is to instruct the filter on when to start and stop the image morph.
Function
Here’s a step by step tutorial on how this filter is used in Adobe After Effects
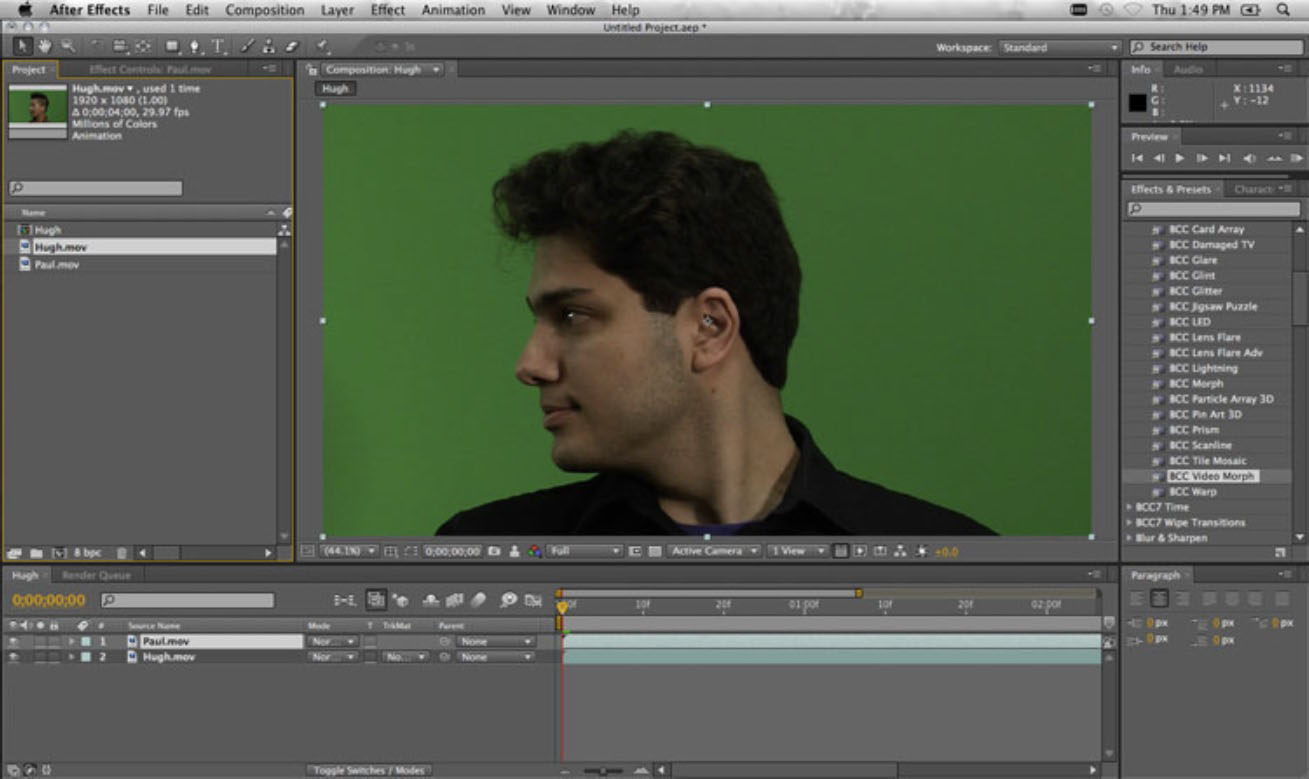
Import two video clips, each one featuring a head and shoulders shot with similar head movements into an AE project and drag the clips into the composition timeline with the source (start) clip on top of the destination (end) clip:
 |
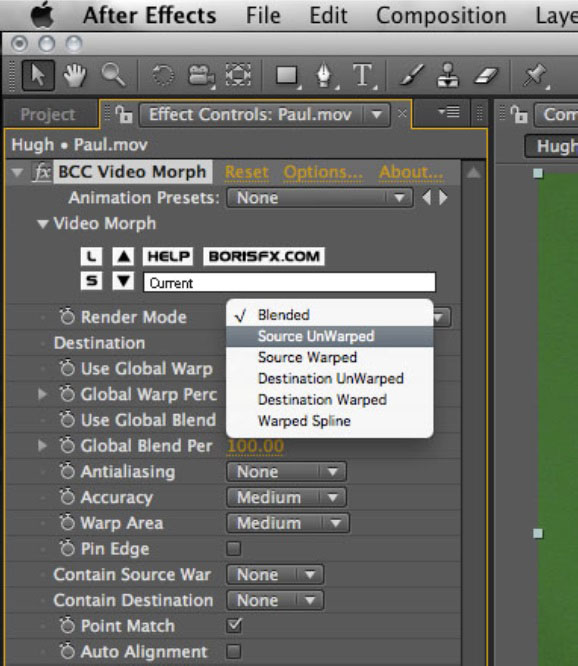
Apply the BCC Video Morph filter to the source clip and set the Render Mode pop-‐up to Source UnWarped.
 |
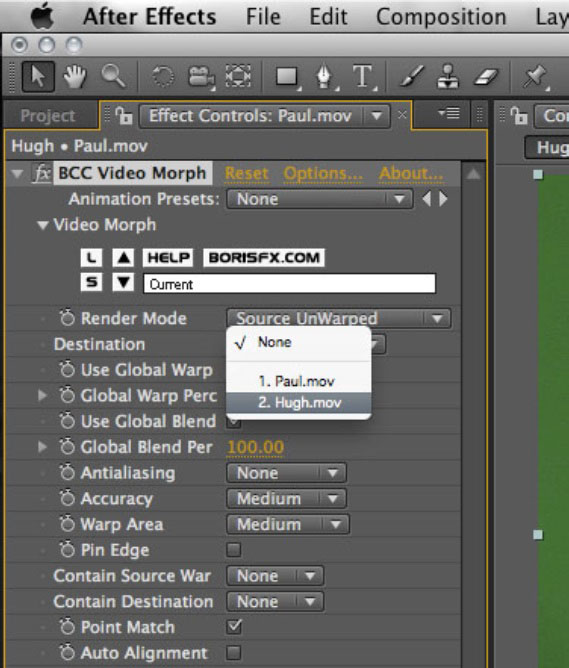
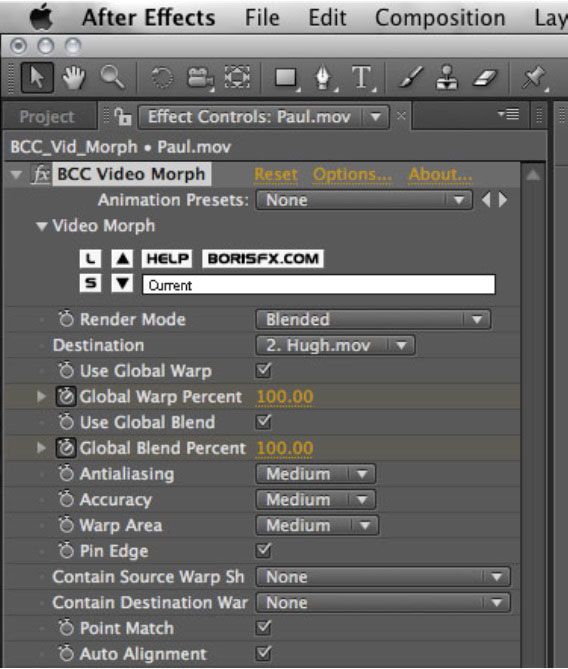
In the Video Morph filter control panel, set the Destination pop-‐up to the destination clip
 |
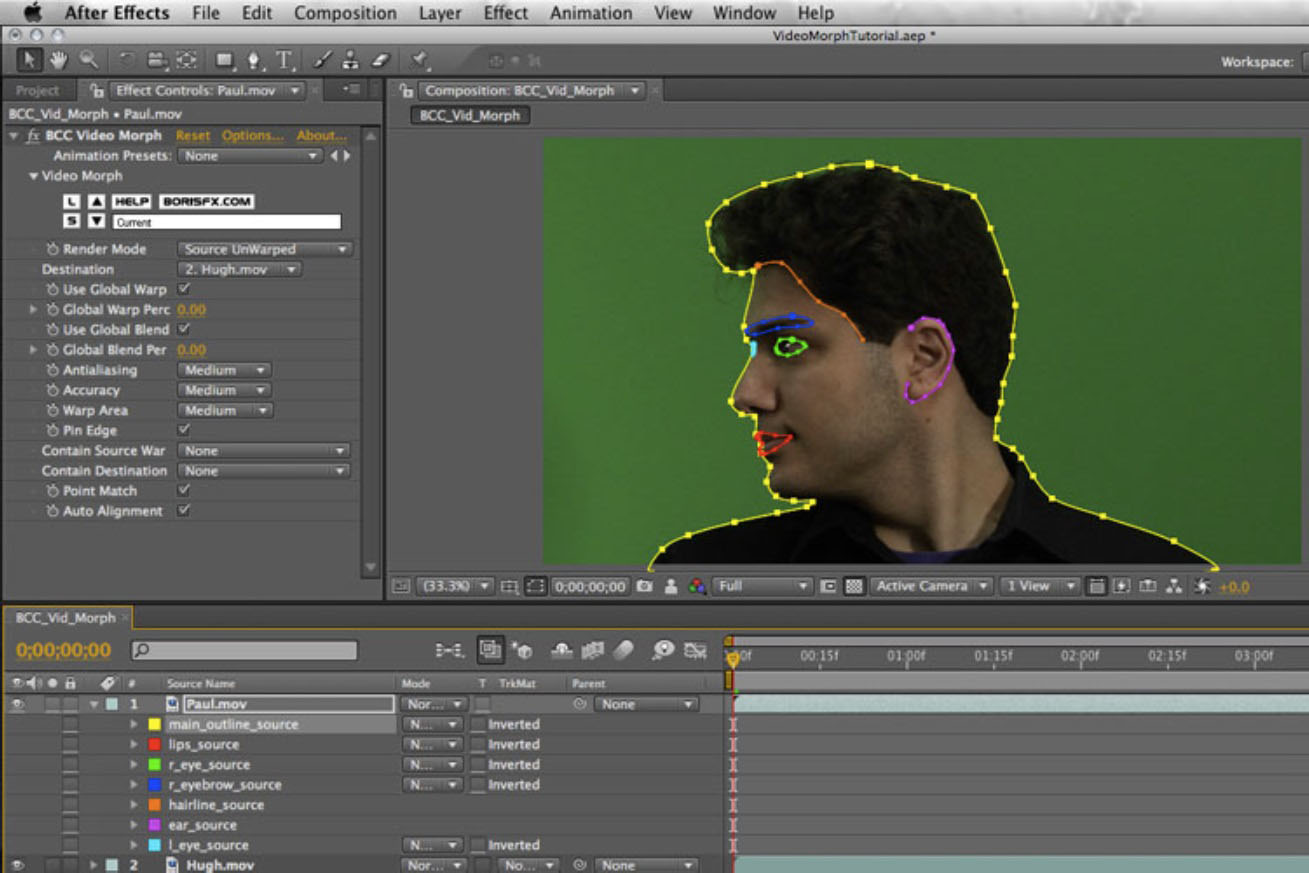
Create a spline mask, which follows the outline of the figure in the source image. Create additional masks that match the contour lines of the eyes, eyebrows and the other main features in the clip. As you create each spline mask shape, it’s a good idea to name the shapes according the feature contour that they are following, i.e., jaw, eye, nose, ear etc etc. You may also want to set a different color for each mask shape.
 |
All masks should be disabled, set to none, in the timeline.
 |
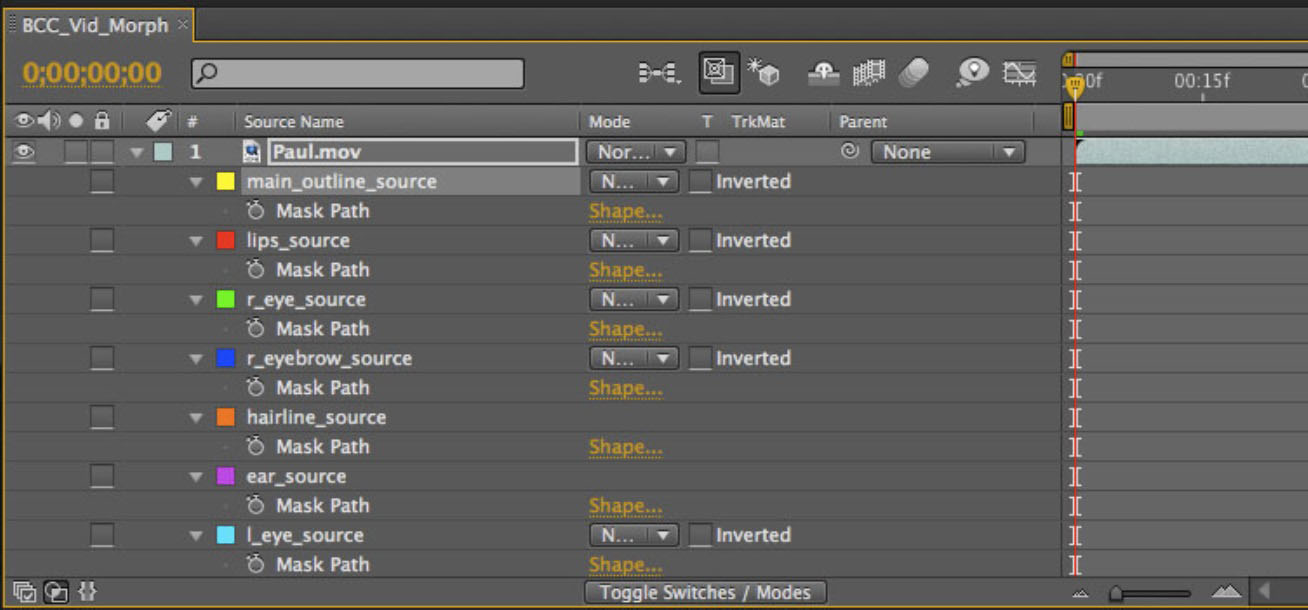
With the CTI at the start of the timeline, select the Source Image clip in the timeline and press the “M” key on the keyboard. This displays the Mask Path properties for all of the masks on this clip.
 |
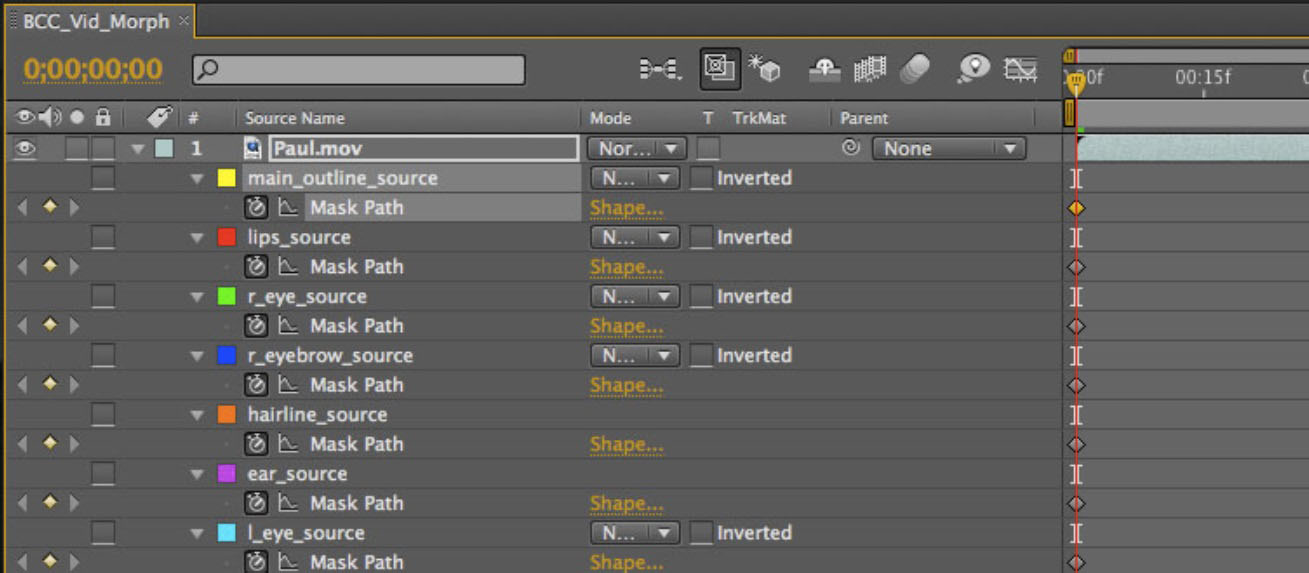
Enable keyframe animation for all of the masks by clicking on the stopwatch icon for the Mask Paths.
 |
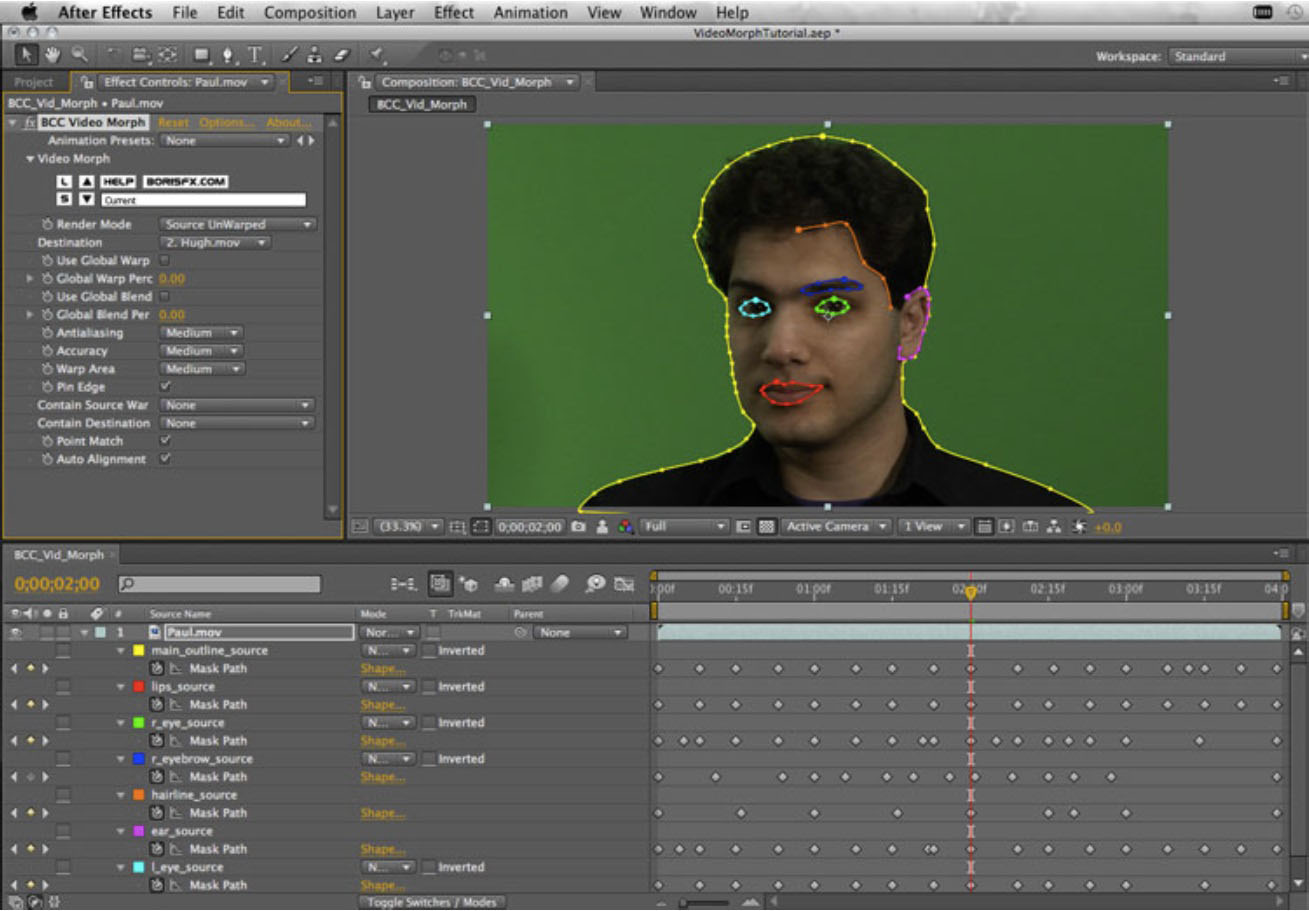
Animate all of the source mask shapes so that they remain aligned to the feature contour over time.
 |
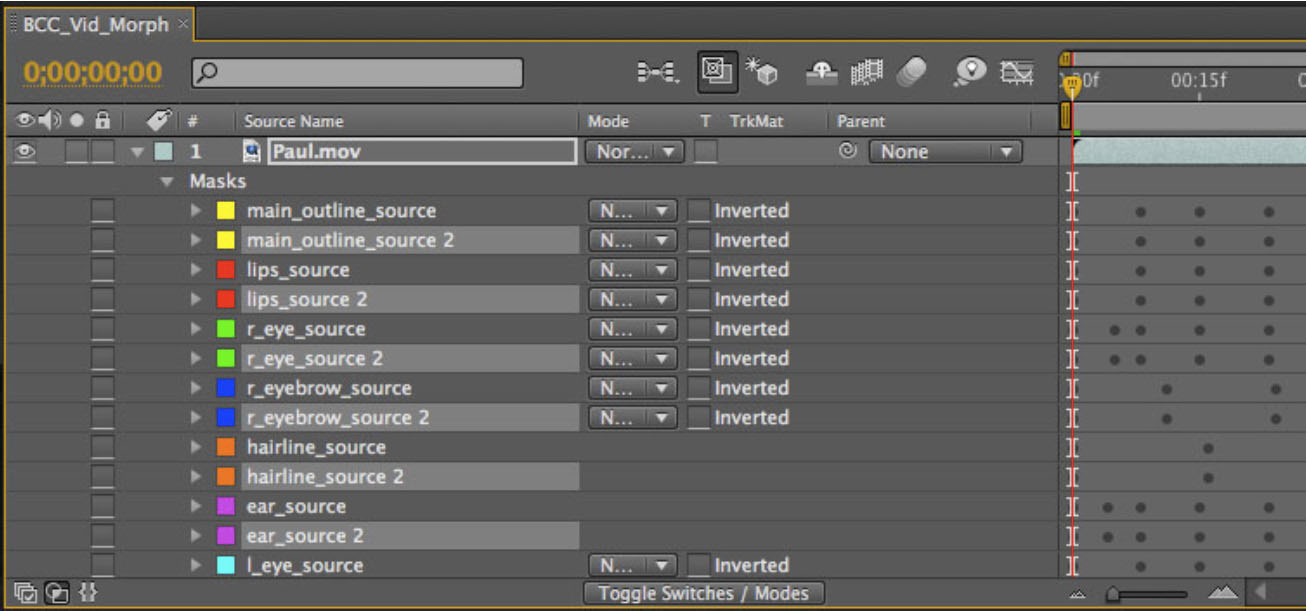
Select all of the mask tracks and duplicate them in the timeline with the Command / Control + D command. This will place a duplicate of each mask underneath the original mask so that we will have sequenced matched pairs of splines following one after the other in the timeline. The original splines will be used for the source clip and the duplicate splines will be used to control the destination clip.
 |
Rename the destination spline shapes, adding destination instead of source at the end of the mask shape name. You will also find it helpful if you alternate colors -‐ in this instance I’ve used complimentary colors to identify the source and destination shapes.
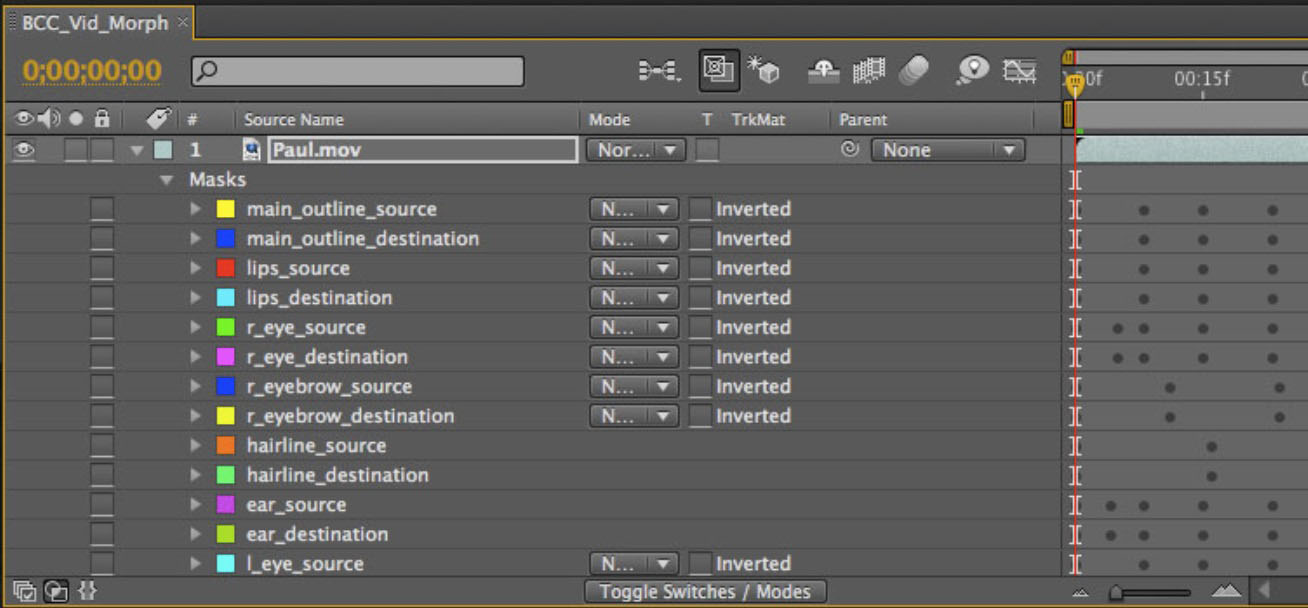 |
Animate all of the destination mask shapes so that they remain aligned to the feature contour over time.
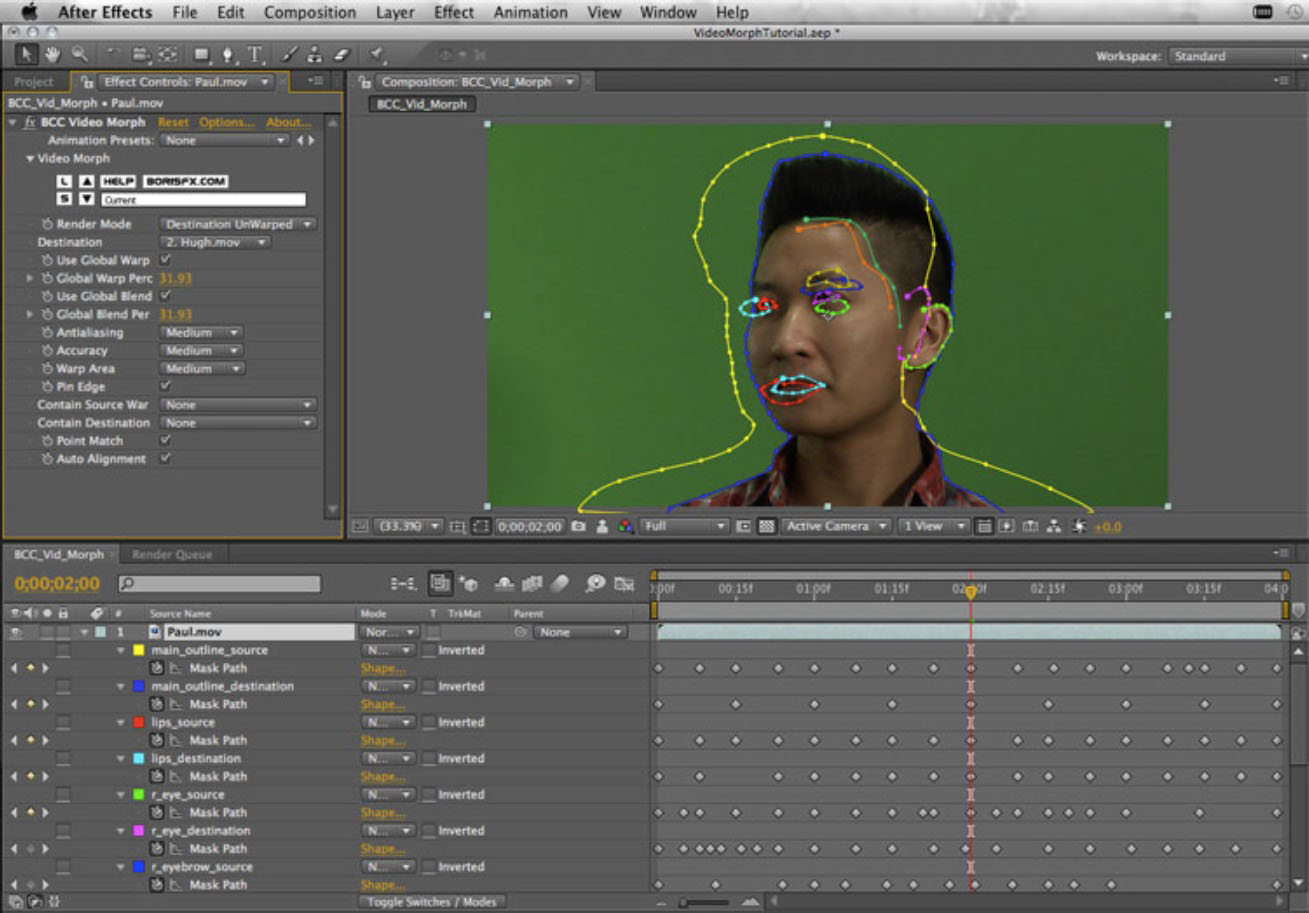 |
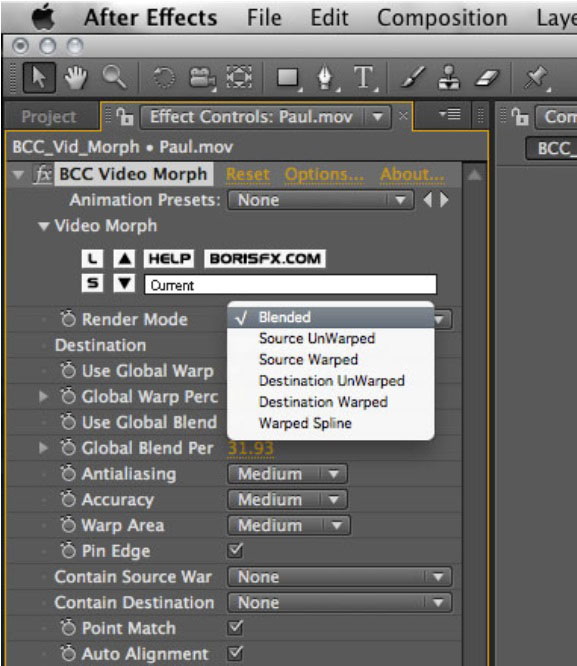
In the filter control panel, set the Render Mode pop-up to Blended.
 |
Move the CTI to the start of the clip. In the filter control panel, enable keyframe animation for the Global Warp Percent and the Global Blend Percent functions and set both parameter values to 0.
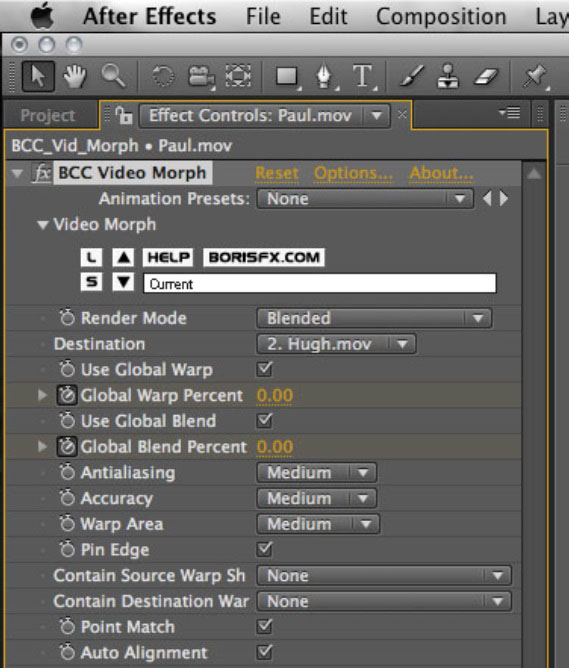 |
Move to the end of the timeline and set the Global Warp Percent and the Global Blend Percent parameter values to 100.
 |
Now play back the composition in the timeline and observe how the images morph over time from the source to the destination image
 |
So that’s the easy way to use the filter. Should you desire a deeper level of control, you can disable the Use Global Warp parameter and control the spline warping on a per spline basis by setting the Mask Expansion parameter value (under the Mask group in the timeline.) Furthermore, the cross-dissolve blend can be controlled on a per spline basis by disabling the Use Global Blend checkbox and using the Mask Opacity parameter value to set the blend level.
Presets and Common Controls
BCC filters come with a library of factory installed presets plus the ability to create your own custom presets and preview them with the BCC FX Browser™.
BCC filters also include common controls that configure global effect preferences and other host-specific effect settings.
For more information about working with presets and other common controls, Click Here.
**Render Mode pop-up:**Used to set the view from the filter in the composition window
- *Blended –*Displays the morphed result when selected
- Source *UnWarped –*Displays only the undistorted source clip when selected
- Source *Warped –*Displays only the distorted source clip when selected
- Destination *UnWarped –*Displays only the undistorted destination clip when selected
- Destination *Warped –*Displays only the distorted destination clip when selected
- Warped *Splines –*Displays only the warped spline shapes when selected
Warp checkbox: Used to enable the warping function of the morph. When disabled only a cross dissolve between the two images will occur and when enabled the result will be a warped morph image.
Destination pop-up: Used to select the destination clip for the morph. All clips that are in the current composition timeline will appear in this list.
Use Global Warp checkbox: Used to enable the global warping function. When enabled, all spline shapes will be warped globally. To control the warp of each spline shape individually, disable this checkbox and keyframe the Mask Expansion feature under the Mask Controls in the timeline to animate the warp.
Global Warp Percent: Used to control the global warp animation. Animate this parameter from 0 – 100 to warp all splines uniformly.
**Use Global Blend checkbox:**Used to enable the global blending function. When enabled, the dissolve blend between the source and destination clips will be controlled globally by the Global Blend Percent parameter. To control the warp of each spline shape individually, disable this checkbox and keyframe the Mask Opacity feature under the Mask Controls in the timeline to animate the blend dissolve.
**Global Blend Percent:**Used to control the global dissolve blend animation. Animate this parameter from 0 – 100 to generate a dissolve blend effect, affecting all areas of the image uniformly.
**AntiAliasing pop-up:** Used to set the level of anti-aliasing in the morph result.
- *None –*No anti-aliasing is applied to the image
- *5 Samples –*Minimum level (5) of antialiasing is applied to the image
- *9 Samples –*Maximum level (9) of antialiasing is applied to the image
**Accuracy pop-up:**Used to set the optimal performance / speed versus the accuracy of the morph. Lower values produce a less smooth morph with fewer points on the grid but increases filter performance. Higher settings produce a smoother morph but take longer to render.
- *Low –*Most coarse grid setting lowest number of grid points
- *Medium –*Medium grid setting
- *High –*Fine grid setting
- *Highest –*Finest grid ‐ highest number of grid points
Warp Area pop-up: Used to set the size of the area in the image that is ultimately affected by the warp grid. Low values will warp only a small portion of the image, while higher values will extend the warp over a larger portion of the image, but will decrease the filter’s performance.
- *Smallest –*Contains image warp to the smallest permissible warp field
- *Small –*Small size warp field
- *Medium –*Medium size warp field
- *Large –*Largest permissible warp field
**Pin Edges:**Used to hold or pin the image edges. Sometimes the image morph can pull the image away from the edges of the frame. Enable this checkbox to pin or lock the edges of the image to the edge of the frame.
Contain Source Warp Shape pop-up: Used to contain the source morph to a select region in the clip. Selecting a mask shape from this pop-‐up will contain the source morph to within the bounds of that mask. If an open spline point is selected, the filter will automatically close the shape by linking the first and last points along the spline.
Contain Destination Warp Shape pop-up: Used to contain the destination morph to a select region in the clip. Selecting a mask shape from this pop-up will contain the destination morph to within the bounds of that mask. If an open spline point is selected, the filter will automatically close the shape by linking the first and last points along the spline.
**Point Match checkbox:**Matches point for point the spline masks of the source and destination images, when enabled.


