 |  |
| Original Image | Filtered Image |
Overview
BCC Wire Remover removes wires and unwanted objects from still or moving images by either cloning or blending pixels together from surrounding areas. This filter has several uses. When working with blue or green screen shots, use this filter to remove wires or eliminate unwanted rigs or objects prior to keying. You can also use this filter to blend replacement pixels over video dropouts or film scratches.
The Wire Remover filter includes two motion tracker parameter groups. This allows you to track the ends of the wire if the ends move.
Function
Presets and Common Controls
BCC filters come with a library of factory installed presets plus the ability to create your own custom presets and preview them with the BCC FX Browser™.
BCC filters also include common controls that configure global effect preferences and other host-specific effect settings.
For more information about working with presets and other common controls, Click Here.
- Note: The BCC Wire Remover’s PixelChooser can be a powerful tool when removing wires or rigs from moving images.
Working with Multiple Wire Remover Filters
In many instances you will need to apply multiple Wire Remover filters. For example, you may need to remove several wires from an image. To do this, apply a second Wire Remover filter directly to the same clip.
The Method menu offers three methods of applying the effect to the image.
- Cover uses pixels from the sides of the area that is defined by the End Point 1, End Point 2 and Width parameters. When you choose this option, Noise adds noise to the Cover. Adding Noise is useful if the background has detail such as grass. The example above shows the Cover method.
- Mask creates a mask between the area that is defined by the End Point and Width parameters. Underlying tracks in the timeline are visible through this area. This method is useful if you are keying the image with wires, or a portion of that image over another track. The example above shows the same result as if you masked it with a clear sky as the underlying track.
- Clone fills the area that is defined by the End Point and Width parameters with the image taken from underneath the specified Clone Center. When you choose this option, the following parameters are active.
- Clone Center XY position controls set the center point of the area that is used as the source for the clone.
- When Center Relative is enabled (the default), the clone point is taken as an offset from the center of the End Point-defined removal rectangle. The offset is calculated as an offset from the center of the frame. When Center Relative is disabled, the clone point is an absolute position for the clone center.
- Clone Time Offset lets you clone from different frames in the timeline.
The View menu sets the display.
- Render displays the rendered effect. Be sure to set this menu to Render before rendering your effect.
- Preview Area displays a red mask over the area that is defined by the End Point and Width parameters. You should use this option to setup your effect. The following example shows two Wire Remover filters applied to an image, one for each wire.
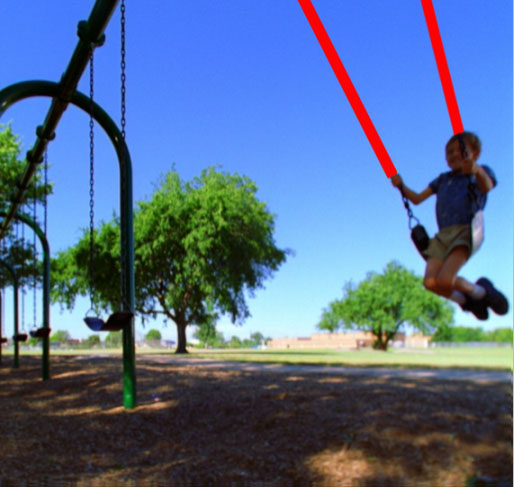 |  |
| Preview Area | Render |
The End Point 1 and End Point 2 position controls set the start and end point of the line on the X and Y axis, respectively. This determines where the effect is positioned.
Width sets the width of the effect area (defined by the End Point parameters), in pixels. In the example below, two Wire Remover filters are used, one for each wire. The wire on the left is thinner; a Width of 4.5 was used. The Wire on the right is set to a Width of 8.
 | 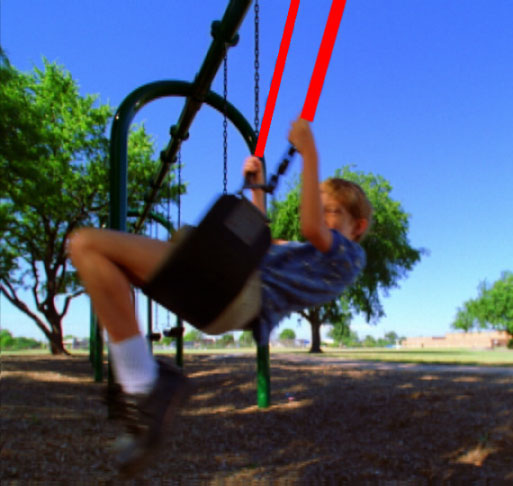 |
Feathering softens the edge of the defined effect area.
Noise adds noise when you choose Cover from the Method menu. Adding Noise is useful if the background has detail such as grass.
Clone Center: Defines the center pixels from which the clone function will replicate the image.
Center Relative: when activated the clone image will move relative to the Clone Center to accommodate for moving wires.
**Time Offset:**Allows the clone image to be pulled from past or future frames.
Mix with Original blends the source and filtered images. Use this parameter to animate the effect from the unfiltered to the filtered image without adjusting other settings, or to reduce the affect of the filter by mixing it with the source image.
PixelChooser
The BCC PixelChooser provides simple, built-in masking of the effect result. The PixelChooser is generally used to select a portion of the image and restrict an effect to just the selected area while maintaining the original image content in unselected regions. The selection can be based on geometric shapes or on the image’s luma/color properties.
For more information on the PixelChooser, Click Here.
Motion Tracker
The BCC Motion Tracker allows you to track the motion of an object, then use the motion path to drive other geometric properties of the effect without the need for keyframing.
For more information on the Motion Tracker, Click Here.
Working with Motion Tracker Parameter Groups
The Motion Tracker parameter groups allow you to track the affected area if it moves in the image. The Wire Remover filter includes two motion tracker parameter groups which allows you to track the ends of the wire if the ends move.The two Motion Tracker parameter groups offers functionality that is similar to the standalone Witness Protection filter. See the BCC Witness Protection filter for more information.
The following steps below provide an overview of the motion tracking process.
Use the parameters in the Motion Tracker parameter group to setup the Target. The Target indicates the area in the media to track. In general, you should manually set up both the first and last keyframe so that the Target points are positioned over the End Point 1. Set the Apply menu to End Point 1.
Repeat the first step, using the parameters in the Motion Tracker 2 parameter group so that the Target points are positioned over the End Point 2 (assuming that both the End Point 1 and End Point 2 move). Set the Apply menu to End Point 2.
Analyze the motion by selecting the Track On-The-Fly checkbox and clicking Play.
The filter generates tracking data.
- Manually correct any errors. See the BCC Witness Protection filter for details.
Selecting the Reset Tracker checkbox resets the parameters in the Motion Tracker parameter group.
The Tracking Source Layer menu allows you to choose a layer in the timeline to use as the source for the filter. By default the filtered layer is used.
When the Track On-the-Fly checkbox is selected and you press Play, the filter calculates the tracking data. When you select this checkbox, the selected effect does not display in the Composer window.
The Tracker Center KF controls set up the area to track. However, in general it is easier to use the onscreen point controls to set this up. Then use the position controls for finetuning.
Target Width sets the size of the area to track. Increasing this value increases preview time but can increase the accuracy of the tracking.
The Apply menu determines which point the Motion Tracker data affects. The choices are None, End Point 1, End Point 2 and Both.
The Offset X and Offset Y parameters, allow you to offset the effect on the X and Y axis respectively. This is useful if you want to track one area, then apply the effect to a different area.


