Title Studio- Creating an Animated Lower Third

BCC 3D Objects

In this section we will look at creating a basic animated lower third. A lower third is a graphic or banner with text that appears at the bottom lower third of your screen. Lower Thirds can range from simple text and a banner to more complicated animations that use shapes, text, shaders and 3D models.


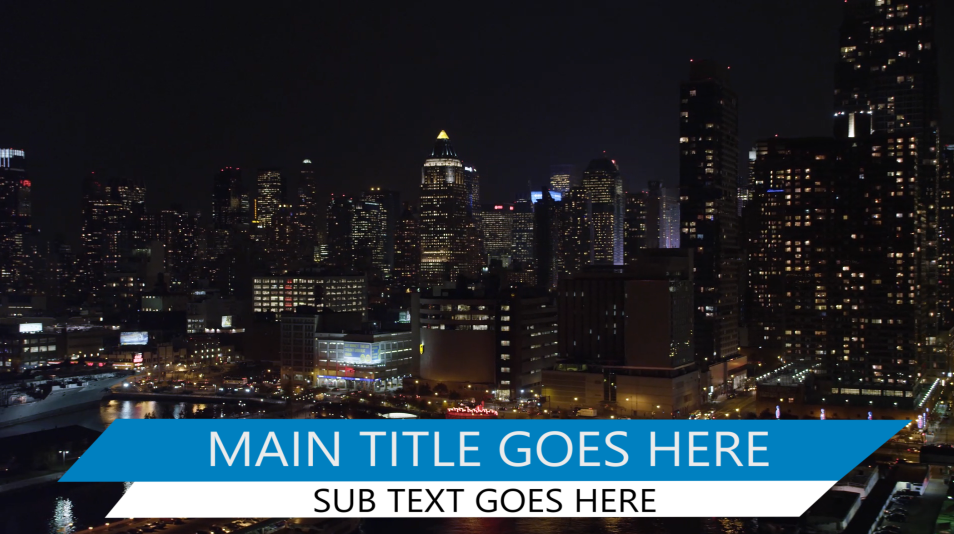
For this tutorial we will focus on creating a basic dual banner using spline objects, animating them, adding primary and sub text, and setting up rigid runs to keep the animation consistent regardless of the length of the clip the preset is applied to.

You can create a new Title Studio project any length you want, but for this tutorial, we will be working with a project length of 5 seconds. While this tutorial will go into depth on how to create the effect, it’s recomended that you review the basics of Title Studio, such as creating text and animating keyframes before you continue.

Step 1: Creating the Main Banner

The first step in creating any kind of lower third is to set up the motion graphic as it will appear when it’s fully on screen. Don’t worry about animating it on or off yet, let’s just focus on creating the finished look.

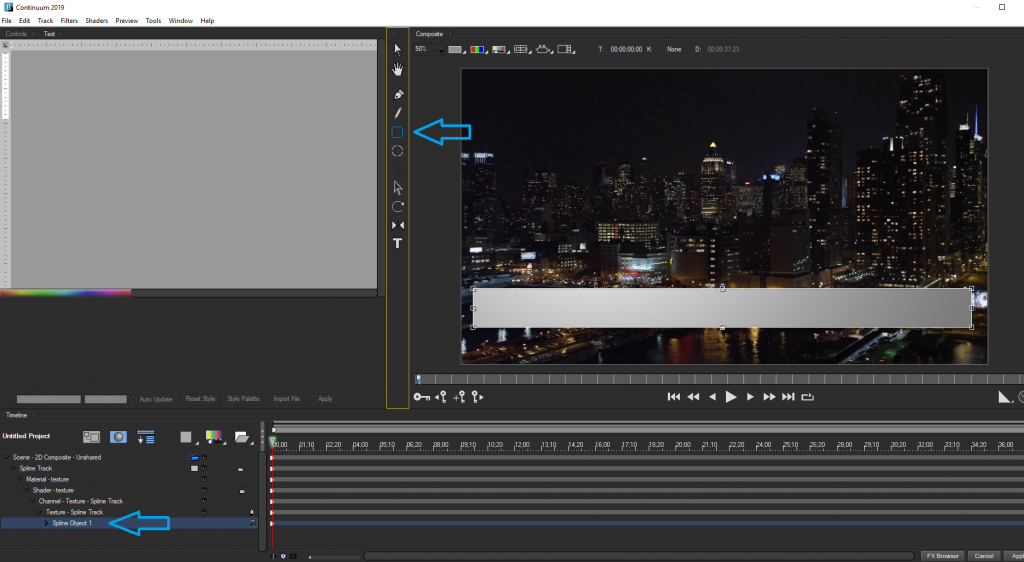
  • In the Timeline window, select Add New Media and choose Spline Object. You can also create a new spline object by selecting the pen, rectangle, or circle tool and clicking in the composite window.

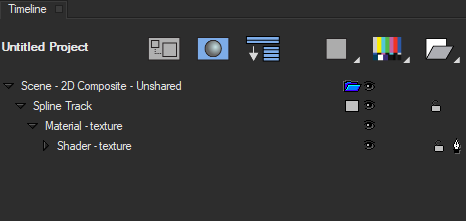
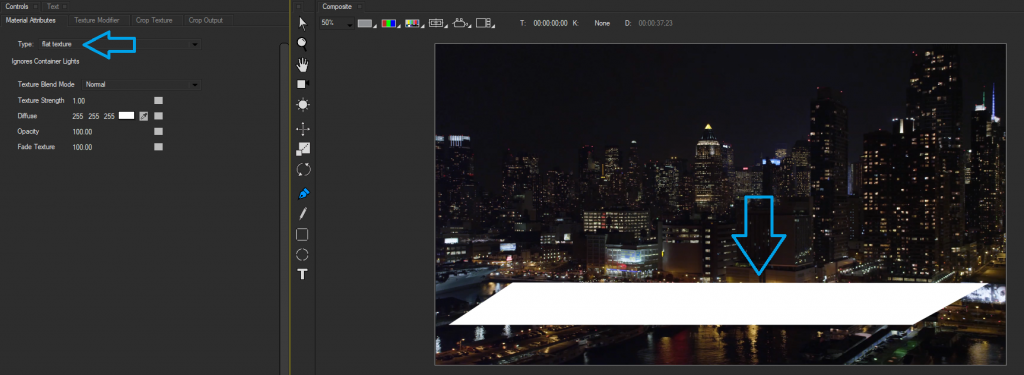
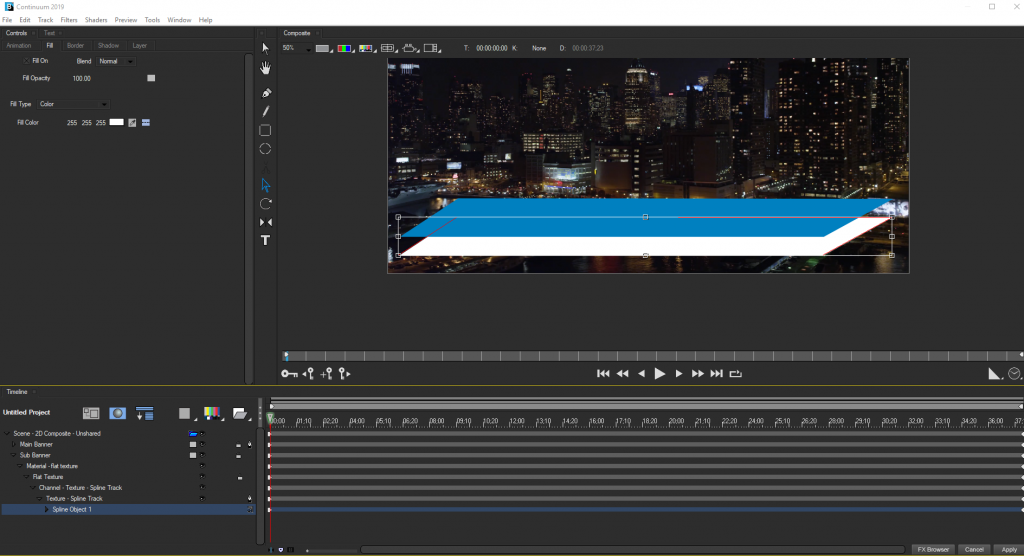
  • A new scene container is created and a default, empty Spline Track is created. Using the Rectangle Tool, draw a rectangle object in the lower third of the screen. Leave extra room at the bottom for the subtext banner, which we will cover in a moment.

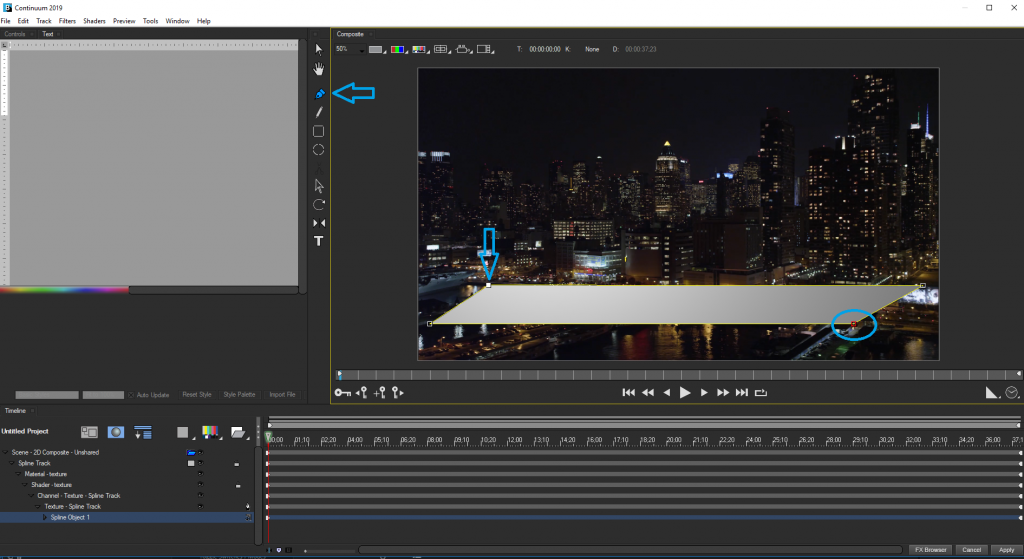
  • With the pen tool selected, select the Spline Object 1 track in the timeline. This will allow you to select a specific point in the spline object and change it’s position. You will only be able to do this if the Spline Object 1 track is selected. Using the pen tool, adjust the top left point and the bottom right point so that you create a bladed look to the banner. Use the spline object outline to make sure that the sides are level. It will appear jagged if the edges are not straight.

  • To change the track texture, make sure that the Show/Hide Material Track is enabled, and then select the Shader – Texture track. Here we can change the Type to Flat Texture. This will prevent the texture from reacting to the light source.

  • Next, select the Material Track, and go to the Fill Tab. The color chip will allow you to set the color of your primary banner. In this example we will set it to blue.

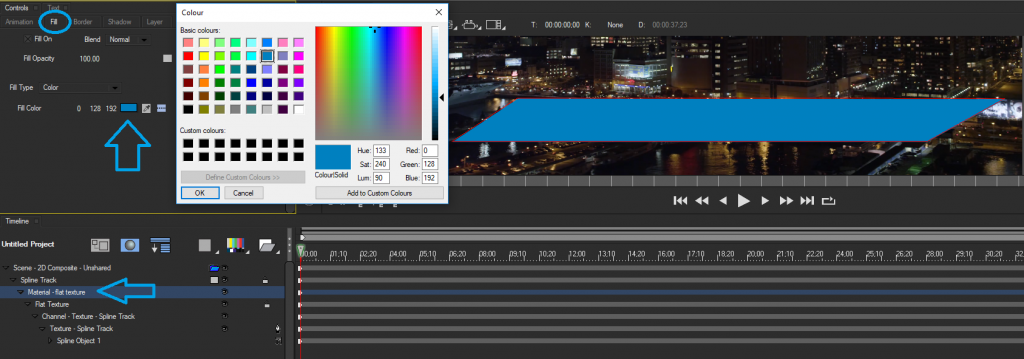
  • Lastly, Select the main Spline Track and right click to bring up the contextual menu and select rename track. This will allow us to chang it’s name to Main Banner.

Step 2: Creating the Sub Banner

To create the second half of the banner where our subtext will go, we will want to repeat the process used in Step 1, however there is a faster way to quickly create a sub banner.

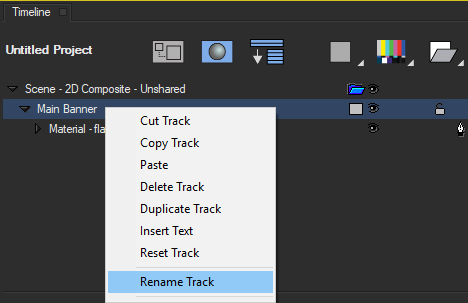
  • Right click on the Main Banner track and select Duplicate. This will create a duplicate track that we can modfy to fit our needs.
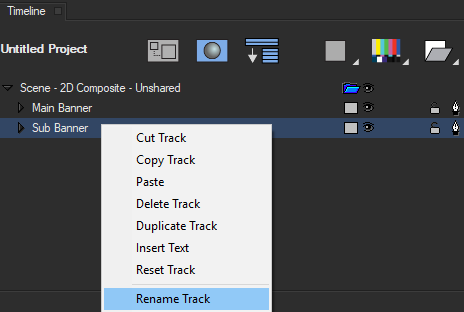
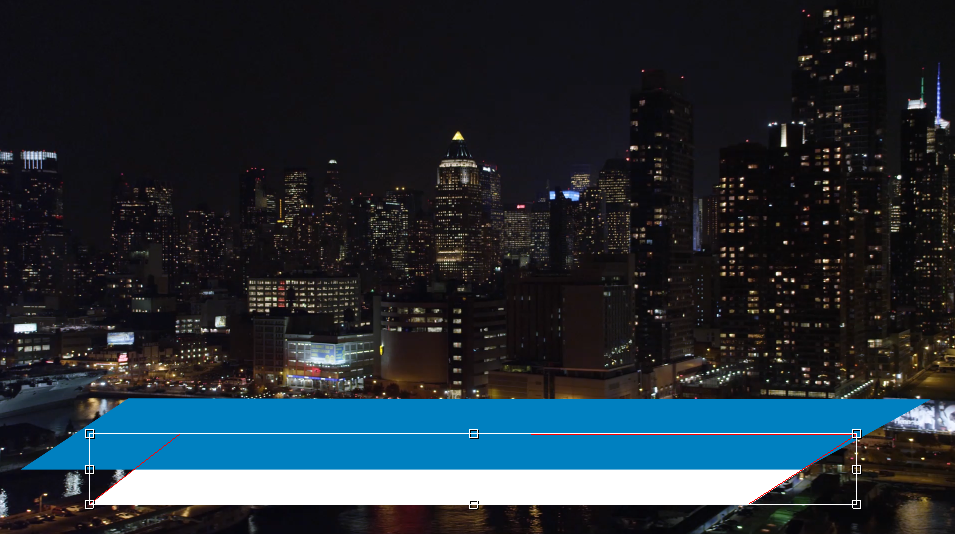
  • Because our sub banner will need to animate from behind the Main Banner, track order is very important. Select the LOWER copy of the Main banner and rename it Sub Banner.

  • Next, select the Material track and in the Fill Tab, change the color to white. We won’t be able to see it at the moment because it’s hidden behind the main banner itself.
  • With the Sub Banner’s Spline Object 1 track selected, use the Solid Arrow tool to reposition the sub banner slightly below the main banner in the composition window.

  • Lastly, select the spline object 1 track and, with the solid arrow tool selected, drag the bounding box in to shrink the shape so that it aligns with the main banner as seen in the photo.

Step 3: Creating the Text

Creating the text is the easiest part of the exercise, and is largely up to you how you want to design it. In this case we will want to create two seperate text tracks.

Feel free to experiment with different fonts, kearning and sizes to get the look that works for you. But ultimately, once you’ve set up the text as needed, it’s time to animate the effect.

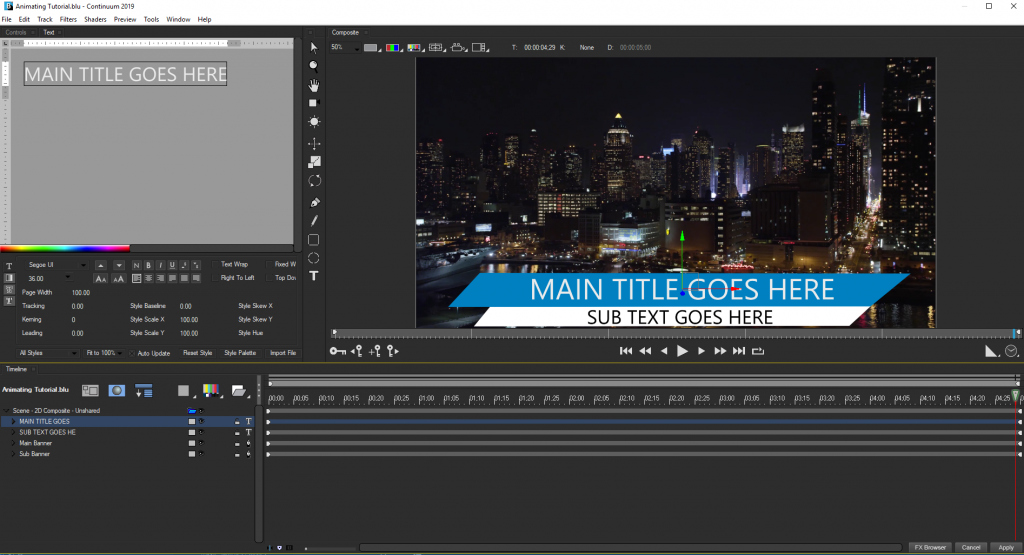
  • Using the Text Tool, or the Add New Media button, create a new flat text track.
  • In the text generator window, we will edit the text, font and size as needed and then position the text in the center of our Main Banner.
  • Next, we’ll create another text track, this time changing the color to black in the text generator window, making the font a bit smaller and then position it at the center of the sub Banner.

Step 4: Grouping the Lower Third Elements

The goal to animate this lower third will be to have the main banner slide on from the left of the screen, and then have the sub banner drop down from behind. It will then animate off in reverse.

To do this, we will first want to group the various elements into 3D Containers. This will allow us to animate each seperately, as well as together.

  • Track order will come in to play here, and to maintain the look, the first thing I want to do is drag my Subtext Text Track below the Main Banner and above the Sub Banner in the timeline. This will place the text behind the main banner, but in front of the sub banner.

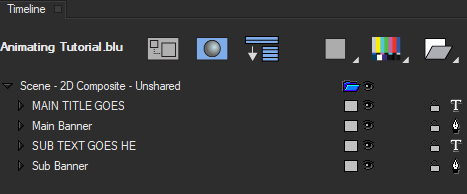
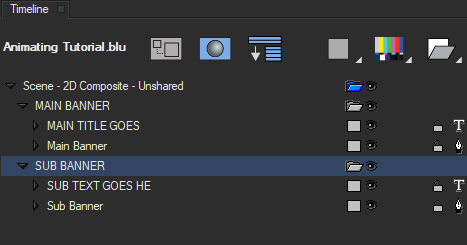
  • Next, I want to group my elements. I’ll do this by, with shift held down, selecting the Main Title Track, and the Main Banner to select them Both. Once that is done, I’ll select New 3D Container from the Add New Container Button. This places both objects inside of a 3D Container, which I can rename MAIN BANNER.

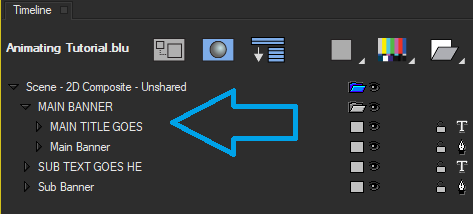
  • I will also do the same thing with the Sub Text and Sub Banner. However, be aware that when I do, the new container will be placed above the Main Bander container. It’s important to drag this container to the bottom of the stack below the Main Banner container, so that the effect looks correct. I will rename this container SUB BANNER


By doing this, I am now able to animate the position of either the individual tracks, or the container that contains them both. This makes it easy to move tracks individually or as a group.

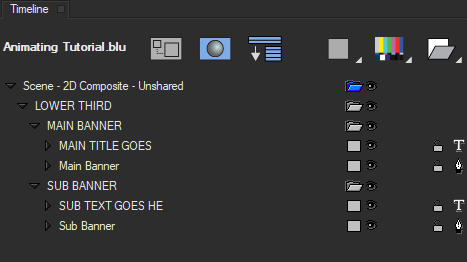
In fact, lets, select both the Main and Sub Banner Containers and place them inside of a new container, which we’ll rename LOWER THIRD.


Now, we can control each element, each section, and the whole lower third as a group. Very handy, and very nicely organized.

Okay, lets begin animating…

Step 5: Animating the Lower Third

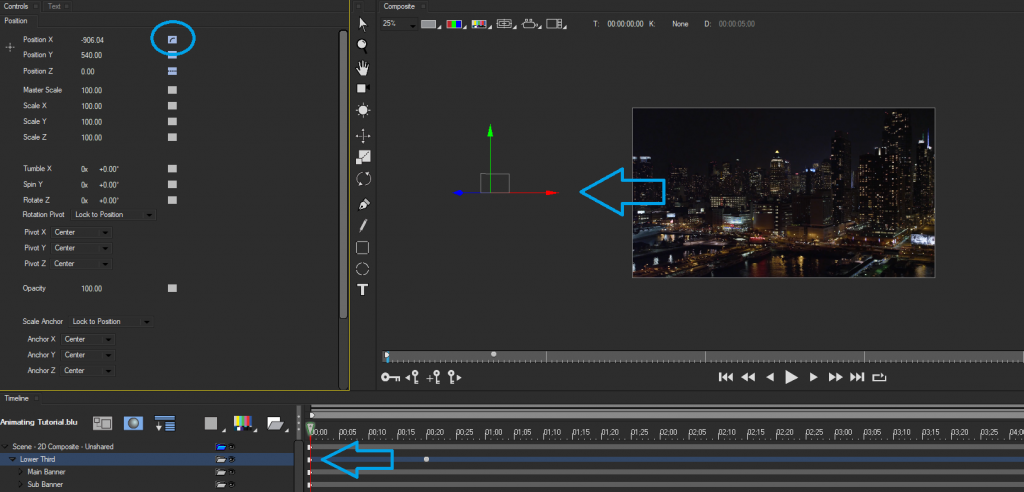
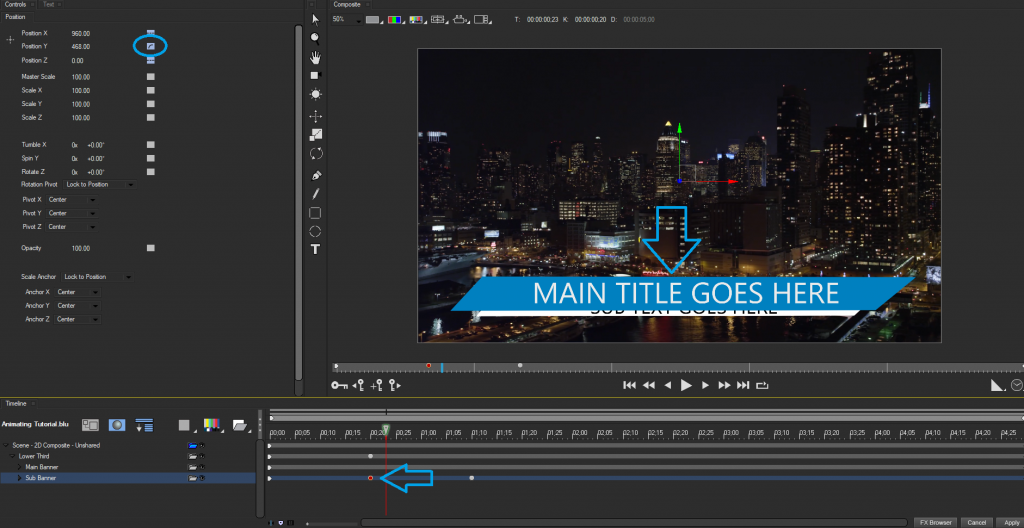
To begin with, lets move the CTI to about the 20 frame mark and select the Lower Third container track.

  • at the 20 frame mark, we will set a Position X hold interpolation keyframe. This is the point at which we want the Lower Third to pause in it’s end position.
  • Next, move the CTI to the first frame and, with the Lower Third container track selected, move the whole thing off screen to the left. You’ll notice that a hold keyframe is created for the Position X value in the container tab.
  • Select the hold interpolation keyframe to bring up a menu of available interpolation settings. Lets select Decelerate. This will cause the lower third to slow down as it gets to it’s final position.


While we’re at it, lets animate the effect off at the end.

  • Move the CTI to about 20 frames from the end of the clip, and set a Hold Keyframe for the Position X value. This is temporary, but it allows us to set things up correctly.
  • Next, move to the very last frame, and move the Position X value off screen to the left, as we did before. This will automatically create a hold value at the end.
  • Lastly, select the previous keyframe and change the interpolation value to Accelerate. This will change the animation so that the effect speeds up as it moves back off screen.

One final thing we can do is animate the sub text so that it slides on after the Main Title has animated on. To do this, we are going to have it drop down from behind the Main Banner.

Since this will animate seperately from the man banner, we will want to make sure that the Sub Banner container has been selected.

  • Move the CTI to about the 1:10 mark and set a Hold Keyframe for the Position Y Value for the Sub Banner
  • Next, move the CTI back to frame 20, where the main animation ended previously. Here we are going to move the Sub Banner up so that it is hidden behind the Main Banner.
  • Now, before we change it’s interpolation value (currently set as Hold), go back to the first frame and set that interpolation value to Hold as well. And set the Position Y value to match the value at frame 20. The reason we want to do this is so that we don’t inadvertantly create an animation between frame 1 and frame 20. We want the sub banner to stay hidden until frame 20.
  • Next, select the keyframe at frame 20 and change the Position Y interpolation value from Hold To Decelerate.
  • Lastly, repeat the same process as before to animate the effect off. Or, feel free to leave the sub baner as is, so that it’s text remains visible while animating off. It’s up to you!

Step 6: Rigid Runs

One important feature of Title Studio is the ability to easily create what’s known as Rigid Runs. In this tutorial we have created an effect based off a 5 second clip. However, often, the presets we create will need to be applied to clips of varying length. If our Lower Third preset was applied to a 10 second clip, the animation that we created for 5 seconds, would now take 10 seconds to animate. While this would be perfectly fine for the main section where the lower third is fully displayed, it would cause the on and off animations to render half as fast as we originally wanted them to.

To keep animations exact, but allow for the non-animated portions to stretch to fit the length of a clip we can employ Rigid Runs to define the areas where Title Studio should use the original animation length.

In our example, we would want to place a rigid run at the very begining, until the 1:10 mark, when the animation ends.

To do this, right click on the timeline and select Add Rigid Run.


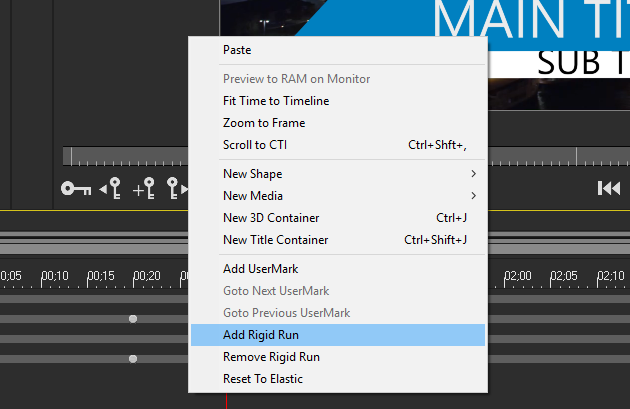
This will create a red adjustable range marker in the timeline wherever the CTI is located. Simply drag the left range marker to frame zero, and then drag the right range marker to the 1.10 mark.


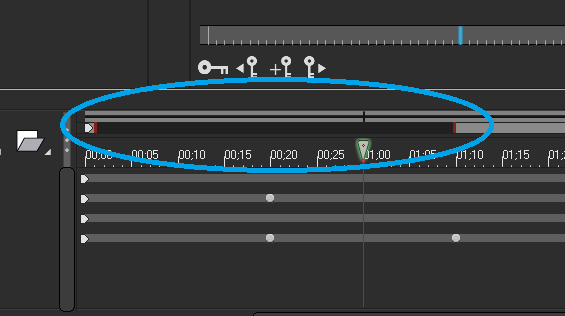
Title Studio will now maintain the animation timing within this range. In essence, regardless of the clip length, the animate on effect will always take 1:10 seconds.

Repeat the Process for the Animate Off portion of the effect.


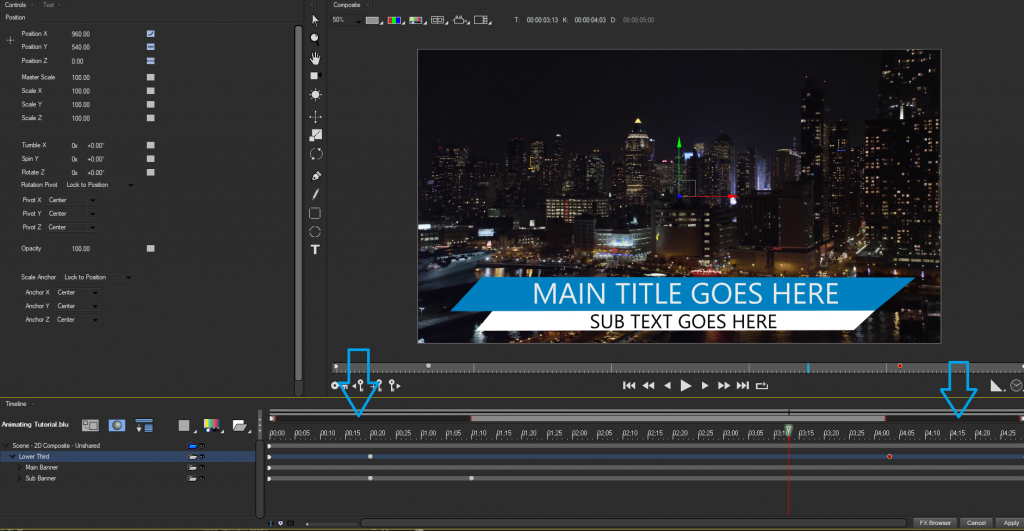
Now, Title Studio will always maintain the timing for the animate on and off, but allow the main section of the effect to stretch to fit the clip.

NOTE: Because Rigid Runs maintain the animation timing of a section of the motion graphic, if the Motion Graphic is applied to a clip that is LESS THAN the length of the original Rigid Run, the effect will not render correctly, because the animation will overlap.

Always make sure that you apply an effect with a Rigid Run to a clip of equal or greater length.


Category:

BCC Film Style

BCC Particles

BCC Color & Tone

BCC Perspective

BCC Perspective

BCC Licensing

BCC Obsolete

BCC Key & Blend

BCC Obsolete

Nested Subgroup

BCC Art Looks

BCC Licensing

BCC Time

Nested Subgroup

BCC Image Restoration

BCC Transitions

BCC Blur & Sharpen

BCC Transitions

BCC Obsolete

BCC Textures

BCC Color & Tone

BCC Image Restoration

BCC Warp

BCC Art Looks

BCC Transitions

BCC Art Looks

BCC Art Looks

BCC Stylize

BCC Textures

BCC Art Looks

BCC Transitions

BCC Key & Blend

BCC Key & Blend

BCC Textures

BCC Textures

BCC Color & Tone

BCC Stylize

BCC Color & Tone

BCC Color & Tone

BCC Obsolete

BCC Color & Tone

BCC Stylize

BCC Transitions

BCC Particles

Uncategorized

Uncategorized

Nested Subgroup

BCC Key & Blend

BCC Key & Blend

BCC Transitions

BCC Match Move

BCC Match Move

BCC Color & Tone

BCC Transitions

BCC Transitions

BCC Transitions

BCC Transitions

BCC Transitions

BCC Perspective

BCC Warp

BCC Transitions

BCC Perspective

BCC Stylize

BCC Transitions

BCC Obsolete

BCC Film Style

BCC Obsolete

BCC Blur & Sharpen

BCC Warp

BCC Stylize

BCC Image Restoration

BCC Image Restoration

BCC Image Restoration

BCC Perspective

BCC Perspective

BCC Key & Blend

BCC Stylize

BCC Lights

Uncategorized

BCC Stylize

BCC 3D Objects

BCC 3D Objects

BCC 3D Objects

BCC Film Style

BCC Transitions

BCC Film Style

BCC Perspective

BCC Blur & Sharpen

BCC Film Style

BCC Obsolete

BCC Obsolete

BCC Film Style

BCC Obsolete

BCC Obsolete

BCC Image Restoration

BCC Transitions

BCC Textures

BCC Browser

BCC Blur & Sharpen

BCC Lights

BCC Lights

BCC Lights

BCC Stylize

BCC Obsolete

Nested Subgroup

BCC Textures

BCC Transitions

BCC Stylize

BCC Art Looks

BCC Color & Tone

BCC Color & Tone

BCC Time

BCC Time

BCC Transitions

BCC Lights

BCC 3D Objects

BCC Stylize

BCC Obsolete

BCC Transitions

BCC Image Restoration

BCC Transitions

BCC Lights

BCC Obsolete

BCC Transitions

BCC Transitions

BCC Transitions

BCC Transitions

BCC Blur & Sharpen

BCC Obsolete

BCC Color & Tone

BCC Lights

BCC Transitions

BCC Obsolete

BCC Lights

BCC Transitions

BCC Key & Blend

BCC Obsolete

BCC Lights

BCC Key & Blend

BCC Key & Blend

BCC Transitions

BCC Time

BCC Image Restoration

BCC Key & Blend

BCC Film Style

BCC Match Move

BCC Key & Blend

BCC Key & Blend

BCC Art Looks

BCC Stylize

BCC Textures

BCC Warp

BCC Stylize

BCC Blur & Sharpen

BCC Image Restoration

Nested Subgroup

Nested Subgroup

Nested Subgroup

Nested Subgroup

Nested Subgroup

Nested Subgroup

Nested Subgroup

Nested Subgroup

Nested Subgroup

BCC Stylize

BCC Transitions

BCC Transitions

BCC Color & Tone

BCC Obsolete

BCC Textures

BCC Image Restoration

BCC Time

BCC Image Restoration

BCC Particles

Uncategorized

Uncategorized

Uncategorized

Uncategorized

BCC Perspective

BCC Perspective

BCC Particles

BCC Particles

BCC Particles

BCC Transitions

BCC Particles

BCC Art Looks

BCC Particles

Nested Subgroup

Nested Subgroup

BCC Image Restoration

Nested Subgroup

BCC Warp

BCC Art Looks

BCC Time

BCC Key & Blend

BCC Key & Blend

BCC Stylize

BCC Transitions

BCC Blur & Sharpen

BCC Blur & Sharpen

BCC Transitions

BCC Particles

BCC Lights

BCC Transitions

BCC Lights

BCC Lights

BCC Lights

BCC Lights

BCC Lights

BCC Lights

BCC Lights

BCC Lights

BCC Transitions

BCC Stylize

BCC Image Restoration

BCC Image Restoration

BCC Textures

BCC Lights

BCC Key & Blend

BCC Transitions

BCC Transitions

BCC Stylize

BCC Stylize

BCC Transitions

BCC Transitions

BCC Warp

BCC Transitions

BCC Textures

BCC Obsolete

BCC Color & Tone

BCC Stylize

BCC Stylize

BCC Obsolete

BCC Image Restoration

BCC Particles

BCC Particles

BCC Perspective

BCC Transitions

BCC Key & Blend

BCC Transitions

BCC Blur & Sharpen

BCC Lights

BCC Art Looks

BCC Lights

BCC Obsolete

BCC Textures

BCC Textures

BCC Obsolete

BCC Transitions

BCC Time

BCC Transitions

BCC Art Looks

BCC Transitions

BCC Time

BCC 3D Objects

BCC Time

BCC Time

BCC Color & Tone

BCC Transitions

BCC Warp

BCC Warp

BCC Transitions

BCC Film Style

BCC Key & Blend

BCC 3D Objects

BCC Blur & Sharpen

BCC Image Restoration

Uncategorized

BCC Transitions

BCC Warp

BCC Textures

BCC Time

BCC Stylize

BCC Warp

BCC Color & Tone

BCC Film Style

BCC Transitions

BCC VR

BCC VR

BCC VR

BCC VR

BCC VR

BCC Warp

BCC Art Looks

BCC Transitions

BCC Warp

BCC Textures

BCC Particles

BCC Image Restoration

BCC Match Move

BCC Textures

BCC Textures

BCC Obsolete

BCC Obsolete

BCC Obsolete

BCC Blur & Sharpen

BCC Image Restoration

BCC Blur & Sharpen

BCC Transitions

BCC Blur & Sharpen

BCC Transitions

BCC Blur & Sharpen

BCC Key & Blend

BCC Transitions

BCC Transitions

BCC Blur & Sharpen

BCC Transitions

BCC Transitions

BCC Color & Tone

BCC Film Style

BCC Transitions

BCC Film Style

BCC Film Style

BCC Color & Tone

BCC Color & Tone

BCC Lights

BCC Transitions

BCC Image Restoration

BCC Transitions

BCC Stylize

BCC Transitions

BCC Transitions

BCC Blur & Sharpen

BCC Transitions

BCC Blur & Sharpen

BCC Transitions

BCC Film Style

BCC Stylize

BCC Lens

BCC Lights

BCC Color & Tone

BCC Film Style

BCC Art Looks

BCC Lens

BCC Optical Diffusion

BCC Lights

BCC Lens

BCC Grads and Tints

BCC Art Looks

BCC Key & Blend

BCC Art Looks

BCC Grads and Tints

BCC Grads and Tints

BCC Film Style

BCC Film Style

BCC Image Restoration

BCC Image Restoration

BCC Color & Tone

BCC Lens

BCC Optical Diffusion

BCC Blur & Sharpen

BCC Color & Tone

BCC Optical Diffusion

BCC Optical Diffusion

BCC Grads and Tints

BCC Key & Blend

BCC Color & Tone

BCC Lights

BCC Film Style

BCC Optical Diffusion

BCC Optical Diffusion

BCC Grads and Tints

BCC Lights

BCC Lights

BCC Lights

BCC Color & Tone

BCC Optical Diffusion

BCC Art Looks

BCC Color & Tone

BCC Key & Blend

BCC Lights

BCC Art Looks

BCC Color & Tone

BCC Lights

BCC Lens

BCC Lights

BCC Lights

BCC Film Style

BCC Color & Tone

BCC Key & Blend

BCC Optical Diffusion

BCC Grads and Tints

BCC Optical Diffusion

BCC Art Looks

BCC Key & Blend

BCC Key & Blend

BCC Lights

BCC Grads and Tints

BCC Color & Tone

BCC Optical Diffusion

BCC Lens

BCC Grads and Tints

BCC Lights

BCC Lights

BCC Lights

BCC Color & Tone

BCC Grads and Tints

BCC Color & Tone

BCC Optical Diffusion

BCC Grads and Tints

BCC Optical Diffusion

BCC Grads and Tints

BCC Lights

BCC Grads and Tints

BCC Textures

BCC Film Style

BCC Grads and Tints

BCC Perspective

BCC Transitions

BCC Lens

BCC Art Looks

Title Studio

Title Studio

Title Studio

Title Studio

Title Studio

Title Studio

Title Studio

BCC 3D Objects

Tutorial

Tutorial

Tutorial

Tutorial

Tutorial

Tutorial

Tutorial

Tutorial

Tutorial

Tutorial

Tutorial

Title Studio

Title Studio

Title Studio

Title Studio

Title Studio

Title Studio

Title Studio

Title Studio

Title Studio

Title Studio

Title Studio

Title Studio

Tutorial

Title Studio

Title Studio

Title Studio

Title Studio

Title Studio

Title Studio

Title Studio

Title Studio

Title Studio

Tutorial

Effect:
BCC+X-Ray
BCC+Wide Angle Lens
BCC+Video Glitch Dissolve
BCC+Transform
BCC+Tint
BCC+Three Strip
BCC+Textures
BCC+Sunset
BCC+Streaks
BCC+Split Tone
BCC+Split Field
BCC+Skin Tone
BCC+Silk
BCC+Shadows/Highlights
BCC+Sepia
BCC+Selective Saturation
BCC+ReLight
BCC+Reflector
BCC+Rays
BCC+Radial Tint
BCC+Radial Exposure
BCC+Rack Focus
BCC+Polarizer
BCC+Photographic
BCC+Overexpose
BCC+Optical Dissolve
BCC+Non-Additive Mix
BCC+Night Vision
BCC+Net
BCC+ND Gradient
BCC+Mist
BCC+Math Composite
BCC+Low Contrast
BCC+Looks
BCC+Light
BCC+Lens Flare
BCC+Lens Distortion
BCC+Key Light
BCC+Kelvin
BCC+Infrared
BCC+Ice Halos
BCC+Holdout Composite
BCC+High Contrast
BCC+Harris Shutter
BCC+Halo
BCC+Grade
BCC+Glow Edges
BCC+Glow Darks
BCC+Glow
BCC+Gels
BCC+FX-Editor
BCC+Frost
BCC+Fog
BCC+Film Stocks
BCC+Eye Light
BCC+Enhancing
BCC+Edge Composite
BCC+Dual Gradient
BCC+Double Fog
BCC+Diffusion
BCC+Develop
BCC+Detail
BCC+Depth of Field
BCC+DeFringe
BCC+Defog
BCC+DeBlock
BCC+DeBand
BCC+Day for Night
BCC+Cross Processing
BCC+Colorize Gradient
BCC+Color Spot
BCC+Color Shadow
BCC+Color Paste
BCC+Color Infrared
BCC+Color Gradient
BCC+Chromatic Aberration
BCC+Chroma Bands
BCC+Center Spot
BCC+Camera Shake
BCC+Borders
BCC+Bleach Bypass
BCC+Black and White
BCC+Ambient Light
BCC+ Vignette
BCC+ Video Glitch
BCC+ Two Strip
BCC+ Spin Blur Dissolve
BCC+ Smear Blur
BCC+ Rays Dissolve
BCC+ Radial Blur
BCC+ Rack Focus Dissolve
BCC+ Prism Dissolve
BCC+ Prism
BCC+ Multi-Star Dissolve
BCC+ Magic Sharp
BCC+ Light Leaks Dissolve
BCC+ Light Leaks
BCC+ Haze
BCC+ Fluorescent
BCC+ Flashing
BCC+ Film Grunge
BCC+ Film Glow Dissolve
BCC+ Film Glow
BCC+ F-Stop
BCC+ Dissolve
BCC+ Directional Blur Dissolve
BCC+ Directional Blur
BCC+ Cross Zoom Dissolve
BCC+ Crash Zoom Dissolve
BCC+ Composite
BCC+ Channel Blur YUV
BCC+ Channel Blur Dissolve
BCC+ Channel Blur
BCC+ Camera Shake Dissolve
BCC+ Blur
BCC+ Beauty Studio
BCC Z-Blur
BCC Z Space III
BCC Z Space II
BCC Z Space I
BCC Wooden Planks
BCC Wood Grain
BCC WitnessProtection
BCC Wire Remover
BCC Wild Cards
BCC Weave
BCC Wave
BCC Water Waves Dissolve
BCC Water Color
BCC Warp
BCC VR Sharpen
BCC VR Reorient
BCC VR Insert
BCC VR Flicker Fixer
BCC VR Blur
BCC Vignette Wipe
BCC Vignette
BCC VideoScope
BCC Video Morph
BCC Video Glitch
BCC Velocity Remap
BCC Veined Marble
BCC Vector Displacement
BCC Vector Blur Dissolve
BCC User Guide
BCC UpRez
BCC Unsharp Mask
BCC Type On Text
BCC Two Way Key
BCC Two Strip Color
BCC Twister
BCC Twirl
BCC Turbulence
BCC Tritone Dissolve
BCC Tritone
BCC Trails Basic
BCC Trails
BCC Title Studio
BCC Time Displacement
BCC Tile Wipe
BCC Tile Mosaic
BCC Textured Wipe
BCC Temporal Blur
BCC Swish Pan
BCC Super Blend
BCC Steel Plate
BCC Stars
BCC Star Matte
BCC Stage Light
BCC Spray Paint Noise
BCC Spotlight
BCC Spiral Blur
BCC Spin Blur Dissolve
BCC Spill Remover
BCC Sphere Transition
BCC Sphere
BCC Sparks
BCC Snow
BCC Smooth Tone
BCC Sequencer
BCC Scatterize
BCC Scanline
BCC Safe Colors
BCC Rough Glow
BCC Rock
BCC Ripple Dissolve
BCC Ripple
BCC Rings Wipe
BCC Ribbon Wipe
BCC RGB Pixel Noise
BCC RGB Edges
BCC RGB Displacement Dissolve
BCC RGB Blur Dissolve
BCC RGB Blend
BCC Reverse Spotlight
BCC Reptilian
BCC Remover
BCC Reframer
BCC Reflection
BCC Rectangular Wipe
BCC Rays Wedge
BCC Rays Textured
BCC Rays Streaky
BCC Rays Ripply
BCC Rays Ring
BCC Rays Radiant Spotlight
BCC Rays Radiant Edges
BCC Rays Puffy
BCC Rays Dissolve
BCC Rays Cartoon
BCC Rain
BCC Radial Wipe
BCC Radial Blur
BCC Pyramid Blur
BCC Prism Dissolve
BCC Prism
BCC Primatte Studio
BCC Presets
BCC Premult
BCC Preferences
BCC Posterize Time
BCC Posterize
BCC Polar Displacement
BCC PixelChooser – Legacy
BCC Pixel Fixer
BCC Pixel Chooser
BCC Pinning Controls
BCC Pin Art 3D
BCC Pencil Sketch
BCC Particle System
BCC Particle Illusion Dissolve
BCC Particle Illusion
BCC Particle Emitter 3D
BCC Particle Array 3D
BCC Pan And Zoom
BCC Page Turn
BCC Overview in Resolve
BCC Overview in FCP
BCC Overview in Avid
BCC Overview in Adobe
BCC Organic Strands
BCC Optical Stabilizer
BCC Optical Flow
BCC Noise Reduction
BCC Noise Map 2
BCC Noise Map
BCC MultiTone Mix
BCC Multi Stripe Wipe
BCC Multi Stretch Wipe
BCC Multi Shadow
BCC Motion Tracker Vegas
BCC Motion Tracker Resolve
BCC Motion Tracker Red
BCC Motion Tracker PRM
BCC Motion Tracker Motion
BCC Motion Tracker FCP
BCC Motion Tracker Avid
BCC Motion Tracker AE
BCC Motion Tracker
BCC Motion Key
BCC Motion Blur
BCC Mosaic
BCC Morph
BCC Mixed Colors
BCC Misalignment
BCC Median
BCC Matte Cleanup
BCC Matte Choker
BCC Match Move
BCC Match Grain
BCC Make Alpha Key
BCC Magic Sharp
BCC Looper
BCC Linear Wipe
BCC Linear Luma Key
BCC Linear Color Key
BCC Lightning
BCC Light Zoom
BCC Light Wrap
BCC Light Wipe
BCC Light Sweep
BCC Light Matte
BCC Light Leaks Dissolve
BCC Light Leaks
BCC Levels Gamma
BCC Lens Transition
BCC Lens Shape
BCC Lens Flash
BCC Lens Flare Spiked
BCC Lens Flare Round
BCC Lens Flare Dissolve
BCC Lens Flare Advanced
BCC Lens Flare 3D
BCC Lens Distortion Wipe
BCC Lens Correction
BCC Lens Blur Dissolve
BCC Lens Blur
BCC LED
BCC Layer Deformer
BCC Laser Beam
BCC Kaleida Dissolve
BCC Jitter Basic
BCC Jitter
BCC Invert Solarize
BCC Hue-Sat-Lightness
BCC Halftone
BCC Grunge
BCC Grid Wipe
BCC Granite
BCC Gradient
BCC Glow Matte
BCC Glow Alpha Edges
BCC Glitter
BCC Glint
BCC Glare
BCC Gaussian Blur
BCC FX Browser
BCC Fractal Noise
BCC Flutter Cut
BCC Flicker Fixer
BCC Fire
BCC Film Process
BCC Film Grain
BCC Film Glow Dissolve
BCC Film Glow
BCC Film Damage
BCC Fast Lens Blur
BCC Fast Flipper
BCC Fast Film Process
BCC Fast Film Glow Dissolve
BCC Fast Film Glow
BCC FAQ
BCC Extruded Text
BCC Extruded Spline
BCC Extruded EPS
BCC Emboss
BCC Effects List
BCC Edge Lighting
BCC Edge Grunge
BCC Edge Cleaner
BCC DVE Basic
BCC DVE
BCC Dv Fixer
BCC Dust and Scratches
BCC Dropout Fixer
BCC Drop Shadow
BCC Displacement Map
BCC Directional Blur
BCC DeNoise
BCC Deinterlace
BCC DeGrain
BCC Damaged TV Dissolve
BCC Damaged TV
BCC Cylinder
BCC Curl Dissolve
BCC Curl
BCC Cube
BCC Cross Zoom
BCC Cross Melt
BCC Cross Glitch
BCC Criss-Cross Wipe
BCC Crash Zoom Dissolve
BCC Correct Selected Color
BCC Corner Pin Studio
BCC Corner Pin
BCC Composite Dissolve
BCC Composite Choker
BCC Composite
BCC Compare Mode
BCC Common Controls - Avid
BCC Common Controls
BCC Comet
BCC Colorize Glow Dissolve
BCC Colorize Glow
BCC Colorize
BCC Color Palette
BCC Color Match
BCC Color Correction
BCC Color Choker
BCC Color Balance
BCC Clouds
BCC Cloth
BCC Chroma Key Studio
BCC Chroma Key
BCC Checker Wipe
BCC Charcoal Sketch
BCC Caustics
BCC Cast Shadow
BCC Cartooner
BCC Cartoon Look
BCC Burnt Film
BCC Bump Map
BCC Bulge
BCC Broadcast Safe
BCC Brightness-Contrast
BCC Brick
BCC Boost Blend
BCC Blur Dissolve
BCC Blur
BCC Blobs Wipe
BCC Beauty Studio
BCC Beat Reactor Integrated
BCC Beat Reactor
BCC AVX Licensing
BCC Artists Poster
BCC Apply Modes
BCC Alpha Spotlight
BCC Alpha Process
BCC Alpha Pixel Noise
BCC AE Licensing
BCC 3D Image Shatter
BCC 3D Extruded Image Shatter
BCC 3 Way Color Grade
BCC 2D Particles
BCC+ Atmospheric Glow