Glow Shaders
In this section we will cover the available Glow IP Shaders that are available in Title Studio with Continuum 2019. There are five types of Glow that can be applied to an object, material or scene in Title Studio:
- Glow Edge
- Glow Light
- Glow Light Replace Color
- Glow Light Remove Color
- Glow Replace Color
Unlike with the blur shader, Glow Styles are selected directly from shaders menu. Once selected, the Material Attributes window will update to reflect the parameters specific to the selected glow style. Each glow offers a selection of standard compositing options such as add, multiply, overlay, etc.
Glow Edge Generates a traditional film glow where the object(s) are subjected to a strong light causing the image to bloom however, the Edge Glow derives the glow result from the edges of objects in the scene. Additional compositing modes are available to provide highly detailed customization.
As seen with the tradtional Blur shader, Glow Edge contains parameters for Master Blur, which controls the overall softness of the glow, as well as parameters for Blur X and Blur Y. These options allow artists to stretch the glow along the X and Y axis.
 In this example, the Master Blur is increased to 250, and the Blur Y and Blur X are decreased to zero respectively to create interesting title effects.
Output Color allows you to change the color of the glow either from the color chip, or by using the eyedropper.
The Use Image Color checkbox will override the Output color, and base the glow off the source image.
Intensity will increase the overall brightness of the glow, while Edge Width controls how much of the edge is used for the glow. Higher values will result in more intense glows, while lower values will result in softer, more refined glows.
X Amount and Y Amount: independent contros for the width and height of the glow. These differ from the Blur X and Y in that, the glow itself is being stretched along the X and Y Axis, rather than the softness of the blur.
Threshold sets the pixel values that are affected by the glow. Lower values apply the glow to more pixels in the object, while higher values will apply the glow to fewer pixels.
Glow Light generates a traditional film glow look, where the object is subjected to a strong light source causing it to bloom.
Parameter controls for Glow Light are similar to those found in previous shaders. The color of the glow is based on the source object.
Master Blur controls the overal level of glow present. Higher values will produce softer results, while a value of zero will produce a very sharp glow
Blur X and Blur Y Independent controls for the width of the glow.
Light Threshold sets the pixel values that are affected by the glow. Lower values apply the glow to more pixels in the object, while higher values will apply the glow to fewer pixels.
Intensitycontrols the intensity of the glow result. Higher values yield a stronger glow with a total white image when this parameter is set to it’s highest value.
Mix With Original blends the glow effect back with the unfiltered input object.
Glow Light Replace Color: as it’s name implies, this type of glow creates a traditional blooming effect, but allows you to select a specific color.
To change the color of your glow, use the Output Color eyedropper or color chip.
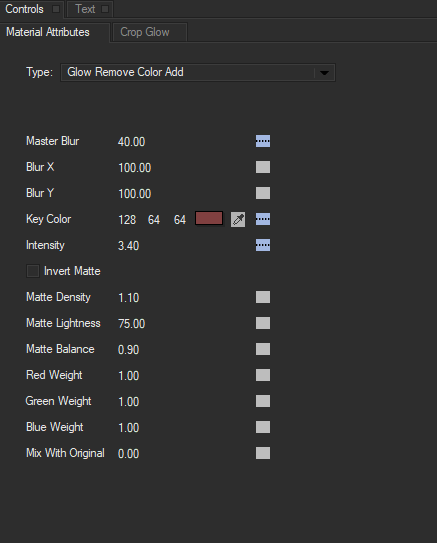
Glow Light Remove Color allows you to assign a glow to a specific key color, preventing unselected colors from glowing.
Key Color allows you to select a color with the color chip or eyedropper to pull a matte that can be further refined.
By increasing the Matte Density transparent areas can be made more transparent and opaque areas more opaque. Be aware that too much density can degrade the matte.
IncreasingMatte** **Lightnessmakes the entire matte more transparent. Boosting transparency might be necessary to ensure that the background shows through semi-transparent areas, although too much Lightness can result in print-through–that is, the background image might show through the foreground object.
Matte Balance adjusts the balance between density and lightness. Adjusting balance can enhance semi-transparent foreground objects and shadows.
Red, Green, and Blue adjust the weight of the corresponding color channel in creating the matte. Adjusting the weights of the color channels slightly changes the key Color and can help improve the matte.


