Understanding the Preferences Window
The Preferences window contains settings that customize the look, performance, and other aspects of Title Studio’s user interface. It can be accessed at any time from the Edit drop down menu. You can undo any recent changes by clicking the reset button, or return Title Studio to its original default factory settings.
These settings are broken into three tabs:
- Appearance
- Tools
- Performance
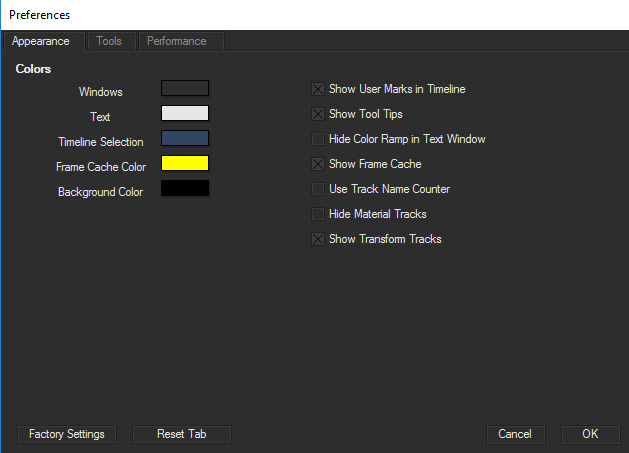
The Appearance Tab contains settings to customize the overall look of the user interface.

Colors allow you to set the color of Title Studio’s Windows and Text. To change the color, click the corresponding swatch to open the system color picker.
- Windows sets the color for the overall user interface, including the background of every panel.
- Text sets the color for all display text.
- Timeline Selection sets the color of selected tracks in the timeline’s track controls (the left side of the timeline).
- Frame Cache Color sets the color of the cached frame markers that appear in the timeline.
- Background sets the background color used in the composite window.
On the right, there are a number of checkboxes that control various interface options.
- Show User Marks in Timeline enables Title Studio to display any User Marks that you create in the timeline. Any associated text displays in the User Marks window and Composite window when the CTI is on the User Mark. When the option is deselected, User Marks do not display in the Timeline, but the Composite window will still display the text when the CTI is on the User Mark time.
- Show Tool Tips enables tool tips to appear whenever the mouse is held over certain elements of the user interface. To hide the tool tips, deselect this option.
- Hide Color Ramp in Text Window disables the color ramp displayed at the bottom of the Text window. The color ramp allows you to use the eyedropper tool to quickly select a color
- Show Cached Frames displays any frames that are cached or stored in memory over the timeline. Disabling this feature will prevent Title Studio from displaying cached frames.
- Use Track Name Counter, when enabled, new tracks created are automatically named Track1, Track 2 etc. When this option is not selected, tracks are named by their media type. For example, when you create a new effect, the tracks are named Video 1 and Video 2. If you change a track’s media to Color, the track is automatically renamed Solid Color. Once you explicitly name a track, the track retains that name, even if you switch the track’s media type.
- Hide Material Tracks removes additional track information for material track layers. This can help to reduce the amount of tracks shown in the timeline when dealing with objects that contain multiple material layers, for example imported 3D models. Leave this disabled to access the full track information.
- Show Transform Tracks, when enabled, transform controls from the controls window will also appear in the track timeline. This gives you full access to all the layer controls for each track directly from the Project window. Disabling this checkbox will remove transform controls from the Project window. You can still access them from the Controls window.
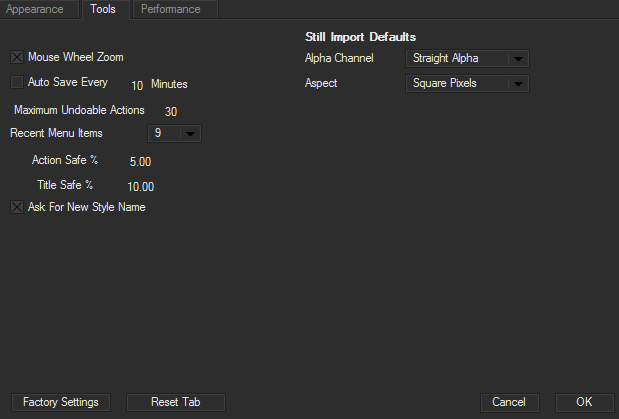
The Tools Tab contains settings to customize the various aspects of the user interface.

- Mouse Wheel Zoom allows you to change the composite window zoom by using the scroll wheel on your mouse. You can disable it if you prefer to use the composite window zoom controls, or if you do not have a mouse wheel.
- Auto Save allows Title Studio to save your work to a file at the specified interval. After the specified time passes, the system automatically saves the current effect to the directory containing the Title Studio application. If Title Studio quits unexpectedly, when you relaunch, a dialog box prompts you to open the autosave file, allowing you to recover your work. Leave this option deselected to avoid creating an autosave file. It is recommended that you select this option.
- Maximum Undoable Actions sets the number of actions that can be undone using the Undo command. The higher the number, the more memory required.
- The Recent Menu Items determines how many recently chosen files or other menu selections appear in menus as options.
- Action Safe % and Title Safe % allow you to specify the size of the Action Safe/Title Safe area. You can display Action Safe/Title Safe boundaries in the Composite window to ensure that your titles and images are not cut off or distorted when viewed on a television monitor. The inner bounding box represents the Title Safe area. The outer bounding box represents the Action Safe area.
- Ask For New Style Name prompts the the Style Palette to open a dialog box where you can name a newly created style and click OK. When Ask for New Style Name is not selected, the style is assigned the name “New Style.”
Still Import Defaults Options
The Alpha Channel menu controls how Title Studio interprets alpha information in imported still image files.
- Choose No Alpha for still image files without alpha information.
- Choose Straight Alpha for still image files with alpha channels that were not premultiplied. Straight Alpha displays the portion of the image defined by the alpha channel. The portion where the alpha channel is black (a value of 0) is transparent. The portion where the alpha channel is white (a value of 255) is opaque. Portions with alpha levels between white and black (gray) display intermediate levels of transparency.
- Choose Premultiplied Black or Premultiplied White for still image files whose alpha channels are premultiplied with a solid black or white color respectively.
The Aspect menu sets the pixel aspect for importing still images.
- Choose 4:3 Aspect Ratio for still images created by exporting 4:3 host media, or for 4:3 images created in animation programs and saved as non-square pixels.
- Choose 16:9 Aspect Ratio for still images created by exporting 16×9 host media, or for 16×9 images created in animation programs and saved as non-square pixels.
- Choose Square Pixels for still images created in a square pixel format or for images that have a different aspect ratio than your project. Choose Square pixels for graphics created as square pixels in graphics programs such as Adobe Photoshop or for still images that have a different aspect ratio than your project. This choice is recommended for importing most still images.
- Choose Fit to Project to scale the movie to a full screen image using the project size specified in the Project Settings window.
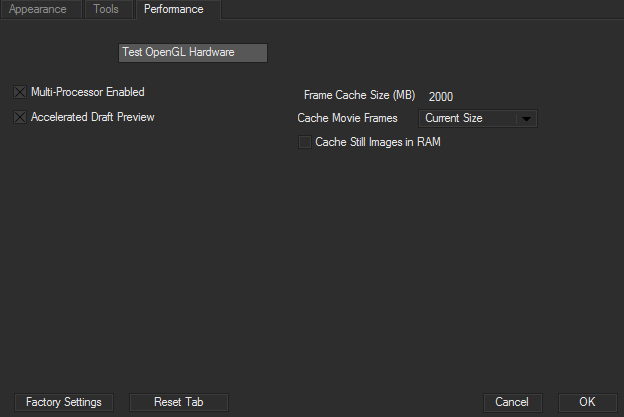
The Performance Tab contains settings to customize the performance and stability of Title Studio.

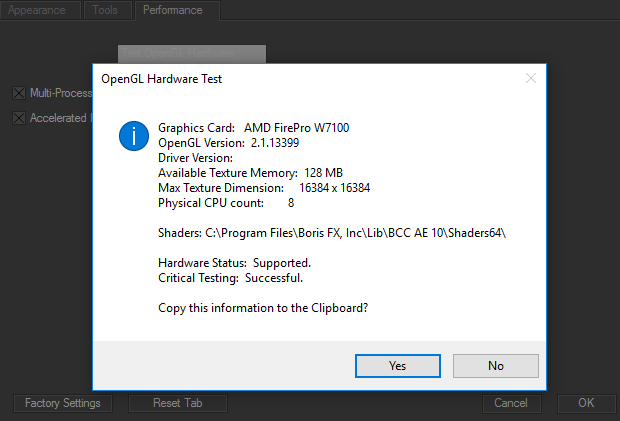
The Test OpenGL Hardware button displays a window with specifics of the your system’s OpenGL hardware and drivers. When you install or launch Title Studio, your hardware is automatically tested to determine if your system meets the minimum requirements to use the OpenGL hardware acceleration.

If you want, click Yes to copy this information to your system clipboard. This allows you to print or E-mail this information.
- The Multi-Processor Enabled checkbox optimizes performance in dual-processor computers. Title Studio renders effects up to 50% faster in dual-processor computers when this option is selected.
- When the Accelerated Draft Preview checkbox is selected previews are rendered in Draft mode while you make adjustments in the Composite window. When you stop dragging, the image renders using the Quality specified in the Preview menu.
- Frame Cache Size (MB) sets the maximum space allocated to the frame cache. For best results, use as high a value as possible.
- The Cache Movie Frames menu controls the size of the cached frames.
- Current Size caches frames using the current resolution setting. This speeds the caching process and uses less disk space, but if you increase the resolution of your project, the frames must be cached again.
- Full Size caches frames at Full resolution.
- When the Cache Still Images in RAM checkbox is selected, still images are cached to RAM at full size when the media is loaded. This greatly reduces the time it takes to change resolution when using still images, particularly with large TGA files.
Return to Main Title Studio Page.


