Understanding the Project Settings Window
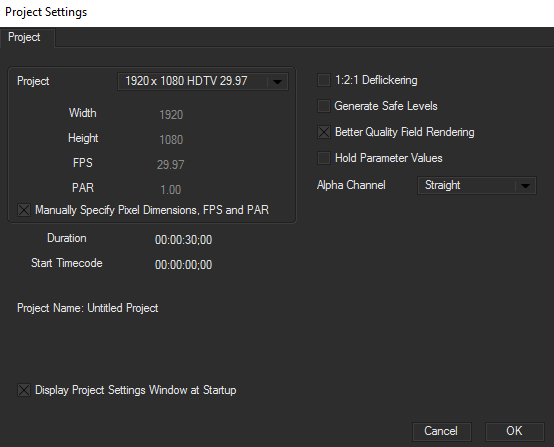
The Project Settings window contains settings that specify the size of your effects as well as the general settings for your project. It can be accessed at any time from the Edit drop down menu.

The Project menu lets you set the width and height (in pixels) for your project. This menu provides project dimensions for the most common video formats. Some project options include 1920 x 1080 HDTV, 4096 x 3112 Film, 720 x 486 NTSC D1, 720 x 480 NTSC DV, 640 x 480 NTSC Square Pixels, 648 x 486 NTSC Square Pixels, 720 x 540 NTSC D1 Square Pixels, 720 x 576 PAL D1 DV, 768 x 576 PAL D1 DV Square Pixels, 1280 x 720 HDTV, 320 x 240 Medium Size, 160 x 120 Small Size, as well as Custom Size.
FPS determines the frame rate of the project in frames per second.
- For NTSC projects, set FPS to 29.97
- For PAL projects, set FPS to 25
- For other multimedia projects, use your specific project’s frame rate. For example, a film or Blu Ray might play at 23.976 frames per second.
PAR determines the pixel aspect ration of the project.
Manually Specify Pixel Dimensions, FPS and PAR allows you to manually adjust those values. By default, when you are working with Title Studio from a host such as After Effects or AVID, Title Studio will take the project dimensions, FPS and PAR directly from the host. By enabling this checkbox you can manually adjust these parameters as you see fit.
Duration allows you to set the default length of your composition in frames.
1:2:1 Deflickering checkbox applies a vertical blur before rendering, which helps eliminate flickering in text rolls and reduces jagged edges on moving graphics with hard edges.
- Select 1:2:1 Deflickering if you are rendering an effect containing text moving vertically, (for example, a credit roll) or a moving graphic with hard edges. Leave this option deselected for any other type of effect.
- If your effect contains static elements in addition to vertically moving text or graphics, deselect 1:2:1 Deflickering to preserve the sharpness of the static elements.
Generate Safe Levels checkbox enables an NTSC/PAL filter that allows only levels that are safe for broadcast. Blue allows RGB values across the full 0-255 range. When Generate Safe Levels is selected, the RGB values are limited to the NTSC/PAL safe range of 16-235.
Better Quality Field Rendering checkbox sets the rendering optimization. This option only affects the output when you field render, and if the effect involves compositing images using hard alpha edges (for example, keying text or video over video).
- When Better Quality Field Rendering is selected (the default), Title Studio optimizes the rendering for quality. This ensures that computer-generated graphics or text animate smoothly. For effects that include edging, an alpha channel or DVE moves, you should use this option to ensure the highest quality edges. This option takes more time to render, but will generally correct any problems with jitter or rough edges on effects.Use the Better Quality Field Rendering option when rendering text rolls, crawls, or any animation that uses computer-generated text or graphics.
- When Better Quality Field Rendering is not selected, Title Studio optimizes the rendering for speed. This is appropriate if you are creating effects such as color treatments or blurs that do not include hard alpha edges. Turning off this option almost doubles rendering speed with no apparent image quality difference. This rendering mode is also suitable for processing images for web or graphics applications.
Hold Parameters checkbox changes the behavior of the first and last keyframes in your effect. You can also choose this option by clicking the Hold Parameters button in the timeline.
- When Hold Parameters is deselected, if you do not explicitly set a value at the first or last keyframe, the keyframe uses the default parameter value.
- With Hold Parameters selected, the first keyframe holds at the value set in the next keyframe. The parameter value for the last keyframe holds at the value set in the next to last keyframe.
Alpha Channel menu controls how Title Studio interprets alpha information for movie files that are exported or rendered from your host application. You can override this setting for a specific composition if you need.
- Choose Straight for movies with alpha channels that are not premultiplied. Straight Alpha displays the portion of the image defined by the alpha channel. The portion where the alpha channel is black (a value of 0) is transparent. The portion where the alpha channel is white (a value of 255) is opaque. Portions with alpha channel levels between white and black (gray) display intermediate levels of transparency. This is the best choice for a movie that may be used in additional compositing. This is also the fastest choice.
- Choose Premultiplied Black or Premultiplied White for movies whose alpha channels are premultiplied with solid black or white, respectively. Some hardware devices may not composite the color channels correctly if you choose Straight Alpha, resulting in problems such as aliased text. This choice corrects that problem. The level of black or white used depends on whether the Generate Safe Levels checkbox is selected.
Display Project Settings Window at Startup determines whether the Preferences window appears when Title Studio launches.
Return to Main Title Studio Page.


