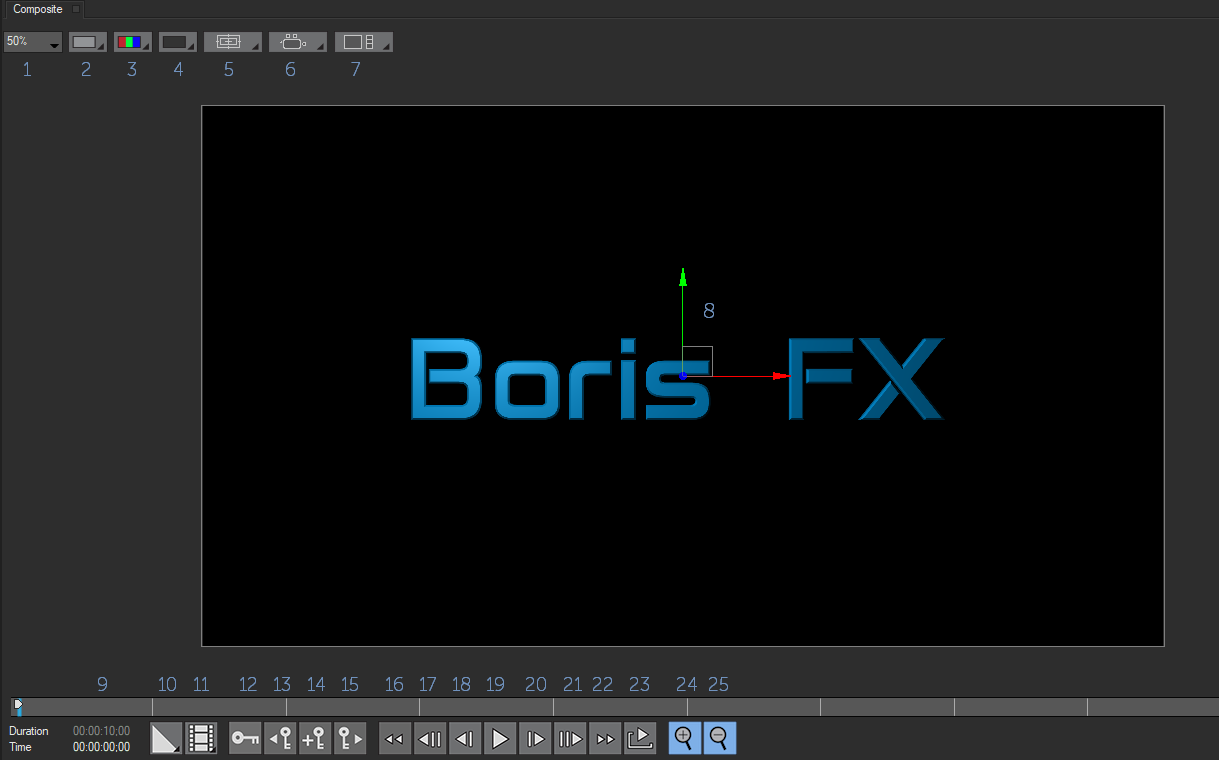
The Composite Window displays the composited effect as it will appear in your final output. It provides on-screen controls that allow you to interact with and manipulate the position, scale, and motion of different objects. It also offers menu options to adjust the quality, resolution, and size of the frame while you work.
Preview Controls
- Zoom Scale
Zoom scale allows you to set the size of the preview relative to the actual image size. A setting of 50% creates a preview that is half the size of the full-size image. Previewing at a smaller scale allows you to use lower resolution without losing quality, which can speed preview time. If you enable use mouse wheel in the preferences window, you can manually adust the zoom scale with your mouse wheel.
2. Change Preview Resolution
The Change Preview Resolution button chooses between Full, Half, and Quarter. Lower resolution settings allow faster previews by displaying fewer pixels. For example, if your project is 640×486, Half resolution displays a 320×243 image, meaning that only a quarter as many pixels are processed.
3. Change Preview Chanel
The Change Preview Channel button sets which image channels display. You can choose to display the RGB, Red, Green, Blue or Alpha channels. Previewing just the Alpha channel is useful when working with masks or filters that create an alpha channel.
4. Preview Background
The Preview Background allows you to set the background for your composite in the preview window. Composite over Color sets the background to a specific color. By default this color is black, however you can change the default background color in the preferences window. Composite over Checkerboard, places a checkerboard pattern in the background. This can be useful when working with alpha. Composite over Background will set the background to the video track Title Studio is applied to in your host. If you are using the Title Studio Stand Alone application, this will place a placeholder video layer in the background.
5. Toggle On-Screen Display Controls
The Display Controls allow you to preview overlays for Title Safe and Grid options.
6. Toggle Camera View
The Toggle Camera View button sets the camera view of your effect in the Composite window, along with a wireframe display of the floor. Choose Render Camera (the default and how your effect will appear rendered), Front, Left, Right, Top, Bottom or Back to view your effect from different camera angles. You may also set up a custom view (which will be rendered) in the Camera tab in the Control window.
7. Toggle Split Panel ViewAllows you to view the composite preview from up to four different angles at once.
8. Open GL InteractorProvides on-screen controls that allow you to manipulate an object’s position, scale and rotation.
Playback Controls
- Time/DurationDisplays the duration of the project and the location of the CTI.
- Change Preview Quality
Allows you to toggle between Draft and High Quality. When you use Draft quality, no antialiasing takes place, which produces a jagged-edged image but speeds preview time. Use High quality to antialias your image.
11. Toggle Draft modes
Toggles between Time and Frame Accurate rendering. When previewing the composition, you can switch between Time Accurate playback, which renders only the frames needed to play back in real time, or Frame Accurate, which renders every frame individually. For faster previews, select Time Accurate.
12. Toggle Animate/Static Mode
The Animate button toggles between Static and the default interpolation.Static interpolation makes parameter adjustments that remain static and do not create keyframes. This is useful when you are compositing rather than animating. The Animate button is red in Default interpolation and gray in Static interpolation.
13. Previous Keyframe
Moves the CTI to the previous keyframe on the track. When dealing with multiple tracks, make sure to select the track you want to use.
14. Add KeyframeAdds a keyframe at the current CTI location.
15. Next KeyframeMoves the CTI to the next keyframe on the track. When dealing with multiple tracks, make sure to select the track you want to use.
16. Go to First Frame
Moves the CTI to the first frame in the timeline. They keyboard shortcut for this is the Home Button.
17. Go Back 10 Frames
Moves the CTI 10 frames backward in time.
18. Previous Frame
Moves the CTI one frame backward in time. The keyboard shortcut for this is Page Up
19. Play/Stop
Plays or Stops the sequence in the timeline. The keyboard shortcut for the is Spacebar
20. Next Frame
moves the CTI one frame forward in the timeline. The keyboard shortcut for this button is Page Down.
21. Go Forward 10 Frames
Moves the CTIU 10 frames forward in time.
22. Go to Last Frame
Moves the CTI to the first frame in the timeline. They keyboard shortcut for this is the End Button.
23. Loop Mode
The Loop Mode Button provides three ways to play back the moving effect.
* Loop plays the sequence through, then repeats from the beginning. The loop will continue until you stop the preview.
* Mirror Loop plays the sequence through, then plays it back in reverse. The loop continues until you stop the preview.
* Normal plays the sequence through once an then stops.
24. Zoom InScales the size of the preview relative to the actual image size. Zooms into the image to allow for more precise interaction.
25. Zoom OutScales the size of the preview relative to the actual image size. Previewing at a smaller scale allows you to use lower resolution without losing quality, which can speed preview time.
Return To Main Title Studio Page.


